Would you like to save this?
Beer Can Chicken Recipe
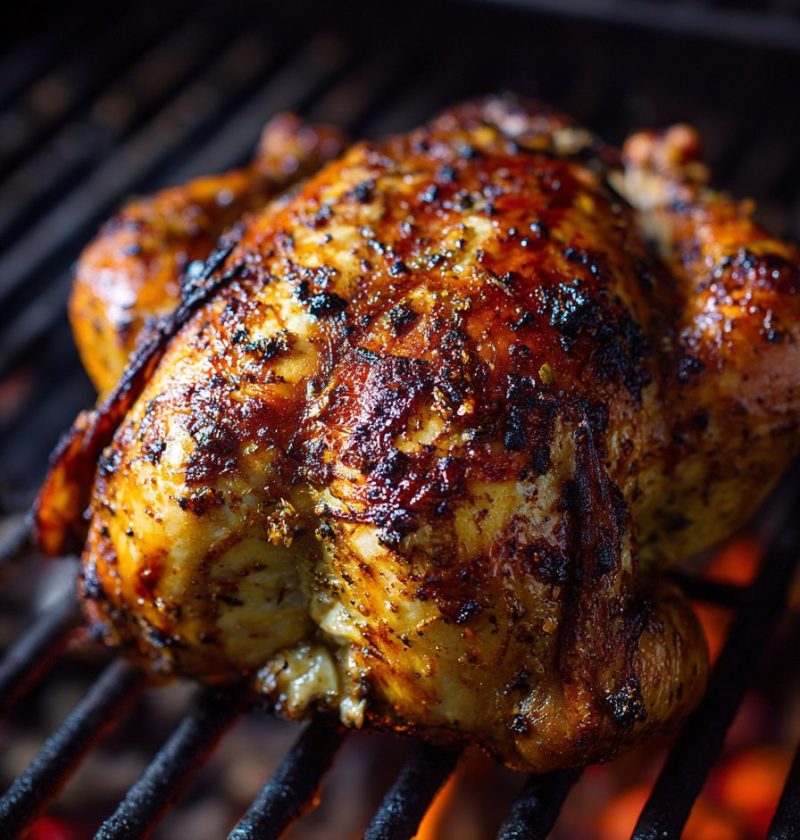
If you want a Beer Can Chicken Recipe that gives you crisp skin, juicy meat, and true backyard barbecue flavor without a fuss, this one is a keeper.
A backyard classic that still deserves the hype
Beer can chicken is exactly what it sounds like: a whole chicken seasoned well, perched over a partially filled can of beer, and cooked upright on the grill until the meat turns tender and the skin gets beautifully bronzed and crisp. It’s one of those old-school summer cookout recipes that people still talk about for a reason. It works.
What makes this beer can Chicken Recipe so special is the way the chicken cooks evenly while the heat circulates all around it. The beer helps keep the environment moist inside the cavity, and the vertical cooking position lets fat drip away as the skin renders. The result? A juicy chicken recipe with deep savory flavor, crisp skin, and that irresistible barbecue chicken aroma floating across the yard.
I’ve been making some version of this for years—usually when the weather turns warm and the patio starts calling my name. It’s the sort of meal I serve when family drops by on a Saturday or when I want something a little fun for a holiday weekend. It feels festive without being fussy, and honestly, that’s my kind of cooking. You get the charm of a barbecue chicken recipe, the comfort of a whole roasted chicken, and the ease of a grilled chicken recipe all in one pan-free package.
Why you’ll love this recipe
- Crispy chicken skin with juicy, tender meat
- Perfect for summer cookouts and casual weekends
- A great outdoor grilling recipe for beginners and seasoned grillers
- Uses simple pantry spices for a dependable seasoned chicken rub
- Looks impressive on the table without extra work
- Frees up your oven on hot days
- Works beautifully for backyard barbecue chicken menus
- Easy to pair with corn, slaw, baked beans, or potato salad
- Gives you leftover chicken for sandwiches, salads, and wraps
- A reliable easy chicken dinner that feels special
Ingredients
For the chicken:
- 1 whole chicken, 4 to 5 pounds
- 1 tablespoon olive oil
- 1 can beer, 12 ounces (lager, pilsner, or pale ale work well)
- 1 teaspoon kosher salt (for the cavity)
For the seasoned chicken rub:
- 2 teaspoons kosher salt
- 1 teaspoon black pepper
- 2 teaspoons smoked paprika
- 1 teaspoon garlic powder
- 1 teaspoon onion powder
- 1 teaspoon brown sugar
- 1 teaspoon dried thyme
- 1 teaspoon chili powder
- 1/2 teaspoon cayenne pepper (optional, for a little heat)
Optional for serving:
- Lemon wedges
- Chopped parsley
- Barbecue sauce on the side
A few helpful ingredient notes:
- Whole chicken: Look for a bird around 4 to 5 pounds so it cooks evenly and fits most grills. Larger birds can work, but they’re a bit more awkward and may need longer cooking.
- Beer: A mild beer is best. You don’t need anything fancy. Honestly, a simple Budweiser, Miller Lite, Coors Banquet, or Yuengling-style lager works perfectly. Avoid very bitter IPAs unless you truly love that taste.
- Smoked paprika: This brings a subtle smoky note, especially helpful if you’re using a gas grill instead of charcoal.
- Brown sugar: It helps with color and that lovely caramelized finish, but keep it modest so it doesn’t burn.
- Kosher salt: Diamond Crystal and Morton will season a little differently by volume, so if you use Morton, go a touch lighter.

Directions
-
Prep the grill for indirect heat.
Preheat your grill to about 375°F to 400°F. If you’re using a gas grill, turn on the outer burners and leave the center off. If you’re using charcoal, bank the coals to the sides. You want the chicken to roast, not sit directly over flames. That’s the secret to a roasted whole chicken texture with barbecue flavor. -
Pat the chicken dry really well.
Remove the giblets if they’re inside, then pat the outside and cavity dry with paper towels. This matters more than people think. Dry skin equals better browning and crispier skin later on. -
Season the chicken.
Rub the chicken all over with olive oil. In a small bowl, mix the salt, pepper, smoked paprika, garlic powder, onion powder, brown sugar, thyme, chili powder, and cayenne. Sprinkle the 1 teaspoon kosher salt inside the cavity, then coat the entire outside with the spice rub. Get into the nooks around the legs and wings too. -
Prepare the beer can.
Open the beer and pour out—or drink—about half the can. I always smile at that part. If you’d like, you can add a pinch of the rub or a sprig of thyme into the can for extra aroma, though the main flavor still comes from the rub and grill. -
Mount the chicken carefully.
Lower the chicken cavity over the beer can so the bird sits upright, with the can acting like a stand. The legs should help form a tripod with the can to keep everything steady. If you have a beer can chicken holder, even better. It makes moving the bird much easier. -
Place it on the grill.
Set the chicken over indirect heat and close the lid. Try to keep the grill temperature steady between 375°F and 400°F. Too cool, and the skin can turn rubbery; too hot, and the outside may brown before the inside finishes. This is one of those small things that makes a big difference. -
Cook until done.
Grill for about 1 hour 15 minutes to 1 hour 30 minutes, depending on the chicken’s size and your grill. Start checking around the 1-hour mark. An instant-read thermometer inserted into the thickest part of the thigh should read 175°F, and the breast should reach 160°F to 165°F. The juices should run clear. -
Rest before carving.
Using sturdy tongs and oven mitts, carefully transfer the chicken to a tray or cutting board. Let it rest for 10 to 15 minutes before removing the can. Be careful—the can and the liquid inside are very hot. Resting gives you a much juicier result, and that little pause is worth every minute. -
Carve and serve.
Remove the can, carve the chicken, and serve with lemon wedges, herbs, or your favorite barbecue sauce. The meat should be moist, the skin savory and crisp, and your kitchen—well, your patio—should smell like a proper cookout.
Servings & timing
- Yield: 4 to 6 servings
- Prep Time: 15 minutes
- Cook Time: 1 hour 15 minutes to 1 hour 30 minutes
- Rest Time: 10 to 15 minutes
- Total Time: About 1 hour 45 minutes
A little timing note: most 4-pound chickens finish closer to 75 minutes, while 5-pound birds often need the full 90 minutes. Weather, wind, and grill style can affect things more than recipes like to admit.
Variations
- Barbecue glazed version: Brush with your favorite barbecue sauce during the last 15 minutes for a sticky Bbq Chicken finish.
- Citrus herb chicken: Add lemon zest, rosemary, and parsley to the rub for a fresher flavor.
- Spicy southern style: Increase the cayenne and add a pinch of cumin for a bolder kick.
- Smoked Chicken Recipe twist: Add soaked wood chips or use a pellet grill for deeper smoky flavor.
- Non-alcohol version: Use a can of ginger ale, apple cider, or even chicken broth if you prefer not to cook with beer.
- Oven-friendly method: If the weather turns on you, roast it in the oven at 375°F using a vertical roaster.
Storage & reheating
Store leftover chicken in an airtight container in the refrigerator for up to 4 days. For longer storage, freeze shredded or carved chicken for up to 3 months.
To reheat, place the chicken in a covered baking dish with a spoonful of broth or water and warm at 300°F until heated through. If you want to freshen the skin, uncover it for the last few minutes. The microwave works for quick lunches, of course, but the oven gives a better texture.
For make-ahead prep, season the chicken and refrigerate it uncovered for up to 24 hours before grilling. That dry rest helps the skin a lot—almost like a mini dry brine.
Notes
One thing I learned after testing this recipe more times than I can count: temperature control matters more than the beer itself. The beer can chicken idea is fun and useful, yes, but the real stars are steady indirect heat, dry skin, and a well-balanced seasoned chicken rub.
Another small lesson? Don’t skip drying the chicken. I know it seems like a tiny step, but it’s the difference between crisp skin and skin that looks promising but never quite gets there.
If your grill runs hot, tent the top loosely with foil once the skin is browned enough. And if the chicken wobbles too much on the can, tuck the wing tips behind the back and gently position the legs to stabilize it. Not glamorous, but very practical.
You can also prep a second chicken if you’re feeding a crowd. Around here, extra chicken never goes to waste. Leftovers make wonderful chicken salad, quesadillas, pasta tosses, and sandwiches the next day.
FAQs
Can beer can chicken be made without a special holder?
Yes. You can place the chicken directly on the can, though a metal holder makes it more secure and easier to move.
What kind of beer is best for beer can chicken?
A mild lager, pilsner, or pale ale is usually best. Strong, bitter beers can sometimes add a sharper note than you want.
Does the beer really flavor the chicken?
A little, but not in a dramatic way. Most of the flavor comes from the seasoning, grill heat, and rendered fat over the skin.
What temperature should beer can chicken be cooked to?
Cook until the thigh reaches about 175°F and the breast reaches 160°F to 165°F. A meat thermometer is your best friend here.
Can I make this as a smoked chicken recipe?
Absolutely. Use a smoker or pellet grill and cook at a lower temperature, around 250°F to 275°F, until the chicken reaches safe internal temperature.
Why isn’t my chicken skin crispy?
Usually it’s one of three things: the chicken wasn’t dried well, the grill temperature was too low, or there was too much moisture trapped under the lid.
Can I use this recipe in the oven?
Yes, you can roast it in the oven using a vertical roaster at 375°F. You’ll still get a juicy whole roasted chicken, though the grill adds extra flavor.
How do I know when it’s done without cutting into it?
Use an instant-read thermometer in the thickest part of the thigh and breast. That’s much more reliable than checking the juices alone.
Conclusion
This Beer Can Chicken Recipe brings together everything people love in a summer meal—crispy skin, juicy meat, easy prep, and that unmistakable backyard barbecue chicken charm. It’s simple enough for a weeknight if you’re feeling ambitious, yet special enough for guests.
Give it a try at your next cookout, and if you do, I’d love to hear how it turned out. Leave a comment, share your favorite rub variation, or browse a few more grilled chicken recipe ideas for your next barbecue menu.