Would you like to save this?
Hawaiian Roll Recipe (Soft, Fluffy, and Perfectly Sweet)
If you’ve been craving that soft, buttery, gently sweet bread from your favorite store-bought bag, this Hawaiian Roll Recipe gives you tender, golden brown rolls with real flavor and a touch of tropical sweetness—straight from your own oven.
A Cozy Homemade Take on Hawaiian Rolls
Let me just say it: homemade Hawaiian rolls are one of those “why didn’t I do this sooner?” recipes. These are soft homemade rolls made from a sweet yeast dough enriched with milk, butter, and eggs, then brightened with pineapple juice for that signature tropical flavor. Think fluffy Hawaiian bread you can pull apart at the table, steam curling off the top, butter melting into all those little layers.
I’m a 50-year-old mom and grandmother in the Midwest, and sweet dinner rolls like this show up at just about every holiday and Sunday dinner. But this particular Hawaiian Roll Recipe started showing up more and more once I realized two things:
- My grocery store kept running out of those famous orange-bag rolls right before Thanksgiving.
- The homemade version is richer, more flavorful, and honestly, more satisfying to make than tearing into plastic.
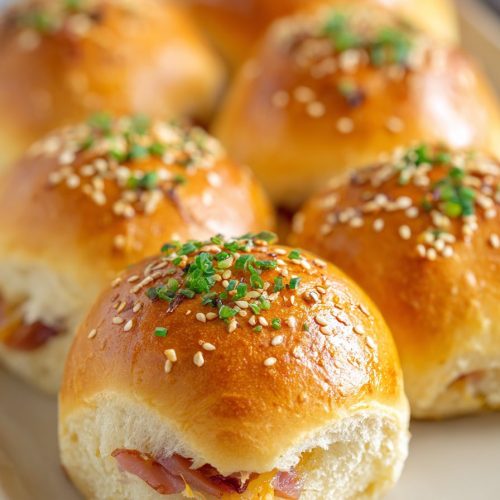
These homemade Hawaiian rolls are slightly sweet, buttery, and ridiculously soft. They’re perfect as pull apart rolls for family dinners, sliders for game day, or just a cozy weekend baking project with a big mug of coffee nearby.
And health-wise, while this is absolutely an enriched bread recipe (we’re not pretending it’s kale), you do get to control the ingredients—real butter, simple pantry staples, and no mystery preservatives. I like that kind of balance: comfort food, but made with care.
Why You’ll Love This Hawaiian Roll Recipe
- Super soft and fluffy – These soft yeast rolls have that classic pillow-y texture everyone fights over.
- Better than store-bought – Richer flavor, fresher crumb, and no plastic taste (you know exactly what I mean).
- Perfect for any occasion – Weeknight dinners, holiday feasts, backyard BBQs, or brunch casseroles.
- Make-ahead friendly – The sweet yeast dough can be chilled overnight so you’re not rushing on party day.
- Versatile – Use them as Hawaiian sweet buns for sliders, sandwiches, or little Breakfast buns with jam.
- Family-approved – Kids love the mild sweetness; grown-ups love the buttery finish.
- Beginner-friendly yeast recipe – Clear steps, simple tools, and plenty of sensory cues so you don’t stress over the dough.
- Freezer-friendly – Bake once, freeze extras, and enjoy soft homemade rolls whenever you like.
Ingredients for the Best Homemade Hawaiian Rolls
Here’s exactly what you’ll need for this Hawaiian Roll Recipe. I’ll list the main ingredients, with a few helpful notes and substitutions.
- 3/4 cup (180 ml) pineapple juice, room temperature
- Canned 100% pineapple juice works great; avoid juice “drinks” with added flavors.
- 1/2 cup (120 ml) whole milk, warmed to 100–110°F (38–43°C)
- Whole milk gives richer, fluffier rolls, but 2% works in a pinch.
- 1/3 cup (67 g) granulated sugar
- Sweetens the dough and feeds the yeast for a good rise.
- 2 1/4 teaspoons (1 packet, 7 g) active dry yeast
- You can use instant yeast; no need to proof separately if you do.
- 4 cups (480 g) all-purpose flour, plus extra for kneading
- A good, unbleached all-purpose flour such as King Arthur or Gold Medal works beautifully.
- 1/2 cup (60 g) bread flour (optional but recommended)
- This adds a bit more structure and chew; you can replace with more all-purpose if needed.
- 1 1/2 teaspoons fine sea salt
- Balances sweetness and brings out that buttery flavor.
- 2 large eggs, room temperature
- If you forget to take them out, place them (in the shell) in warm water for 5–7 minutes.
- 1/4 cup (57 g) unsalted butter, very soft
- Use real butter for flavor; margarine just doesn’t compare.
- 2 tablespoons Honey
- Adds a deeper, floral sweetness that makes this taste like true Hawaiian sweet bread.
- 1 teaspoon vanilla extract
- Subtle, but it rounds out the tropical flavor bread notes.
For brushing and finishing:
- 3 tablespoons unsalted butter, melted – for brushing before/after baking
- 1 tablespoon honey – whisked into some of the melted butter for a glossy, sweet finish
- Flaky sea salt (optional) – a tiny sprinkle on top balances all that sweetness in the most addictive way.

Step-by-Step Directions: How to Make Soft, Fluffy Hawaiian Rolls
1. Proof the yeast (wake it up gently).
In a small bowl or measuring cup, stir together the warm milk, 1 tablespoon of the sugar, and the active dry yeast. Let it sit for 5–10 minutes until it’s foamy and creamy on top.
If it doesn’t foam, your yeast may be old or the liquid too hot; better to start over than end up with dense rolls.
2. Mix the wet ingredients.
In the bowl of a stand mixer (or a large mixing bowl if working by hand), whisk together the pineapple juice, remaining sugar, honey, vanilla, and eggs until smooth. Add the softened butter and whisk again; it may look a little separated, and that’s okay.
3. Combine dry ingredients.
In another bowl, whisk together the all-purpose flour, bread flour (if using), and salt. This helps evenly distribute the salt so it doesn’t shock the yeast when everything meets.
4. Bring the dough together.
Pour the foamy yeast mixture into the bowl with the wet ingredients. Using the dough hook (or a sturdy wooden spoon if by hand), gradually add the flour mixture, about 1 cup at a time.
Mix on low speed until the dough starts to come together and pulls away from the sides of the bowl. The dough should feel slightly tacky but not gluey.
5. Knead for structure and stretch.
Continue kneading with the mixer on medium-low for 8–10 minutes, or knead by hand on a lightly floured surface for about 10–12 minutes.
You’re looking for a smooth, elastic dough that passes the “windowpane test”—if you gently stretch a small piece, it should become thin and almost translucent without tearing right away. This is what gives you extra fluffy Hawaiian rolls.
Tip: If the dough is very sticky after a few minutes of kneading, sprinkle in 1 tablespoon of flour at a time. Go slowly; too much flour gives dense rolls.
6. First rise: let the dough puff up.
Shape the dough into a ball and place it into a lightly greased bowl, turning once to coat. Cover with plastic wrap or a clean kitchen towel.
Let rise in a warm, draft-free spot for 1–1 1/2 hours, or until doubled in size. A slightly warm oven (turned off) or the microwave with a cup of hot water inside makes a great proofing box.
7. Prepare your pan.
While the dough rises, grease a 9×13-inch baking dish with butter or nonstick spray. If you like super soft sides, a metal pan helps the bottoms brown a bit more while keeping edges tender.
8. Shape into pull apart rolls.
Punch down the risen dough gently to release air. Turn it out onto a lightly floured surface and pat into a rectangle.
Using a bench scraper or sharp knife, divide the dough into 15–16 equal pieces (I like 4 by 4 for 16 rolls). You can weigh each piece (around 55–60 g) if you want bakery-level consistency.
Shape each piece into a tight ball by pulling the edges under and tucking them into the center, then rolling it seam-side down on the counter with a cupped hand. Place each ball in the prepared pan, seam-side down, spacing them evenly.
9. Second rise: let them get puffy and cute.
Cover the pan loosely with plastic wrap or a towel and let the rolls rise again in a warm spot for 45–60 minutes, or until noticeably puffy and nearly touching. When you gently poke a roll, the indent should slowly spring back—this means they’re ready to bake.
10. Preheat and butter the tops.
About 20 minutes before baking, preheat your oven to 350°F (175°C).
Brush the tops of the rolls lightly with melted butter. This helps them bake up with that classic golden brown finish.
11. Bake to golden perfection.
Bake the rolls on the middle rack for 18–22 minutes, or until the tops are deep golden brown and the internal temperature reaches around 190°F (88°C).
If they’re browning too quickly, tent the pan loosely with foil for the last 5–7 minutes.
12. Finish with honey butter and cool slightly.
While the rolls are baking, whisk together the remaining melted butter and honey.
As soon as the rolls come out, brush them generously with the honey butter. Let them cool in the pan for at least 10–15 minutes before tearing apart. This short rest lets the crumb set so they’re soft, not gummy.
Servings & Timing
- Yield: 15–16 pull apart rolls
- Prep Time: 25–30 minutes (plus a little shaping time)
- Rise Time: 2–2 1/2 hours total (first and second rise)
- Bake Time: 18–22 minutes
- Total Time: About 3 hours (mostly hands-off, perfect for a slow afternoon or weekend baking session)
Fun Variations on This Hawaiian Roll Recipe
You know what? Once you’ve mastered the basic sweet homemade bread, it’s really fun to play a bit.
- Coconut Hawaiian Rolls – Add 1/4 cup unsweetened shredded coconut to the dough and brush the tops with coconut milk before baking.
- Garlic Butter Hawaiian Rolls – Skip the honey in the finishing butter and add minced garlic and parsley for savory, buttery dinner rolls.
- Whole Wheat Twist – Swap 1 cup of the all-purpose flour for white whole wheat flour for a slightly heartier roll.
- Cheesy Hawaiian Sliders Rolls – Sprinkle shredded cheddar or mozzarella over the rolls halfway through baking for gooey, cheesy tops.
- Glazed Breakfast Rolls – Drizzle cooled rolls with a simple powdered sugar and pineapple juice glaze for brunch-worthy sweet rolls.
- Mini Hawaiian Sweet Buns – Portion the dough smaller (about 30 g each) and bake in a 9×13 to make tiny buns perfect for party sliders.
How to Store, Freeze, and Reheat Hawaiian Rolls
Homemade Hawaiian rolls actually keep better than you’d think, especially for an enriched bread recipe.
-
Room temperature:
- Store cooled rolls in an airtight container or zip-top bag at room temp for 2–3 days. Add a paper towel in the bag to absorb extra moisture and keep them from getting sticky.
-
Refrigerator:
- You can refrigerate them, but they’ll firm up faster. If your kitchen is very warm or humid, store for up to 5 days in the fridge and rewarm before serving.
-
Freezer (baked rolls):
- Cool completely, wrap tightly in plastic, then place in a freezer bag. Freeze for up to 2 months.
- To serve, thaw at room temperature and warm in a 300°F oven for about 10 minutes, covered with foil.
-
Freezer (unbaked rolls):
- Shape the rolls, let them rise just until slightly puffy, then freeze on a baking sheet. Once solid, transfer to a freezer bag.
- To bake later, thaw overnight in the fridge, let them finish rising at room temp until puffy, then bake as directed. This is a smart move for holiday dinners.
-
Reheating:
- For that “just baked” feel, wrap rolls in foil and warm in a 300°F oven for 8–10 minutes.
- A quick 15–20 seconds in the microwave (one or two rolls at a time) also works, though the texture is softer and less toasty.
Notes from My Kitchen (Little Things That Matter)
- Pineapple juice temperature matters. If it’s ice cold, it can slow the yeast, so let it sit out a bit before mixing.
- Sweet dough likes patience. This is a sweet enriched bread, so sometimes it rises more slowly than plain bread dough. Give it time; rushing it leads to dense rolls.
- Humidity changes flour. On a humid summer day, you may need a little more flour; in winter, sometimes a bit less. Always pay more attention to how the dough feels than the exact number on the measuring cup.
- Even rolls = even baking. If you want perfectly even soft homemade rolls, weighing each piece is worth the extra two minutes.
- Don’t skip the second rise. I know it’s tempting when you’re hungry, but that second proof is what creates that soft, airy texture in these homemade sweet rolls.
- Honey butter is magic. That final brush of honey butter is what makes your “homemade hawaiian rolls” taste bakery-level. It’s a tiny step with a big payoff.
FAQs About Making Hawaiian Rolls at Home
1. Can I make this Hawaiian Roll Recipe without a stand mixer?
Yes. Mix with a wooden spoon until it comes together, then knead by hand for 10–12 minutes until smooth and elastic; it’s a bit of a workout, but very doable.
2. My dough isn’t rising—what went wrong?
Most often, the yeast is old or the liquid was too hot and killed it. Make sure your milk is warm, not hot, and always check the expiration date on your yeast.
3. Can I use instant yeast instead of active dry yeast?
Yes, use the same amount of instant yeast and skip the proofing step—mix it directly with the flour, then combine with the liquids.
4. How do I make the rolls even softer?
Use whole milk, don’t skimp on the butter, and avoid adding too much flour; a slightly tacky dough bakes into softer rolls.
5. Can I reduce the sugar to make them less sweet?
You can reduce the sugar by a couple of tablespoons and skip the honey glaze, but keep at least 1–2 tablespoons for proper yeast activity and flavor.
6. What’s the best way to shape the rolls for sliders?
Portion them smaller (about 30–35 g each), place them close together in the pan, and bake a few minutes less, watching for golden brown tops.
7. Can I make the dough the day before?
Yes. After the first rise, punch down the dough, cover the bowl, and refrigerate overnight. The next day, shape, let rise again until puffy, and bake.
8. Why are my rolls dry or dense?
Usually this means too much flour or not enough rise time. Next time, add flour slowly and stop when the dough is just tacky, and make sure both rises nearly double before baking.
Wrapping It Up (And Tearing Them Apart!)
These homemade Hawaiian sweet buns are everything I want in a roll: soft, fluffy, a little sweet, and just begging for a swipe of butter—or maybe a leftover Turkey slider the next day. This Hawaiian Roll Recipe gives you reliable, bakery-style pull apart rolls that feel special but are simple enough for a quiet Sunday.
If you try this recipe, I’d love to hear how it goes—tell me in the comments what you served them with, or if you gave any of the variations a whirl. And if you’re in a bread-baking mood, this is a lovely “gateway” recipe before you move on to other soft yeast rolls and enriched bread recipes on your cooking list.
Hawaiian Roll Recipe (Soft, Fluffy, and Perfectly Sweet)
Ingredients
- 3/4 cup pineapple juice 180 ml, room temperature, 100% juice
- 1/2 cup whole milk 120 ml, warmed to 100–110°F (38–43°C)
- 1/3 cup granulated sugar divided (1 tablespoon for proofing yeast)
- 2 1/4 teaspoons active dry yeast 1 packet (7 g); instant yeast may be substituted
- 4 cups all-purpose flour 480 g, plus extra for kneading
- 1/2 cup bread flour 60 g, optional but recommended; or use more all-purpose flour
- 1 1/2 teaspoons fine sea salt
- 2 large eggs room temperature
- 1/4 cup unsalted butter 57 g, very soft, for dough
- 2 tablespoons honey for dough
- 1 teaspoon vanilla extract
- 3 tablespoons unsalted butter melted, for brushing rolls
- 1 tablespoon honey for honey-butter glaze
- flaky sea salt optional, for sprinkling on top
- butter or nonstick spray for greasing the baking dish
Instructions
- In a small bowl or measuring cup, stir together the warm milk, 1 tablespoon of the granulated sugar, and the active dry yeast. Let sit for 5–10 minutes, until foamy and creamy on top. If it does not foam, discard and start again with fresh yeast and correctly warmed milk.1/2 cup whole milk, 1/3 cup granulated sugar, 2 1/4 teaspoons active dry yeast
- In the bowl of a stand mixer (or a large mixing bowl), whisk together the pineapple juice, remaining granulated sugar, honey, vanilla extract, and eggs until smooth. Add the softened 1/4 cup (57 g) unsalted butter and whisk again; the mixture may look slightly separated and that is fine.3/4 cup pineapple juice, 1/3 cup granulated sugar, 2 large eggs, 1/4 cup unsalted butter, 2 tablespoons honey, 1 teaspoon vanilla extract
- In a separate bowl, whisk together the all-purpose flour, bread flour (if using), and fine sea salt until evenly combined. This helps distribute the salt before it comes into contact with the yeast.4 cups all-purpose flour, 1/2 cup bread flour, 1 1/2 teaspoons fine sea salt
- Pour the foamy yeast mixture into the bowl with the wet ingredients. Using a dough hook (or a sturdy wooden spoon if mixing by hand), gradually add the flour mixture, about 1 cup at a time, mixing on low speed until the dough comes together and begins to pull away from the sides of the bowl. The dough should feel slightly tacky but not overly sticky or gluey.3/4 cup pineapple juice, 1/2 cup whole milk, 1/3 cup granulated sugar, 2 1/4 teaspoons active dry yeast, 4 cups all-purpose flour, 1/2 cup bread flour, 1 1/2 teaspoons fine sea salt, 2 large eggs, 1/4 cup unsalted butter, 2 tablespoons honey, 1 teaspoon vanilla extract
- Knead the dough with the mixer on medium-low speed for 8–10 minutes, or turn it out onto a lightly floured surface and knead by hand for 10–12 minutes. The dough should become smooth, elastic, and able to pass the windowpane test (a small piece stretches thin and almost translucent without tearing immediately). If the dough is very sticky after a few minutes, sprinkle in additional flour 1 tablespoon at a time, just until it is tacky but manageable.
- Shape the dough into a ball and place it into a lightly greased bowl, turning once to coat. Cover the bowl with plastic wrap or a clean kitchen towel and let the dough rise in a warm, draft-free place for 1–1 1/2 hours, or until doubled in size.
- Grease a 9×13-inch (23×33 cm) baking dish with butter or nonstick spray. A metal pan will help the bottoms brown nicely while keeping the sides soft.butter or nonstick spray
- Gently punch down the risen dough to release excess air. Turn it out onto a lightly floured surface and pat into a rectangle. Using a bench scraper or sharp knife, divide the dough into 15–16 equal pieces (about 55–60 g each for standard rolls). Working with one piece at a time, pull the edges under and pinch to create a tight ball, then roll seam-side down on the counter with a cupped hand until smooth. Arrange the dough balls seam-side down in the prepared pan, spacing them evenly.
- Cover the pan loosely with plastic wrap or a towel and let the rolls rise in a warm place for 45–60 minutes, or until noticeably puffy and nearly touching. When gently poked, the indentation should slowly spring back, indicating they are ready to bake.
- About 20 minutes before baking, preheat the oven to 350°F (175°C). Once preheated and the rolls have risen, lightly brush the tops of the rolls with some of the melted butter.3 tablespoons unsalted butter
- Bake the rolls on the middle rack for 18–22 minutes, or until the tops are deep golden brown and the internal temperature registers about 190°F (88°C). If the rolls are browning too quickly, tent the pan loosely with foil for the last 5–7 minutes of baking.
- While the rolls bake, whisk the remaining melted butter with 1 tablespoon honey. Immediately after removing the rolls from the oven, generously brush the tops with the honey-butter mixture and, if desired, sprinkle lightly with flaky sea salt. Let the rolls cool in the pan for at least 10–15 minutes before pulling apart and serving so the crumb can set.3 tablespoons unsalted butter, 1 tablespoon honey, flaky sea salt