Would you like to save this?
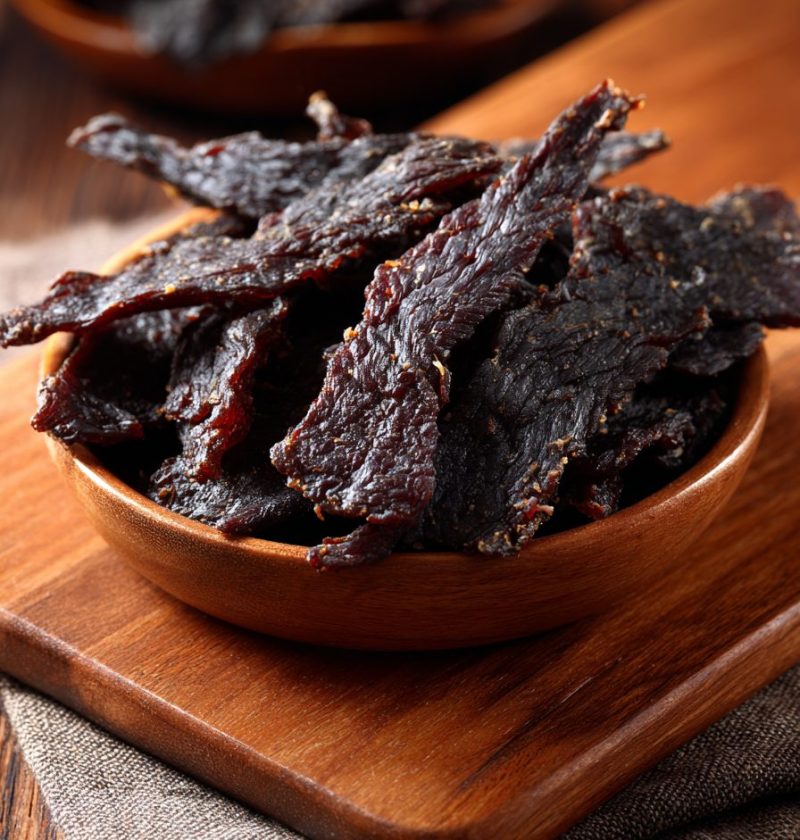
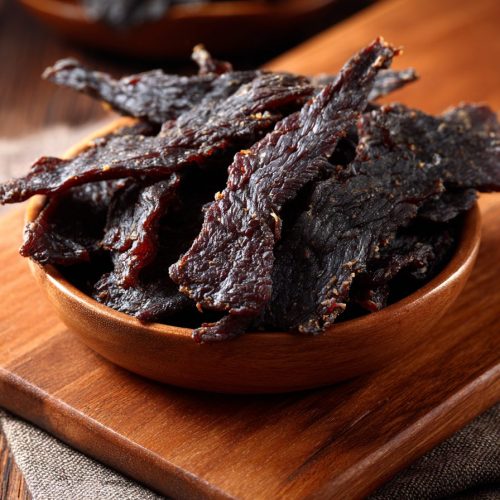
Ground Venison Jerky Recipe
If you’ve got a freezer full of venison and a craving for a high-protein snack, this Ground Venison Jerky Recipe is your new best friend—lean, flavorful, easy to prep, and perfect for dehydrators, smokers, or even your oven.
What Makes This Ground Venison Jerky Recipe So Special?
Ground venison jerky is a fun twist on traditional sliced venison jerky. Instead of wrestling with a knife and semi-frozen roasts, you’re working with seasoned ground Meat that presses into tidy strips or snack sticks. It’s especially great if your deer was processed into a lot of ground venison and you’re tired of only making chili and burgers.
This Ground Venison Jerky Recipe is lean, low fat, and high in protein, which is why it’s become a favorite “grab-and-go” snack at my house. I’m a 50-year-old mom and grandma, and I still like to keep up on a hike or a long day of canning in the kitchen—this gives me the energy without a sugar crash later.
We’ll use simple pantry spices to build deep flavor, plus a short marinating rest so the ground venison absorbs every bit of seasoning. From there, you can turn it into:
- Dehydrated venison jerky in a classic dehydrator
- Oven venison jerky right on wire racks
- Or smoked venison jerky if you’ve got a pellet or electric smoker
You can shape it into flat jerky strips or thicker venison snack sticks depending on your tools and mood. And yes, we’ll talk about food safety, storage, and how to tweak this into spicy venison jerky or kid-friendly mild bites.
Why You’ll Love This Recipe
- Perfect for ground meat – No need for whole muscle roasts; this recipe is made for ground venison jerky.
- High-protein, low-fat snack – Lean venison jerky is great for hikers, hunters, and lunch boxes.
- Uses basic pantry ingredients – No hard-to-find curing agents required for a tasty batch.
- Flexible cooking methods – Works as dehydrated venison jerky, oven venison jerky, or smoked venison jerky.
- Customizable heat level – Easy to make mild, smoky, or very spicy venison jerky.
- Freezer-friendly – Keeps well for weeks or months; great for meal prep and road trips.
- Budget-wise – Turns inexpensive ground venison into something that tastes like a gourmet jerky brand.
- Family-tested – My kids and grandkids happily trade chips for this high protein venison snack.
- No special jerky gun required – You can use a piping bag or even your hands if needed.
- Great for batch cooking – Make a big batch once, snack on it for days.
Ingredients for Ground Venison Jerky
Here’s what you’ll need for this Ground Venison Jerky Recipe. This makes about 1½–2 pounds of finished jerky, depending on how thin you shape it.
- 2 pounds ground venison (90–95% lean; avoid adding too much extra fat)
- 2 tablespoons Worcestershire sauce
- 2 tablespoons soy sauce (low-sodium if you prefer)
- 2 teaspoons kosher salt (use 1½ tsp if using regular table salt)
- 1½ teaspoons black pepper, freshly ground
- 1 teaspoon onion powder
- 1 teaspoon garlic powder
- 1 teaspoon smoked paprika (adds a lovely smoky note even if you’re using the oven)
- 1 teaspoon paprika (regular or sweet)
- ½–1 teaspoon crushed red pepper flakes (adjust for spicy venison jerky)
- 1 teaspoon brown sugar or honey (just a touch helps balance the salt and spice)
- ½ teaspoon liquid smoke (optional, for deeper smoky flavor, especially in the oven)
- ¼ teaspoon curing salt (Prague Powder #1), optional but recommended for long storage – about 1 level teaspoon per 5 pounds of meat, so ¼ tsp is a safe, conservative amount for 2 pounds
Ingredient notes and substitutions
- Ground venison – If your venison is extremely lean and tends to dry out, you can mix in up to ½ pound ground pork or 80/20 ground beef for texture. Don’t go overboard or you’ll lose that nice lean venison jerky feel.
- Soy sauce – Use tamari or coconut aminos for a gluten-free version (just reduce any added sugar by a pinch; those can be a bit sweeter).
- Sugar or honey – You can skip it for a very low-carb, low fat jerky recipe, but it really rounds the flavor.
- Heat level – For kids, cut the red pepper flakes to ¼ teaspoon or leave them out altogether. For “hot head” folks, bump to 1½ teaspoons and add ¼ teaspoon cayenne.
And if you’re a visual person, this is the jerky style we’re making here:

Step-by-Step Directions
1. Mix the marinade with the meat
Add the ground venison to a large mixing bowl. In a separate small bowl, whisk together the Worcestershire, soy sauce, salt, pepper, onion powder, garlic powder, smoked paprika, paprika, crushed red pepper, brown sugar or honey, liquid smoke, and curing salt (if using).
Pour the seasoning mixture over the ground venison. Using clean hands, gently mix until everything is very evenly combined—kind of like you’re making Meatloaf, but don’t overwork it or the jerky can turn dense.
2. Chill for flavor and easier handling
Cover the bowl tightly with plastic wrap or transfer the meat mixture to a resealable bag, pressing out as much air as you can.
Refrigerate for at least 4 hours, ideally overnight (8–12 hours). This rest lets the seasoning soak through the ground venison and firms it up slightly so it presses into cleaner jerky strips.
3. Prep your equipment
You’ve got three main options here:
- Dehydrator – Set it to 160°F (or your manual’s recommended temperature for meat). Lightly spray the trays with oil or use nonstick mesh screens.
- Oven – Preheat to 170–180°F (or the lowest your oven goes). Line baking sheets with foil and place wire racks on top; spray racks lightly with oil for easier cleanup.
- Smoker – Preheat your smoker to around 160–175°F. Use a mild wood like apple, cherry, or hickory.
If you’re using a jerky gun, assemble it now with the flat strip or snack stick attachment.
4. Shape the ground meat jerky
There are a few easy ways to do this Ground Venison Jerky Recipe, even if you don’t own special tools:
- With a jerky gun (easiest): Load the chilled meat into the gun and pipe ¼-inch thick strips or sticks directly onto dehydrator trays, smoker racks, or wire racks on your baking sheet.
- With a rolling pin: Place the meat between two sheets of parchment and roll it out to about ¼-inch thick. Peel off the top paper and cut into strips with a pizza cutter or sharp knife. Transfer strips carefully to trays.
- By hand: Pinch off small portions and gently press them into ¼-inch thick logs or flat strips with your fingers, laying them on your prepared racks. It’s rustic—but it works.
Leave a little space between pieces so air can circulate and dry them evenly.
5. Heat to a safe temperature first
This part is important for food safety with ground meat jerky. The USDA recommends that ground meats reach 160°F internally.
- If you’re using a dehydrator that doesn’t reach 160°F quickly, you can pre-bake the jerky strips in a 275°F oven for about 10–15 minutes, just until they hit 160°F inside, then transfer them to the dehydrator to finish drying.
- If you’re using the oven or smoker set around 170–180°F, you can check a piece after about 45–60 minutes with an instant-read thermometer to ensure it reaches 160°F while it dries.
Once you know your usual method, this step feels less fussy—but it’s worth it.
6. Dry the jerky low and slow
- Dehydrator: Dry at 160°F for 4–7 hours, checking after 3–4 hours.
- Oven: Dry at the lowest setting, often 170–180°F, for 3–6 hours. Crack the oven door open slightly with a wooden spoon to let moisture escape.
- Smoker: Smoke at 160–175°F for 3–5 hours, rotating racks if needed so everything dries evenly.
The jerky is done when it’s dry to the touch, bends without breaking, and shows small white fibers when you tear it. It shouldn’t feel wet or spongy in the center.
7. Cool and condition the jerky
Let the jerky cool completely on the racks.
For the best storage, place the fully cooled jerky in a large jar or container loosely (not packed tight), seal it, and let it sit at room temperature for 24 hours, shaking once or twice. This “conditioning” step helps any remaining moisture equalize between pieces. If you see condensation in the container, it needs more drying.
8. Store and enjoy
Once conditioned, portion your homemade venison jerky into airtight containers, jars, or vacuum-sealed bags. Label with the date (future you will thank you), and stash some in the pantry, fridge, or freezer depending on how fast your crew snacks.
Servings & Timing
- Yield: About 1½–2 pounds finished jerky (enough for 10–14 snack servings)
- Prep Time: 20–25 minutes (mixing and shaping)
- Marinating Time: 4–12 hours (hands-off, in the fridge)
- Drying Time: 3–7 hours depending on method and thickness
- Total Time: About 8–16 hours including marinating and drying (mostly passive time)
Easy Variations to Keep Things Interesting
You know what? Once you’ve made this Ground Venison Jerky Recipe once, you’ll start playing with flavors. Here are some fun twists:
- Sweet & Smoky BBQ Jerky – Add 1 tablespoon BBQ rub and 1 extra tablespoon brown sugar; skip or reduce the red pepper flakes.
- Teriyaki Venison Jerky – Swap the Worcestershire for teriyaki sauce, reduce the salt a bit, and add ½ teaspoon fresh grated ginger.
- Chipotle-Lime Spicy Jerky – Stir in 1 teaspoon chipotle chili powder and 1 tablespoon lime juice for smoky heat and tang.
- Garlic-Lover’s Jerky – Double the garlic powder and add ½ teaspoon granulated dried garlic pieces for extra punch.
- Peppercorn Snack Sticks – Use the jerky gun with a round nozzle and bump the black pepper to 2 teaspoons for classic venison snack sticks.
- Smoked Maple Jerky – Add 1 tablespoon pure maple syrup and another ¼ teaspoon liquid smoke for a breakfast-style, slightly sweet jerky.
Storage & Make-Ahead Tips
Homemade venison jerky is shelf-stable for a bit, but let’s be smart about it, especially with ground meat jerky.
- Room temperature: In an airtight container, in a cool, dark place, it keeps about 1 week (2 weeks if you used curing salt and dried it very well).
- Refrigerator: Store in zip-top bags or sealed jars up to 3–4 weeks. This is my preferred method for ground venison jerky.
- Freezer: For long-term storage, vacuum-seal if possible and freeze up to 6 months. Thaw in the fridge overnight or at room temperature for an hour.
It doesn’t really need “reheating”—just bring chilled jerky to room temperature for the best texture and flavor.
For make-ahead, you can:
- Mix and marinate the meat up to 24 hours before shaping.
- Shape and freeze raw jerky strips flat on a tray, then bag them and dry from frozen later (add about 30–45 minutes to the drying time).
Notes from My Kitchen to Yours
- Fat content matters. The leaner the ground venison, the longer your jerky will last without getting greasy. A little fat improves texture, but too much can cause spoilage and off-flavors.
- Salt balance. Homemade venison jerky can taste slightly saltier when warm. Always taste a cooled piece before deciding to increase salt in the next batch.
- Uniform thickness. Try to keep your strips or sticks as even as you can—thick pieces dry much slower and can stay soft in the center.
- Smell as your guide. You’ll start to notice a change in aroma when the jerky’s almost done—less “meaty” and more like that classic jerky smell. That’s your cue to start checking.
- Don’t skip cooling. If you bag it warm, condensation forms and can cause mold. I learned this the hard way one summer when I rushed a batch for a fishing trip. Now I’m patient. Usually.
- Label those flavors. If you’re making multiple variations (say mild for the kids and spicy venison jerky for the adults), label your bags clearly. Trust me, your spice-averse niece will appreciate that.
FAQs about Ground Venison Jerky
1. Can I use this recipe with ground beef or turkey?
Yes. This works with ground beef, elk, or even ground turkey—just make sure it’s at least 90% lean and follow the same drying and food safety steps.
2. Do I have to use curing salt?
No, curing salt is optional. It helps with longer storage and that classic jerky color, but if you plan to store your jerky in the fridge or freezer and eat it within a few weeks, you can skip it.
3. How do I know when the jerky is done?
The jerky should be dry on the surface, firm but still flexible, and bend without snapping. When you tear a piece, you should see fibers but no raw or mushy center.
4. My jerky turned out crumbly—what happened?
That usually means it dried too long or was very lean and shaped too thin. Next time, make slightly thicker strips and start checking for doneness earlier.
5. Can I make this Ground Venison Jerky Recipe less salty?
Yes. Reduce the soy sauce to 1 tablespoon and salt to 1 teaspoon. Just remember that salt also helps with preservation, so refrigerate or freeze if you go very low.
6. Is this recipe good for people watching their fat intake?
Absolutely. Venison is naturally lean, and this is a low fat jerky recipe compared to most store-bought options made with fattier cuts.
7. Can I add cheese or other mix-ins?
I don’t recommend cheese in jerky that’s stored at room temperature, as it can spoil. Save cheese for fresh snack sticks that you’ll refrigerate and eat quickly.
8. How spicy is this as written?
As written, it’s a gentle medium—just a little kick. Cut the red pepper flakes way down for mild, or add cayenne and extra flakes for serious heat.
Wrapping It Up
This Ground Venison Jerky Recipe is one of those keeper recipes that turns a simple ground venison package into something special—lean, savory, portable, and honestly kind of addictive. Whether you’re packing school lunches, stocking your hunting pack, or just trying to eat a little more protein and a little less junk, homemade venison jerky checks all the boxes.
Give it a try, then come back and let me know in the comments how it went and which flavor variation you tried. And if you’re looking for more ground venison recipes, don’t be shy—peek around for my favorite venison meatballs, chili, and burger recipes next.
Ground Venison Jerky
Ingredients
- 2 pounds ground venison 90–95% lean
- 2 tablespoons Worcestershire sauce
- 2 tablespoons soy sauce low-sodium if preferred
- 2 teaspoons kosher salt use about 1 1/2 teaspoons if using regular table salt
- 1 1/2 teaspoons black pepper freshly ground
- 1 teaspoon onion powder
- 1 teaspoon garlic powder
- 1 teaspoon smoked paprika
- 1 teaspoon paprika regular or sweet
- 1/2-1 teaspoon crushed red pepper flakes adjust to taste for spice level
- 1 teaspoon brown sugar or honey
- 1/2 teaspoon liquid smoke optional, for extra smoky flavor
- 1/4 teaspoon curing salt (Prague Powder #1) optional but recommended for longer storage; conservative amount for 2 pounds of meat
Instructions
- Add the ground venison to a large mixing bowl. In a separate small bowl, whisk together the Worcestershire sauce, soy sauce, salt, black pepper, onion powder, garlic powder, smoked paprika, paprika, crushed red pepper flakes, brown sugar or honey, liquid smoke, and curing salt (if using). Pour the seasoning mixture over the ground venison and, using clean hands, gently mix until everything is very evenly combined without overworking the meat.
- Cover the bowl tightly with plastic wrap or transfer the meat mixture to a resealable bag, pressing out as much air as possible. Refrigerate for at least 4 hours, ideally 8–12 hours or overnight, to let the flavors absorb and to firm up the mixture for easier shaping.
- For a dehydrator, set it to 160°F and lightly spray the trays with oil or use nonstick mesh screens. For an oven, preheat to 170–180°F (or the lowest setting), line baking sheets with foil, place wire racks on top, and lightly oil the racks. For a smoker, preheat to 160–175°F and use a mild wood such as apple, cherry, or hickory. If using a jerky gun, assemble it with the flat strip or snack stick attachment.
- Shape the chilled meat into 1/4-inch thick strips or sticks. Use a jerky gun to pipe strips or sticks directly onto dehydrator trays or racks if you have one. Alternatively, place the meat between two sheets of parchment and roll it out to about 1/4 inch thick, then cut into strips with a pizza cutter or knife and transfer to trays. You can also shape logs or flat strips by hand. Leave space between pieces for air circulation.
- Ensure the jerky reaches 160°F internally for food safety. If your dehydrator does not quickly reach 160°F, pre-bake the shaped strips in a 275°F oven for 10–15 minutes, just until they reach 160°F inside, then transfer to the dehydrator. If using an oven or smoker at 170–180°F, begin checking a piece after 45–60 minutes with an instant-read thermometer to confirm it reaches 160°F while drying.
- Dry the jerky low and slow until fully dehydrated. In a dehydrator, dry at 160°F for about 4–7 hours, checking after 3–4 hours. In the oven, dry at 170–180°F for about 3–6 hours, cracking the oven door slightly to allow moisture to escape. In a smoker, smoke at 160–175°F for about 3–5 hours, rotating racks as needed for even drying. The jerky is done when it is dry to the touch, bends without breaking, and shows small white fibers when torn, with no wet or spongy center.
- Let the finished jerky cool completely on the racks. Place the cooled jerky loosely in a large jar or container, seal, and let it sit at room temperature for about 24 hours, shaking once or twice. This conditioning period allows any remaining moisture to distribute evenly between pieces. If condensation appears inside the container, return the jerky to the dehydrator, oven, or smoker for additional drying.
- After conditioning, portion the jerky into airtight containers, jars, or vacuum-sealed bags and label with the date. Store at room temperature in a cool, dark place for up to 1 week (or up to 2 weeks if curing salt was used and the jerky is very dry), in the refrigerator for 3–4 weeks, or in the freezer for up to 6 months. Bring chilled jerky to room temperature before eating for the best texture and flavor.