
Would you like to save this?
Instant Pot Yogurt Recipe (Thick, Creamy, and Foolproof Every Time)
If you’ve ever dreamed of a big batch of thick, creamy yogurt bubbling away safely while you sleep, this Instant Pot Yogurt Recipe is about to become your new favorite kitchen ritual—easy, economical, and wonderfully cozy.
What Makes This Instant Pot Yogurt Recipe So Special?
Homemade yogurt used to feel like something only very patient people did—thermometers, careful timing on the stove, and hovering like a hawk over a pot of milk. With the Instant Pot yogurt setting, all that fuss gets simplified. The machine holds the temperature for you, so your yogurt starter culture has the perfect, stable environment for fermentation.
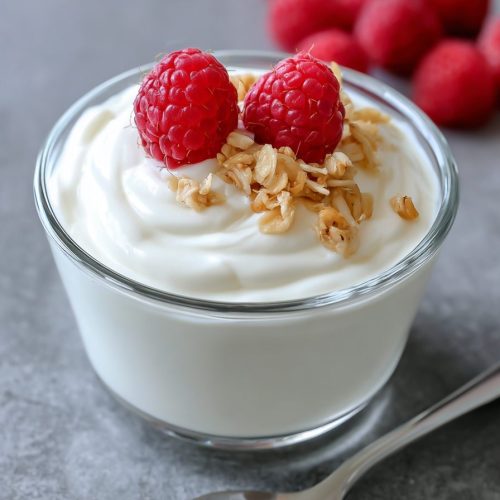
This Instant Pot Yogurt Recipe gives you a big batch of creamy yogurt homemade from simple ingredients: just milk and a little store‑bought yogurt or powdered starter. No thickeners, no fancy gadgets beyond the electric pressure cooker you already have on your counter.
I like to make this on a Sunday evening, let it incubate overnight, then chill it on Monday. By Tuesday morning, we have jars of homemade yogurt ready for breakfasts, snacks, and even savory sauces. It’s one of those quiet, behind‑the‑scenes kitchen habits that makes the whole week feel smoother—and honestly, a little more nurturing.
From a “food nerd” perspective, Instant Pot fermentation is also wonderfully reliable. The consistent low heat gives those friendly bacteria (your yogurt starter culture) a chance to flourish, creating a thick, tangy, probiotic‑rich yogurt that’s fresher and usually cheaper than anything you’ll find at the store.
Why You’ll Love This Instant Pot Yogurt Recipe
- Hands‑off and easy – The Instant Pot handles the temperature and timing; you mostly just pour, stir, and wait.
- Simple ingredients – Just milk and yogurt starter culture—no stabilizers, gums, or mystery ingredients.
- Customizable texture – Make it mild or tangy, thin or Greek‑style thick, simply by tweaking fermentation time and straining.
- Budget‑friendly – A gallon of milk turns into a week’s worth of creamy yogurt homemade at a fraction of store prices.
- Family‑friendly – Great for lunch boxes, breakfast parfaits, and picky eaters (you control the sweetness and flavors).
- Protein‑rich breakfast – A smart Instant Pot breakfast recipe to keep everyone full through the morning.
- Scalable – Works in a 6‑ or 8‑quart electric pressure cooker; make a small batch or a crowd‑sized one.
- Perfect base for flavors – Add Vanilla, fruit, honey, or even savory seasonings after it sets.
Ingredients For Homemade Instant Pot Yogurt
For this Instant Pot yogurt recipe, you’ll only need a few basics, but the details matter.
-
1 gallon (3.8 L) milk
- Best: Whole cow’s milk for the creamiest yogurt.
- Works: 2% milk (still nice, just a touch less rich).
- You can use skim, but the yogurt will be thinner. If you do, you may want to strain it.
- Use pasteurized or ultra‑pasteurized milk—both are fine here.
-
2–3 tablespoons plain yogurt with live active cultures
- This is your yogurt starter culture. Look at the label and make sure it says “live and active cultures.”
- Choose a plain, unsweetened yogurt with a flavor you like; its character will carry into your homemade batch.
- Greek yogurt works beautifully and can help make thicker yogurt.
-
Optional for thicker yogurt (but I rarely bother):
- 1/4 cup nonfat dry milk powder, whisked into the warm milk before incubating. This adds extra milk solids and boosts thickness.
-
Optional for sweetness and flavor (add after incubation):
- 1–3 tablespoons honey, maple syrup, or sugar
- 1–2 teaspoons pure vanilla extract
- A pinch of salt (just a pinch deepens the flavor gently)
Ingredient Tips:
- Use fresh milk, ideally within a week of the expiration date; older milk can give off‑flavors.
- For your first batch, start with a high‑quality store yogurt like Stonyfield, Fage, or Chobani plain. Once you’ve made a successful batch, you can save 1/2 cup of your own yogurt to use as starter next time.
- Avoid flavored or sweetened yogurt as a starter; additives can interfere with fermentation.
Instant Pot Yogurt Directions (Step‑By‑Step)
I’ll walk you through the basic “boil and set” method using the yogurt button. Most newer Instant Pots have this function, but if yours doesn’t, I’ll add a quick note later.
1. Prep the Instant Pot
Make sure your inner pot is clean and dry—any leftover food or soap residue can affect fermentation. If you’ve cooked strong flavors (like chili) recently, you might want to give the sealing ring a quick sniff; if it’s very smelly, you can remove it while making yogurt or use a “sweet” ring just for dairy recipes.
2. Heat the milk (“Boil” cycle)
- Pour the gallon of milk into the inner pot.
- Close the lid (vent position doesn’t matter for the yogurt setting).
- Press Yogurt, then press Adjust or Mode until it shows “Boil” or “More” (depending on model).
- The Instant Pot will heat the milk up to around 180–185°F (82–85°C). This step denatures the milk proteins, which helps create thicker yogurt.
You’ll hear a beep when it’s done. This can take about 30–45 minutes.
3. Check the temperature
Open the lid carefully. Give the milk a gentle whisk to even out the temperature and prevent a skin from forming on top.
- Use an instant‑read thermometer and make sure the milk has reached at least 180°F.
- If it hasn’t, use the Saute function on low and heat gently, whisking, until it does.
This little step is one of those “fussy but worth it” things—it makes the difference between thin and lush pressure cooker yogurt.
4. Cool the milk to 110–115°F
Now the milk needs to cool so the live cultures don’t get killed.
- Remove the inner pot from the Instant Pot housing so it cools faster.
- You can let it sit on the counter for 30–45 minutes, or set the pot in a sink with a couple inches of cool water around it, whisking occasionally.
You’re aiming for **110–115°F (43–46°C)**—warm but not hot, about the temperature of a warm bath. If you don’t have a thermometer, touch the side of the pot: it should feel warm, not hot, and you should be able to hold your hand there comfortably.
5. Temper the starter
In a small bowl, add:
- 2–3 tablespoons of your plain yogurt starter.
- Ladle in about 1 cup of the warm (not hot) milk.
Whisk until smooth. This “tempers” the yogurt so it blends smoothly and the cultures are evenly distributed.
Then pour this mixture back into the inner pot of warm milk and whisk gently but thoroughly.
6. Incubate the yogurt (the cozy nap stage)
Place the inner pot back in the Instant Pot base.
- Press Yogurt again.
- Set the time between 8–12 hours, depending on how tangy you like your yogurt:
- 8 hours – mild and creamy
- 10 hours – medium tang
- 12 hours – tangy and thick
The Instant Pot will hold the milk at around 110°F, the sweet spot for instant pot fermentation. Try not to move or jostle it during this time. I usually start it in the evening and let it incubate overnight.
When it’s done, it will beep and the display will say “Yogt” or switch to “End.”
7. Check for set yogurt
Open the lid gently and peek inside.
- The yogurt should look set and slightly jiggly, like a soft custard.
- You might see a little clear liquid (whey) on top—that’s completely normal.
Resist the urge to stir at this point if you want the smoothest texture; stirring will release more whey.
8. Chill to firm up
Cover the inner pot with a lid or plastic wrap and place it in the refrigerator for at least 4 hours, preferably overnight. This chilling time helps the yogurt thicken and the flavor mellow.
After chilling, you can gently spoon the yogurt into jars or storage containers.
9. Optional: Make Greek‑style yogurt
If you like thicker, Greek‑style yogurt:
- Line a large mesh strainer with cheesecloth, a clean thin dish towel, or a coffee filter.
- Set over a bowl.
- Pour some or all of the chilled yogurt into the lined strainer.
- Let it drain in the fridge for 2–4 hours, depending on how thick you like it.
You’ll be left with wonderfully thick yogurt in the strainer and liquid whey in the bowl, which you can use in smoothies, baking, or just discard.
10. Flavor before serving
Keep the bulk of your yogurt plain—it stays more versatile and you can use it as a starter for your next Instant Pot dairy recipe. Sweeten portions right before eating:
- Stir in honey, maple syrup, sugar, or fruit.
- Add vanilla or spices like cinnamon or cardamom.
Servings & Timing
- Yield: About 1 gallon of yogurt (roughly 16 cups), or less if you strain for Greek‑style.
- Prep Time: 15 minutes active (pouring, whisking, tempering).
- Heat Time (Boil Cycle): 30–45 minutes.
- Cooling Time: 30–45 minutes.
- Incubation Time: 8–12 hours.
- Chill Time: 4–8 hours.
Total Time: Around 13–18 hours, with only about 15–20 minutes of hands‑on work. It’s mostly “set it and forget it” time, perfect for an overnight project.
Fun Variations For Your Instant Pot Yogurt
Once you’ve mastered the basic Instant Pot yogurt recipe, you can start playing with flavors and styles.
- Vanilla Bean Yogurt – Stir in 2–3 teaspoons pure vanilla extract and 2–4 tablespoons sugar or honey after chilling.
- Fruit‑On‑The‑Bottom Cups – Spoon a tablespoon of cooked fruit compote or jam into jars, then top with plain yogurt for homemade “store style” cups.
- Honey‑Greek Yogurt – Strain the yogurt until thick, then whisk in honey and a tiny pinch of salt for a luxurious, dessert‑like treat.
- Coconut‑Style Yogurt (Dairy Base) – After chilling, stir in a little full‑fat canned coconut milk and vanilla for a rich, tropical twist.
- Savory Yogurt Sauce – Whisk yogurt with lemon, garlic, olive oil, salt, and herbs for a quick sauce for grilled meats and veggies.
- Kid‑Friendly “Pudding” Yogurt – Add mashed banana and a dash of cinnamon; it feels like dessert but it’s still a wholesome snack.
Storage & Make‑Ahead Tips
One of the best reasons to keep this pressure cooker yogurt in your rotation is how beautifully it stores.
-
Refrigerator:
- Store yogurt in glass jars, Mason jars, or food‑safe containers with lids.
- Keeps well for 10–14 days in the fridge.
- For your next batch, save 1/2 cup plain yogurt from this one as your starter; try to use it within 7–10 days for the strongest culture.
-
Freezer:
- You can freeze small amounts of yogurt (2–3 tablespoons each) in ice cube trays as future starter culture.
- Once frozen, transfer cubes to a freezer bag and label. Use within 1–2 months for best performance.
- I don’t recommend freezing yogurt for everyday eating—thawing changes the texture—but it’s perfectly fine for smoothies or baking.
-
Reheating / Thawing:
- If you’ve frozen starter cubes, thaw them gently in the fridge before using, or stir them into a small amount of warm (not hot) milk to loosen up.
- Don’t heat finished yogurt for eating; high heat will kill the live cultures.
-
Make‑Ahead:
- Make a full gallon on the weekend, portion it into small jars, and you’ve got a week of grab‑and‑go breakfasts ready.
- For school mornings, I like to top jars with granola and frozen berries right before serving so everything stays fresh.
Notes From My Kitchen To Yours
- Starter quality really matters. If your store‑bought yogurt is weak or heavily processed, your homemade batch can turn out thinner. When you find a starter that gives you thick, creamy yogurt, stick with it.
- Longer isn’t always better. Yes, more time makes tangier yogurt, but if you go much beyond 12 hours, you can get a sharp flavor that some folks (especially kids) don’t enjoy.
- Don’t panic about the whey. A little clear liquid on top is normal; you can stir it back in or pour it off. If you see a lot of whey and the yogurt is very loose, your incubation temperature was off or your starter was weak. It’s still usually safe to use in smoothies.
- Label your jars. I like to jot down the date and whether it’s strained or regular. It helps when you’re grabbing things quickly in the morning.
- Smell is your friend. Good yogurt smells pleasantly tangy and fresh. If it ever smells sour in a “wrong” way or funky, trust your nose and toss it.
And one tiny, slightly embarrassing confession: it took me a couple of tries to remember to take the inner pot out of the base to cool the milk. Leaving it there makes cooling drag on forever—and since I tend to make yogurt in the evenings when I’m already in my slippers, I appreciate anything that helps me get to bed sooner.
FAQs About Instant Pot Yogurt
1. Do I need a special “Yogurt” button on my Instant Pot?
It helps a lot. The yogurt setting keeps a stable warm temperature for fermentation. If your pot doesn’t have it, you can use the “Keep Warm” function on some models, but you’ll need to monitor with a thermometer to keep it around 110°F.
2. Can I make this Instant Pot yogurt recipe with non‑dairy milk?
Non‑dairy instant pot yogurt is possible, but it usually needs thickeners like agar or tapioca and behaves differently. This specific recipe is designed for dairy milk, especially cow’s milk.
3. Why is my yogurt runny?
Common causes: the milk didn’t heat high enough during the boil step, the milk was too hot when you added the starter, or your starter culture was weak or old. You can still strain it for a thicker texture.
4. Can I use flavored yogurt as my starter?
It’s better not to. Flavored yogurts often contain sweeteners, thickeners, or flavorings that can interfere with fermentation. Always use plain yogurt with live and active cultures.
5. How many times can I reuse my homemade yogurt as starter?
Generally, you can “re‑culture” your yogurt 4–6 times. After that, the cultures can weaken and your yogurt may become thinner, so it’s smart to occasionally refresh with a new store‑bought starter.
6. Is Instant Pot yogurt safe for kids?
Yes, as long as it’s handled like any dairy product and stored properly. You can keep it mild by incubating for fewer hours and sweetening individual portions lightly with fruit or honey (for kids over one year old).
7. Can I halve the recipe?
Absolutely. Use half a gallon of milk and 1–2 tablespoons starter culture. The process and times stay the same.
8. Can I sweeten the milk before incubating?
Better to wait. Adding sugar or honey before fermentation can sometimes affect the culture’s activity. Sweeten after the yogurt is fully set and chilled.
Wrapping It Up (And Grabbing a Spoon)
This Instant Pot Yogurt Recipe is one of those quiet little kitchen routines that pays you back all week—thick, creamy homemade yogurt, customizable, budget‑friendly, and honestly very comforting to have on hand. Once you make it a couple of times, it stops feeling like a “project” and starts feeling like second nature.
Try a batch this week, then come back and tell me how it went—Did you go Greek‑style? Vanilla? Fruit‑on‑the‑bottom? And if you’re ready for more Instant Pot breakfast recipes or easy yogurt recipes, you might enjoy branching out into overnight oats, smoothie bowls, or yogurt‑based parfaits next.
Instant Pot Yogurt (Thick, Creamy, Foolproof)
Ingredients
- 1 gallon milk whole milk for creamiest yogurt; 2% or skim also work; pasteurized or ultra-pasteurized
- 2 tablespoons plain yogurt with live active cultures unsweetened; Greek or regular; used as starter culture
- 1 tablespoon plain yogurt with live active cultures optional; use a 3rd tablespoon for extra culture strength if desired
- 1/4 cup nonfat dry milk powder optional; whisk into warm milk before incubating for thicker yogurt
- 1 tablespoon honey, maple syrup, or sugar optional; add after incubation, adjust up to 3 tablespoons to taste
- 1 teaspoon pure vanilla extract optional; add after incubation, adjust up to 2 teaspoons to taste
- fine salt optional; just a pinch after incubation to gently deepen flavor
Instructions
- Make sure the Instant Pot inner pot is clean and completely dry. If you’ve recently cooked strong flavors like chili, remove the sealing ring or use a separate “sweet” ring for dairy to avoid off-odors.
- Pour the gallon of milk into the inner pot and close the lid (vent position does not matter for the yogurt function). Press Yogurt, then Adjust or Mode until the display shows “Boil” or “More,” depending on your model. The Instant Pot will heat the milk to about 180–185°F (82–85°C) to denature the proteins for thicker yogurt. This usually takes 30–45 minutes and the pot will beep when it’s done.1 gallon milk
- Open the lid carefully and whisk the hot milk to even out the temperature and prevent a skin from forming. Use an instant-read thermometer to confirm the milk has reached at least 180°F (82°C). If it has not, turn on Sauté on low and heat gently, whisking constantly, until it does. Turn off Sauté once the temperature is reached.1 gallon milk
- Remove the inner pot from the Instant Pot base to speed cooling. Let the pot sit on the counter for 30–45 minutes, or place it in a sink with a few inches of cool water around the outside, whisking occasionally. Cool the milk to 110–115°F (43–46°C), warm but not hot. If you don’t have a thermometer, the sides of the pot should feel warm but comfortable to hold.1 gallon milk
- If using nonfat dry milk powder for thicker yogurt, whisk 1/4 cup into the warm (110–115°F) milk until completely dissolved and smooth.1 gallon milk, 1/4 cup nonfat dry milk powder
- In a small bowl, add 2–3 tablespoons of plain yogurt with live active cultures. Ladle in about 1 cup of the warm (not hot) milk and whisk until completely smooth. This gently warms and loosens the starter so it distributes evenly.2 tablespoons plain yogurt with live active cultures, 1 tablespoon plain yogurt with live active cultures, 1 gallon milk
- Pour the tempered yogurt mixture back into the inner pot of warm milk. Whisk gently but thoroughly so the cultures are evenly distributed without creating too much foam.1 gallon milk, 2 tablespoons plain yogurt with live active cultures, 1 tablespoon plain yogurt with live active cultures
- Return the inner pot to the Instant Pot base and close the lid. Press Yogurt again and set the incubation time for 8–12 hours at around 110°F. Choose 8 hours for mild, creamy yogurt, 10 hours for medium tang, or 12 hours for tangy and thicker yogurt. Avoid moving or jostling the pot during incubation. The Instant Pot will beep and display “Yogt” or “End” when the cycle is finished.
- Open the lid gently and look at the surface. The yogurt should appear set and slightly jiggly, similar to a soft custard. A small amount of clear liquid whey on top is normal. For the smoothest texture, do not stir at this stage, as stirring will release more whey.
- Cover the inner pot with a lid or plastic wrap and refrigerate the yogurt for at least 4 hours, preferably overnight. This chilling time helps the yogurt thicken further and allows the flavor to mellow. After chilling, gently spoon the yogurt into jars or storage containers.
- For thicker, Greek-style yogurt, line a large mesh strainer with cheesecloth, a clean thin dish towel, or coffee filters and set it over a bowl. Pour some or all of the chilled yogurt into the lined strainer. Refrigerate and let drain for 2–4 hours, depending on desired thickness. Transfer the thickened yogurt to containers and reserve or discard the liquid whey as desired.
- Keep the bulk of the yogurt plain for versatility and to use as starter for future batches. Sweeten individual portions right before serving by stirring in honey, maple syrup, or sugar, plus vanilla extract and a tiny pinch of salt if desired. You can also add fruit, jam, or spices like cinnamon or cardamom.1 tablespoon honey, maple syrup, or sugar, 1 teaspoon pure vanilla extract, fine salt
- Transfer the finished yogurt to jars or airtight containers and refrigerate for 10–14 days. Save about 1/2 cup plain yogurt from this batch (within 7–10 days) to use as the starter for your next Instant Pot yogurt.