Would you like to save this?
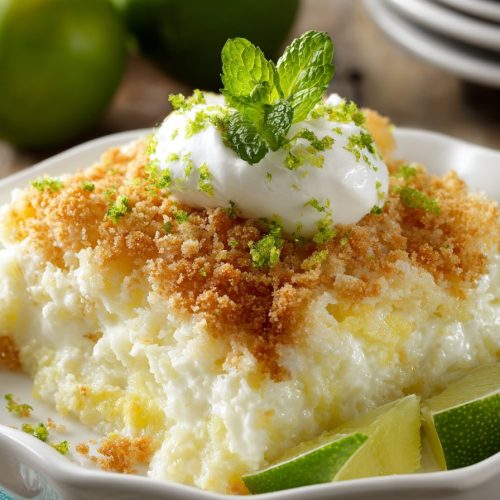
Key Lime Dump Cake Recipe
This Key Lime Dump Cake Recipe is a bright, tangy, tropical, one-pan dessert that tastes like a trip to Florida in flip-flops—without asking you to fuss with layers, frosting, or fancy tools.
What Makes This Key Lime Dump Cake So Special?
If you’ve never made a dump cake before, think of it as the laid-back cousin of a cobbler and a sheet cake. You “dump” your ingredients into a baking dish, sprinkle on cake mix, add butter, and let the oven do the magic. No mixer, no creaming butter and sugar, and no decorating.
This version leans into sunny, citrus flavors. It has that classic key lime dessert tang, a buttery cake topping, and a little tropical flair from coconut and graham cracker crumbs. It’s a fantastic summer Cake Recipe for potlucks, pool parties, church socials, or “it’s Tuesday and I need something sweet” nights.
As a 50-year-old mom and long-time home baker, I love recipes like this that I can pull together in 10 minutes while the grill is going or the grandkids are running laps in the backyard. I tested this key lime dump cake three different ways—using lemon cake mix, yellow cake mix, and white cake mix; trust me, you’re getting the best version right here.
It’s not exactly health food (we’re using butter and cake mix), but it is a one-pan dessert that can be lightened a bit with a few small tweaks. And because the flavor is so bright and citrusy, it never feels heavy. It’s the kind of easy dump cake that disappears from the dessert table long before the chocolate stuff.
Why You’ll Love This Key Lime Dump Cake Recipe
- Ridiculously easy: No mixer, no fancy skills—just layer, sprinkle, bake.
- One pan, less mess: Everything bakes in a single 9×13 pan for quick cleanup.
- Big key lime flavor: Tangy, citrusy, and refreshing—perfect for a warm day.
- Crowd-pleaser: Feels special like a key lime dessert from a bakery but is simple enough for a weeknight.
- Flexible ingredients: Works with canned key lime pie filling, lime pie filling, or even lemon-lime blends.
- Customizable: Easy to make a tropical dump cake with coconut, pineapple, or even a graham cracker crumble.
- Great make-ahead dessert: Tastes even better after it chills and the flavors settle.
- Perfect for summer gatherings: Travels well, slices cleanly, and can be served cold, room temp, or slightly warm.
Ingredients for the Key Lime Dump Cake Recipe
Here’s what you’ll need to make this bright and simple cake recipe. I’ll include a few suggestions and swaps as we go.
- 2 cans (21 oz each) key lime pie filling
- You can also use regular lime pie filling or even lemon-lime pie filling. If you can’t find key lime pie filling, mix 1 can lemon pie filling with 1 can lime pie filling.
- 1 box (15.25 oz) yellow cake mix
- White cake mix works too and gives a slightly lighter flavor. Lemon cake mix will make this extra citrusy.
- 1/2 cup (1 stick) unsalted butter, very thinly sliced
- Cold butter slices melt more evenly over the cake mix. You can also use salted butter; just reduce any added salt elsewhere.
- 1/2 cup sweetened shredded coconut (optional but highly recommended)
- Adds a tropical dessert vibe. Toast it lightly in a dry skillet first if you want extra flavor and texture.
- 1/2 cup graham cracker crumbs
- Brings that classic key lime pie crust note into this lime cake recipe.
- Zest of 2 limes
- Fresh zest makes a big difference; it wakes up the canned filling.
- 2 tablespoons fresh key lime or regular lime juice
- Stirred into the pie filling for extra tang. Bottled key lime juice (like Nellie & Joe’s) works really well.
- 1/4 teaspoon salt
- Just a pinch to balance the sweetness.
- 1 cup frozen whipped topping or lightly sweetened whipped cream, for serving (optional)
- A dollop on top makes it feel like a complete key lime dessert, especially if you chill the cake first.
- Extra lime slices or zest, for garnish (optional)
If you’re someone who likes to keep pantry staples ready, this is a smart recipe to remember. Cake mix, canned pie filling, and butter are easy to stock, which means you’re never far from a quick one-pan dessert.

Step-by-Step Directions for Your Key Lime Dump Cake
1. Preheat and prepare your pan
Preheat your oven to 350°F (175°C). Lightly grease a 9×13-inch baking dish with butter or nonstick spray. A glass or ceramic pan works best, but a metal pan is fine—just keep an eye on the edges so they don’t brown too fast.
2. Stir some brightness into the filling
In a medium bowl, add your key lime pie filling. Stir in the lime zest, fresh lime juice, and salt. This little step makes a big difference—the fresh zest and juice help the canned filling taste fresher and more “homemade.”
3. Spread the filling
Pour the lime mixture into the prepared baking dish and spread it into an even layer with a spatula. Make sure it goes all the way to the corners; this ensures every serving has lots of citrus filling.
4. Sprinkle graham cracker crumbs
Sprinkle the graham cracker crumbs evenly over the filling. Don’t worry if it doesn’t look perfect. As it bakes, the crumbs soak up some of the lime filling and give you that key lime pie vibe in a simple cake recipe format.
5. Add the coconut (if using)
Sprinkle the shredded coconut over the graham cracker layer. If you toasted it first, it’ll smell amazing already. This step turns your dessert into a tropical dump cake that feels beachy and fun.
6. Add the dry cake mix
Open the box of yellow cake mix and sprinkle the dry mix evenly over the top. Try to cover the whole surface, gently smoothing it with your hand or a spoon. Don’t stir it into the filling—resist that urge. The moisture from the filling and the butter will hydrate the cake mix as it bakes.
7. Top with sliced butter
Lay the thin slices of butter all over the cake mix layer, overlapping just a bit so most of the surface is covered. You want butter in as many spots as possible; that’s what gives you those golden, crisp, cake-like bites on top. If you have a few dry patches after baking, I’ll explain how to fix them in the Notes.
8. Bake until golden and bubbly
Bake the cake for 35–45 minutes, or until the top is golden brown and the edges are bubbly. Every oven is a little different—my gas oven usually finishes this around 40 minutes. The center should look set, not soupy, though it will still jiggle a little from the filling.
9. Rest before serving
Let the cake rest on a cooling rack for at least 15–20 minutes before cutting. It will be quite loose when hot, then thicken as it sets. For cleaner slices and a more “bar-like” texture, chill it for a couple of hours in the fridge.
10. Serve and garnish
Serve warm, room temperature, or chilled with a spoonful of whipped topping or whipped cream. Add a pinch of extra lime zest and a thin lime slice on each piece if you’re feeling fancy.
Servings & Timing
- Yield: About 12 servings
- Prep Time: 10 minutes
- Bake Time: 35–45 minutes
- Rest/Chill Time: 15–120 minutes (15 minutes for scooping, up to 2 hours if you want neatly sliced pieces)
- Total Time: About 1 hour (or a little longer if you chill it before serving)
Honestly, this is the kind of summer cake recipe you can slide into the oven while you eat dinner, then serve warm for dessert.
Fun Variations on This Key Lime Dump Cake Recipe
You know what? Once you’ve made it once, you’ll probably start thinking of your own twists. Here are a few ideas to get you started:
- Pineapple Key Lime Dump Cake: Add 1 cup well-drained crushed pineapple on top of the pie filling before the graham crumbs for extra tropical flavor.
- Coconut Cream Key Lime Dessert: Swap half the lime pie filling with coconut cream pie filling and keep the shredded coconut on top.
- Lightened-Up Version: Use sugar-free cake mix and low-sugar pie filling, and reduce the butter to 6 tablespoons; the texture is a bit softer but still tasty.
- Berry-Lime Cake: Scatter 1 cup fresh blueberries or raspberries over the filling to make a bright citrus dessert recipe with a little color.
- Gluten-Free Key Lime Dump Cake: Use your favorite gluten-free yellow cake mix and gluten-free graham crackers.
- Extra-Crunch Top: Add 1/2 cup chopped macadamia nuts or pecans on top of the cake mix before baking.
Storage & Reheating Tips
-
Fridge:
Store leftover key lime dump cake covered in the refrigerator for 3–4 days. I like using a glass container with a tight lid so it doesn’t pick up fridge smells. -
Freezer:
You can freeze slices for up to 2 months. Wrap each slice in plastic, then place them in a freezer bag. Label it so you don’t forget what it is—that’s a very “ask me how I know” tip. -
Thawing & Reheating:
Thaw in the fridge overnight. Eat cold or warm gently in the microwave for 15–20 seconds per slice. The filling heats fast, so don’t overdo it or it can get soupy. -
Make-Ahead:
This key lime dessert can be baked one day ahead. Chill it, then bring it out about 20–30 minutes before serving, or serve it straight from the fridge like a denser, spoonable key lime pie.
Notes from My Kitchen Tests
-
About those dry cake mix spots:
If you pull the cake out and see a few dry patches of cake mix, you can gently press them down with the back of a spoon and drizzle a tablespoon or two of melted butter over the top. Pop it back in the oven for 5–8 minutes. -
Sweeter vs. tangier:
If your crew likes very tangy key lime baking, add an extra tablespoon of lime juice and a bit more zest. If they like sweeter desserts, leave it as-is and serve with sweet whipped cream. -
Cake mix choice:
Yellow cake mix gives a nice buttery, classic flavor. White cake mix is a little lighter and lets the lime shine more. Lemon cake mix gives a stronger citrus dessert recipe feel that’s bright and bold. -
Serving temperature:
Warm is cozy and gooey, but chilled is my personal favorite for this recipe—it tastes more like a tropical dump cake meets key lime pie bars. Try it both ways and see what you like. -
Pan choice matters a little:
In my glass pan, the center stays a bit softer (which I love). In a metal pan, the edges get crispier. Neither is wrong—just different textures.
FAQs About This Key Lime Dump Cake Recipe
1. Can I use regular limes instead of key limes?
Yes. Regular Persian limes work just fine for the zest and juice; key limes are a bit more floral and tart, but both taste great in this lime cake recipe.
2. I can’t find key lime pie filling—what should I use?
Use lemon pie filling mixed with a few tablespoons of lime juice and zest, or mix one can lemon pie filling with one can lime pie filling for a similar flavor.
3. Do I mix the cake mix with eggs and water like a normal cake?
No. For this easy dump cake, you use the dry cake mix straight from the box and layer it on top of the filling, then add butter over it.
4. Can I make this dairy-free?
You can use dairy-free margarine or plant-based butter and check that your cake mix and pie filling are dairy-free; the texture will be slightly different but still delicious.
5. How do I know when the cake is done?
The top should be golden brown and crisp in spots, and the edges should be bubbly. The center will look set but still a little jiggly from the filling.
6. Can I serve this key lime dump cake cold?
Absolutely. Chilling it makes it firmer and easier to slice, and the flavors mellow in a really nice way—almost like a key lime dessert bar.
7. Is this recipe good for a potluck or picnic?
Yes. It travels well in the same pan it’s baked in, and it tastes good at room temperature. Just keep it out of direct sun and refrigerate leftovers.
8. Can I double the recipe?
You can make two separate 9×13 pans, which is the easiest method. If you use a bigger pan, you’ll need to watch the bake time closely so the center cooks through.
Conclusion: A Bright, Easy Key Lime Dessert You’ll Make Again and Again
This Key Lime Dump Cake Recipe gives you all the tart, creamy, sunny flavor of classic key lime dessert with almost no effort—just simple pantry ingredients, one pan, and a little zest. It’s an easy dump cake that works for summer parties, casual dinners, or anytime you’re craving something citrusy and comforting.
If you try this tropical dump cake, let me know how it turned out for you—did you add coconut, pineapple, or keep it classic? Leave a comment, share your tweaks, and then explore more citrus dessert recipes and simple cake recipes the next time you’re in the mood to bake something sweet without spending all day in the kitchen.
Key Lime Dump Cake
Ingredients
- 2 cans (21 oz each) key lime pie filling or regular lime pie filling, or 1 can lemon pie filling + 1 can lime pie filling
- 1 box (15.25 oz) yellow cake mix white or lemon cake mix can be substituted
- 1/2 cup unsalted butter 1 stick, very thinly sliced; salted butter can be used if you reduce added salt
- 1/2 cup sweetened shredded coconut optional but recommended; toast lightly first for extra flavor
- 1/2 cup graham cracker crumbs for classic key lime pie crust flavor
- 2 limes zest only (zest of 2 limes)
- 2 tablespoons fresh key lime or regular lime juice bottled key lime juice such as Nellie & Joe’s also works
- 1/4 teaspoon salt to balance sweetness
- 1 cup whipped topping or lightly sweetened whipped cream optional, for serving
- extra lime slices or additional lime zest optional, for garnish
Instructions
- Preheat your oven to 350°F (175°C). Lightly grease a 9x13-inch baking dish with butter or nonstick spray. Glass or ceramic works best, but metal is fine—just watch the edges so they don’t brown too quickly.
- In a medium bowl, add the key lime pie filling. Stir in the lime zest, fresh lime juice, and salt until evenly combined. This refreshes and brightens the canned filling.
- Pour the lime filling mixture into the prepared baking dish and spread into an even layer, making sure it reaches all the way to the corners.
- Sprinkle the graham cracker crumbs evenly over the lime filling layer. They will absorb some of the filling and add key lime pie–style flavor.
- If using, sprinkle the sweetened shredded coconut evenly over the graham cracker crumbs. Toasted coconut will add extra flavor and texture.
- Open the box of yellow cake mix and sprinkle the dry mix evenly over the top of the coconut or graham layer. Gently smooth it into an even layer with your hand or a spoon, but do not stir it into the filling.
- Arrange the thin slices of butter over the surface of the dry cake mix, overlapping slightly so most of the top is covered. The butter will melt and moisten the cake mix as it bakes.
- Bake for 35–45 minutes, or until the top is golden brown and crisp in spots and the edges are bubbly. The center should look set but still have a gentle jiggle from the filling.
- Transfer the pan to a cooling rack and let the cake rest for at least 15–20 minutes before serving. It will thicken as it cools. For cleaner, bar-like slices, chill in the refrigerator for 1–2 hours.
- Serve warm, at room temperature, or chilled with a spoonful of whipped topping or whipped cream. Garnish with extra lime zest or thin lime slices if desired.