Would you like to save this?
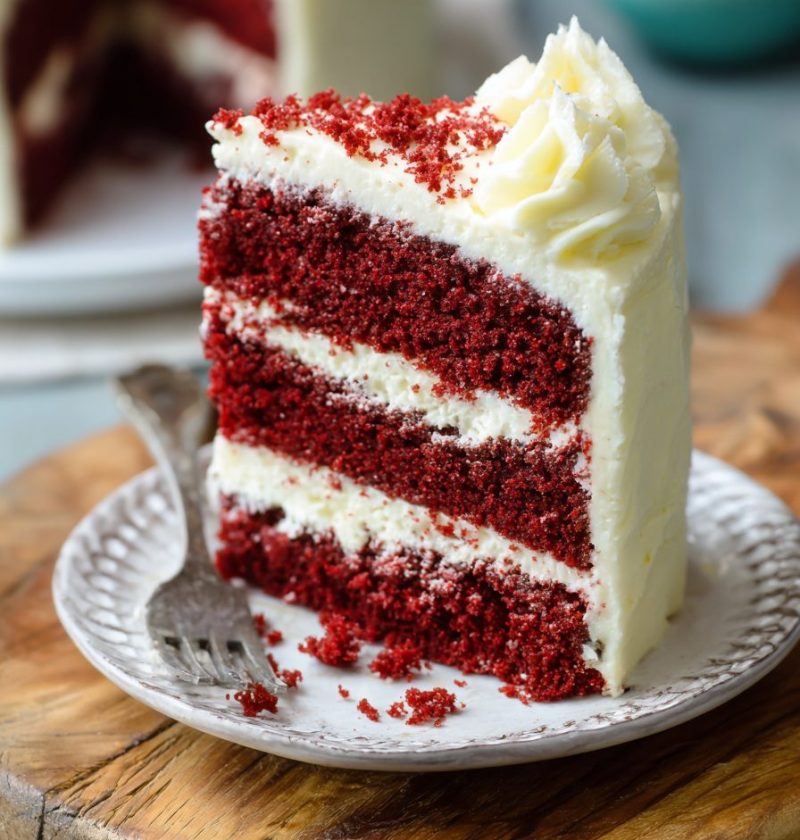
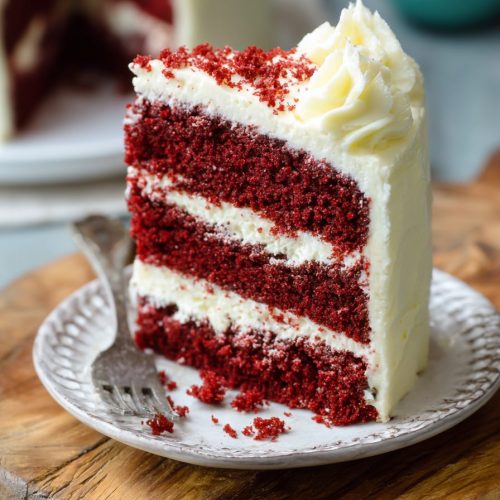
Red Velvet Cake Recipe
If you’ve been craving a bakery-style Red Velvet Cake Recipe that’s moist, tender, and crowned with tangy cream cheese frosting, this is the one you’ll want to keep forever.
Meet Your New Favorite Red Velvet Cake
Red velvet cake is one of those classic American desserts that never really goes out of style. It’s that festive dessert recipe you see at Christmas, Valentine’s Day, birthdays, baby showers—any time people want something a little special and a little dramatic.
This Red Velvet Cake Recipe gives you a soft, moist red velvet cake with a hint of cocoa, a gentle tang from buttermilk, and that signature cream cheese frosting that makes everyone go back for “just one more thin slice.”
I’ve been baking red velvet cake since the late 90s, back when I first tore this idea out of a magazine and scribbled notes all over it. Over the years, I tweaked the cocoa, switched to buttermilk, tested oil vs. butter, and fussed with the baking temperature. This version is the one my grown kids still request for their birthdays. It slices beautifully, looks like it came from a bakery, and doesn’t dry out on day two.
Is it healthy? Let’s be honest—this is a treat. But there are smart choices here: using buttermilk and oil keeps the crumb tender without heavy, dense texture; a little cocoa powder adds depth, and the cream cheese frosting is rich enough that a thin layer goes a long way.
Whether you’re baking a holiday Cake Recipe for Christmas, a classic red velvet cake for a wedding shower, or a simple homemade red velvet cake for Sunday dinner, this one is reliable, festive, and surprisingly simple once you get going.
Why You’ll Love This Red Velvet Cake Recipe
- Moist, tender crumb that stays soft for days—no dry, crumbly cake here.
- Classic bakery-style red velvet cake flavor with just the right hint of cocoa.
- Cream cheese frosting that’s thick, tangy, and spreads like a dream.
- Uses basic pantry ingredients plus buttermilk—nothing fussy or hard to find.
- Perfect for layering: makes an impressive layered red velvet cake for parties.
- Great make-ahead dessert; cake layers freeze well and frost beautifully later.
- Ideal festive dessert recipe for holidays, birthdays, and special occasions.
- Easy to double for a big crowd or bake as cupcakes instead of a full cake.
- Clear, step-by-step directions that are friendly for beginners.
Ingredients for the Best Classic Red Velvet Cake
Here’s everything you’ll need to make this moist red velvet cake and the cream cheese frosting. I’ll walk you through a few helpful notes as we go.
For the Red Velvet Cake
- 2 ½ cups (300 g) all-purpose flour
- Spoon and level the flour; don’t pack it down or your cake can turn dense.
- 2 tablespoons unsweetened natural cocoa powder
- Classic red velvet uses just a little cocoa powder, not as much as a full chocolate cake.
- 1 teaspoon baking soda
- 1 teaspoon fine sea salt (or table salt)
- 1 ½ cups (300 g) granulated sugar
- ½ cup (115 g) unsalted butter, softened to room temperature
- ½ cup (120 ml) neutral oil (canola or vegetable)
- The mix of butter and oil gives great flavor plus a moist crumb.
- 2 large eggs, room temperature
- 2 teaspoons pure vanilla extract
- 1 cup (240 ml) buttermilk, room temperature
- Real buttermilk is key for that classic buttermilk cake recipe flavor and tenderness.
- No buttermilk? Mix 1 tablespoon white vinegar or lemon juice with milk, let sit 5–10 minutes.
- 1 tablespoon white vinegar
- 1–1 ½ tablespoons red food coloring (liquid or gel)
- Gel color gives stronger color with less liquid; start with less and add more as needed.
For the Cream Cheese Frosting
- 16 oz (450 g) cream cheese, brick-style, softened
- Use full-fat brick cream cheese, not the whipped tub kind, for a sturdy frosting.
- ½ cup (115 g) unsalted butter, softened
- 4–5 cups (480–600 g) powdered sugar, sifted
- Use more for a thicker, pipeable frosting; less for a softer, spreadable one.
- 2 teaspoons pure vanilla extract
- Pinch of salt (about 1/8 teaspoon)
- Just a bit balances the sweetness and brings out the tang.

Step-by-Step Directions for This Red Velvet Cake Recipe
1. Prep the pans and oven
- Preheat your oven to 350°F (175°C).
- Grease two 9-inch round cake pans, then line the bottoms with parchment paper.
- Lightly grease and flour the parchment and sides, or use baking spray with flour.
- This extra step makes the cake layers release cleanly—especially important with a soft, moist red velvet cake.
2. Whisk the dry ingredients
- In a medium bowl, whisk together the flour, cocoa powder, baking soda, and salt.
- Set aside. You want all the dry ingredients evenly mixed so you don’t get pockets of cocoa or soda.
3. Cream the butter, oil, and sugar
- In a large mixing bowl (or stand mixer with the paddle attachment), beat the softened butter and sugar on medium speed for 3–4 minutes, until light and fluffy.
- Add the oil and beat another 1–2 minutes.
- The mixture should look creamy and a little lighter in color; this step builds structure and helps the cake rise nicely.
4. Add eggs and vanilla
- Add the eggs one at a time, mixing on low–medium speed just until incorporated after each egg.
- Mix in the vanilla extract.
- Scrape down the bowl so nothing heavy settles at the bottom; a flexible spatula is your best friend here.
5. Add the color and tang
- In a small bowl or measuring cup, stir together the buttermilk, vinegar, and red food coloring.
- Start with 1 tablespoon of color; you can always add a bit more if you want a deeper red.
- With the mixer on low speed, alternate adding the dry ingredients and the buttermilk mixture:
- Add ⅓ of the dry ingredients, then ½ of the buttermilk mixture.
- Repeat, ending with the last ⅓ of the dry ingredients.
- Mix just until the batter is smooth and no flour streaks remain.
- Don’t overmix—once the flour is in, too much mixing can make the crumb tough.
6. Bake the cake layers
- Divide the batter evenly between the two prepared pans.
- If you want to be precise, you can weigh the pans; it helps your layers bake at the same rate.
- Gently tap each pan on the counter a few times to pop any large air bubbles.
- Bake for 25–30 minutes, or until the centers spring back lightly when touched and a toothpick comes out with just a few moist crumbs.
- Every oven runs a little different; start checking around 23 minutes.
7. Cool completely
- Place the pans on a wire rack and let the cakes cool in the pans for 10–15 minutes.
- Run a knife gently around the edges, then turn the cakes out onto the rack. Peel off the parchment.
- Let the cake layers cool completely before frosting—this takes about 45–60 minutes.
- If you frost while they’re even a little warm, the cream cheese frosting will melt and slide.
8. Make the cream cheese frosting
- In a large bowl, beat the cream cheese and butter together on medium speed until smooth and creamy, about 2–3 minutes.
- Add vanilla and salt; mix to combine.
- Gradually add powdered sugar, 1 cup at a time, starting on low so you don’t cover the kitchen in sugar clouds.
- Beat until smooth and fluffy, 2–3 more minutes.
- If the frosting seems too soft, add a bit more sugar and chill in the fridge for 15–20 minutes.
9. Assemble your layered red velvet cake
- If your cake layers are domed, use a long serrated knife or cake leveler to trim them flat. Save the scraps for crumbling on top.
- Place one cake layer on a serving plate or cake stand. Spread a generous layer of cream cheese frosting over the top.
- Set the second cake layer on top, bottom side up (this gives a flatter, neater top).
- Apply a thin “crumb coat” of frosting over the top and sides of the cake. Chill for 15–20 minutes to set.
- Finish with a thicker, even layer of frosting, swirling the top if you like.
- Crumble some trimmed cake scraps and sprinkle around the top edge or over the sides for that classic bakery-style red velvet cake look.
You know what? At this point, it’s very hard not to cut a slice immediately—but a brief chill helps the cake slice more cleanly.
Servings & Timing
- Yield: 12–14 slices
- Prep Time: About 25–30 minutes
- Baking Time: 25–30 minutes
- Cooling & Chilling Time: 1–1 ½ hours
- Total Time: About 2–2 ½ hours (mostly inactive while the cake cools)
Easy Variations on This Red Velvet Cake Recipe
- Red Velvet Cupcakes: Bake the batter in lined muffin tins at 350°F for 18–22 minutes for classic red velvet cupcakes.
- Four-Layer Showstopper: Slice each 9-inch cake in half horizontally and stack four layers with thinner frosting between each.
- Chocolate Chip Red Velvet: Fold 1 cup mini chocolate chips into the batter for extra chocolate pops in every bite.
- Lighter Frosting: Use half cream cheese and half whipped cream (stabilized) for a lighter, fluffier topping.
- Valentine’s Heart Cake: Bake in a heart-shaped pan or cut a heart from a sheet cake and frost for a sweet Valentine dessert.
- Gluten-Free Version: Use a good 1:1 gluten-free baking flour blend; the crumb will be slightly different but still delicious.
Storage, Freezing, and Make-Ahead Tips
Red velvet cake holds up nicely, which makes it a great make-ahead holiday cake recipe.
- Room temperature: Because of the cream cheese frosting, I don’t leave this out for more than 2 hours.
- Refrigerator: Cover the frosted cake and store in the fridge for up to 4 days. Let slices sit at room temp 20–30 minutes before serving so the cake softens and the frosting tastes creamier.
- Freezing cake layers: Wrap unfrosted, cooled cake layers tightly in plastic wrap, then foil, and freeze for up to 2 months. Thaw overnight in the fridge, still wrapped, before frosting.
- Freezing frosted cake: Freeze slices on a baking sheet until firm, then wrap individually; thaw in the fridge, then bring to room temp.
- Make-ahead plan:
- Day 1: Bake and cool cake layers; wrap and chill or freeze.
- Day 2: Make cream cheese frosting and assemble the cake.
Honestly, serving this cake slightly chilled with the frosting just starting to soften is my favorite.
Notes from My Kitchen (What I Learned Testing This Cake)
- Buttermilk matters: Using real buttermilk (not just milk) gives that soft, velvety crumb and a gentle tang. When I tried all-milk versions, the cake always felt a little flatter in flavor.
- Go easy on the cocoa: Red velvet is not a chocolate cake; too much cocoa turns the cake brownish and heavy instead of bright and tender. Two tablespoons is that sweet spot for a true classic red velvet cake.
- Color is personal: Some people like a deep, dark red; others prefer a softer blush. Start with less food coloring and build up—especially if you’re using gel.
- Don’t skip the crumb coat: That thin first layer of frosting locks in crumbs so your final layer looks neat and bakery-style. It’s a tiny extra step that makes a big difference, especially with a red cake and white frosting.
- Room temperature ingredients: Eggs, buttermilk, butter, and cream cheese all mix more smoothly at room temp, which gives a more even, tender cake and a silky frosting.
- Use the right pans: Metal pans (light-colored) give more even baking than glass for this cake. When I tested glass, the edges browned faster while the centers lagged behind.
Frequently Asked Questions About Red Velvet Cake
1. What flavor is red velvet cake supposed to be?
Red velvet cake has a mild cocoa flavor, a subtle tang from buttermilk and vinegar, and a buttery richness—it’s not a full-on chocolate cake, more of a soft, slightly chocolatey buttermilk cake.
2. Can I make this Red Velvet Cake Recipe without buttermilk?
You can use a homemade substitute by mixing 1 tablespoon vinegar or lemon juice with milk, but real buttermilk gives the most authentic texture and flavor.
3. Why do you add vinegar to red velvet cake?
The vinegar reacts with baking soda and cocoa, which helps the cake rise and stay tender, and it adds a tiny bit of tang that balances the sweetness.
4. Can I use Dutch-process cocoa powder instead of natural cocoa?
I don’t recommend it here; Dutch-process cocoa can dull the red color and change how the cake rises, so stick with natural cocoa powder for this classic recipe.
5. My cake turned out brownish instead of red—what happened?
Usually this means either too much cocoa powder, not enough food coloring, or sometimes using Dutch-process cocoa; the cake will still taste good, just less vibrant.
6. How do I keep my cream cheese frosting from being runny?
Use brick-style cream cheese, make sure it’s not overly warm, add powdered sugar gradually, and chill the frosting briefly if it feels too soft before frosting the cake.
7. Can I bake this as a sheet cake instead of layers?
Yes, pour the batter into a greased 9×13-inch pan and bake about 30–35 minutes, then frost the top once cool for an easy sheet pan red velvet cake.
8. Is this Red Velvet Cake Recipe good for decorating?
Absolutely; the cake has enough structure to hold layers, and the frosting can be made thicker by adding a little extra powdered sugar so it pipes nicely for borders and swirls.
Final Thoughts (and a Little Nudge to Bake)
This Red Velvet Cake Recipe gives you everything you want in a classic red velvet cake: a moist, velvety crumb, a gorgeous red color, and plenty of tangy cream cheese frosting that tastes like it came from a bakery—without leaving your kitchen.
If you bake it, I’d love to hear how it turned out for you—did you serve it for a birthday, a holiday, or just a cozy Sunday at home? Leave a comment with your tweaks, questions, or favorite way to decorate it. And if you enjoyed this, you might like trying a simple cocoa powder cake or another buttermilk cake recipe next time you’re in the mood to bake.
Red Velvet Cake
Ingredients
- 2 1/2 cups all-purpose flour 300 g; spoon and level, do not pack
- 2 tablespoons unsweetened natural cocoa powder
- 1 teaspoon baking soda
- 1 teaspoon fine sea salt or table salt
- 1 1/2 cups granulated sugar 300 g
- 1/2 cup unsalted butter 115 g; softened to room temperature
- 1/2 cup neutral oil 120 ml; such as canola or vegetable
- 2 large eggs room temperature
- 2 teaspoons pure vanilla extract
- 1 cup buttermilk 240 ml; room temperature; real buttermilk preferred
- 1 tablespoon white vinegar
- 1-1 1/2 tablespoons red food coloring liquid or gel; use gel for stronger color
- 16 oz cream cheese 450 g; full-fat brick style, softened
- 1/2 cup unsalted butter 115 g; softened, for frosting
- 4-5 cups powdered sugar 480–600 g; sifted; more for thicker, pipeable frosting
- 2 teaspoons pure vanilla extract for frosting
- 1/8 teaspoon salt pinch; to balance frosting sweetness
Instructions
- Preheat oven to 350°F (175°C). Grease two 9-inch round metal cake pans, line the bottoms with parchment paper, then lightly grease and flour the parchment and sides (or use baking spray with flour).
- In a medium bowl, whisk together the flour, cocoa powder, baking soda, and salt until evenly combined. Set aside.
- In a large mixing bowl or stand mixer fitted with the paddle attachment, beat the softened butter and granulated sugar on medium speed for 3–4 minutes, until light and fluffy. Add the oil and beat another 1–2 minutes until creamy and slightly lighter in color.
- Beat in the eggs one at a time on low–medium speed, mixing just until incorporated after each addition. Mix in the vanilla extract, scraping down the sides and bottom of the bowl as needed.
- In a small bowl or measuring cup, stir together the buttermilk, white vinegar, and red food coloring. Start with 1 tablespoon of color and add more as needed for your desired shade of red.
- With the mixer on low speed, alternate adding the dry ingredients and the buttermilk mixture: add about 1/3 of the dry ingredients, then 1/2 of the buttermilk mixture; repeat, ending with the remaining dry ingredients. Mix just until the batter is smooth and no streaks of flour remain; do not overmix.
- Divide the batter evenly between the prepared pans (weigh the pans if you want perfectly even layers). Gently tap each pan on the counter a few times to release large air bubbles. Bake for 25–30 minutes, or until the centers spring back lightly when touched and a toothpick inserted in the center comes out with just a few moist crumbs. Begin checking around 23 minutes.
- Place the pans on a wire rack and let the cakes cool in the pans for 10–15 minutes. Run a knife gently around the edges, then turn the cakes out onto the rack and peel off the parchment. Let the layers cool completely, about 45–60 minutes, before frosting.
- In a large bowl, beat the softened cream cheese and softened butter together on medium speed until smooth and creamy, 2–3 minutes. Add the vanilla and salt and mix to combine. Gradually add the powdered sugar, 1 cup at a time, starting on low speed to avoid splatters, then increasing speed once mostly incorporated. Beat until smooth and fluffy, 2–3 more minutes. If the frosting is too soft, add a bit more powdered sugar and chill for 15–20 minutes.
- If the cake layers are domed, use a long serrated knife or cake leveler to trim them flat, reserving the scraps for garnish. Place one layer on a serving plate or cake stand and spread a generous layer of cream cheese frosting over the top. Set the second layer on top, bottom side up for a flatter top. Apply a thin crumb coat of frosting over the top and sides of the cake and chill for 15–20 minutes to set.
- Apply a thicker, even final layer of cream cheese frosting over the top and sides of the cake, swirling the top if desired. Crumble some of the reserved cake scraps and sprinkle around the top edge or over the sides for a classic red velvet look. Chill briefly if you’d like cleaner slices before serving.
Notes
Variations: Bake as cupcakes at 350°F for 18–22 minutes; bake as a 9×13-inch sheet cake for about 30–35 minutes; slice each 9-inch layer in half for a four-layer cake; fold 1 cup mini chocolate chips into the batter for extra chocolate; use stabilized whipped cream for a lighter frosting; or bake in a heart-shaped pan for Valentine’s Day.
Storage: Because of the cream cheese frosting, do not leave the cake at room temperature for more than 2 hours. Refrigerate the frosted cake, covered, for up to 4 days; let slices sit at room temperature 20–30 minutes before serving. To freeze unfrosted layers, wrap well in plastic wrap then foil and freeze up to 2 months; thaw overnight in the fridge before frosting. To freeze frosted slices, freeze until firm, then wrap individually and thaw in the fridge before bringing to room temperature.
Tips: Use real buttermilk for best flavor and texture; stick with natural cocoa (not Dutch-process); adjust food coloring to your preferred shade; don’t skip the crumb coat for a neat finish; bring eggs, buttermilk, butter, and cream cheese to room temperature before mixing; use light-colored metal pans for more even baking.