Would you like to save this?
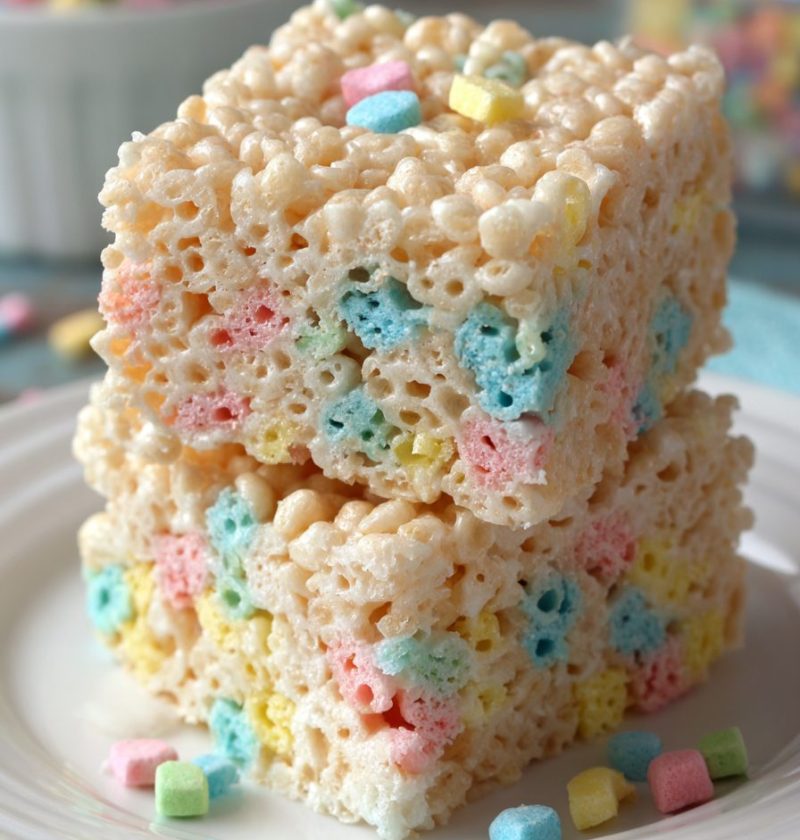
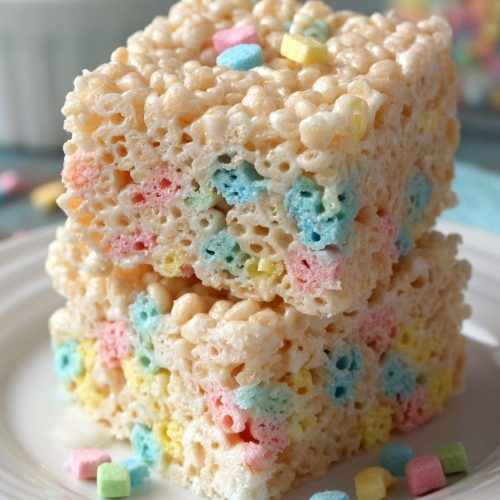
Rice Krispie Treats Recipe
This classic Rice Krispie Treats Recipe makes soft, chewy, no-bake cereal bars packed with gooey marshmallow flavor—perfect for last-minute parties, lunchbox treats, or a late-night sweet tooth.
Meet Your New Go-To Rice Krispie Treats Recipe
If you grew up in the United States like I did, rice krispie treats were probably a regular guest at classroom parties, church potlucks, or Little League games. This Rice Krispie Treats Recipe is my polished, grown-up version of that childhood favorite: still simple, still a no-bake rice krispie treat, but with better texture, bigger marshmallow pockets, and a rich, buttery flavor that tastes like you fussed a lot more than you did.
We’re talking homemade rice krispie treats that are:
- Extra chewy, not dry
- Thick and bakery-style
- Sweet but not tooth-achingly sweet
- And so easy that my teenagers can make them while I shout instructions from the couch
This marshmallow rice krispie treats recipe leans on a couple of tiny tricks I’ve picked up across years of making cereal bar recipes for bake sales, birthday parties, and “Mom, I forgot I need a snack for school tomorrow” emergencies. There’s a touch of vanilla, a bit of salt to balance the sweetness, and a mix of melted and whole marshmallows so you get that stretchy, pull-apart moment in every bite.
Are they healthy? Let’s be honest: this is a party dessert bar, not a kale smoothie. But compared to frosted cupcakes or store-bought cookies loaded with mystery ingredients, these simple marshmallow treats are made with a short, familiar ingredient list—and that counts for something in my book.
And because this is a no-bake recipe, it’s a wonderful kids friendly dessert project. Little hands can help measure the cereal, stir (with supervision), and sprinkle toppings. If you’re looking for a quick dessert recipe that never fails and always disappears first from the table, you’re in the right place.
Why You’ll Love This Rice Krispie Treats Recipe
- No oven needed – These no bake rice krispie treats come together right on the stovetop.
- Ready in about 20 minutes – Perfect for last-minute parties, snacks, or late-night cravings.
- Perfect texture – Soft, chewy rice krispie snack bars that don’t turn rock hard by the next day.
- Kid and crowd approved – A family favorite dessert that works for birthdays, school events, and potlucks.
- Simple pantry ingredients – Just cereal, marshmallows, butter, and a few flavor boosters.
- Easy to customize – Add chocolate chips, sprinkles, Peanut Butter, or holiday candies for fun twists.
- Budget-friendly dessert – A big pan of classic rice krispie treats feeds a crowd without breaking the bank.
- Great make-ahead party dessert bars – They hold up beautifully overnight and pack well for travel.
Honestly, there’s a reason rice krispie dessert bars never go out of style. Search data shows that “easy rice krispie treats” and “marshmallow rice krispie treats” spike around back-to-school, Halloween, and Christmas—and that’s exactly when I’m making them, too.
Ingredients for the Best Homemade Rice Krispie Treats
Here’s what you’ll need to make these chewy, classic rice krispie treats. I’ll add a few tips I’ve learned along the way.
- 6 cups Rice Krispies cereal (or any crisped rice cereal; name-brand tends to stay a little crispier than generic)
- 10 cups mini marshmallows, divided (about two 10 oz bags)
- 7 cups for melting
- 3 cups stirred in at the end for extra gooey pockets
- 6 tablespoons unsalted butter (use real butter, not margarine, for flavor and texture)
- 1 teaspoon pure vanilla extract (adds warmth and depth)
- 1/4 teaspoon fine sea salt (balances the sweetness and brightens the flavor)
- Nonstick cooking spray or extra butter (for greasing the pan and spatula)
Ingredient Tips & Simple Substitutions
- You can use regular-size marshmallows instead of mini; just chop them a bit so they melt more evenly.
- For a slightly richer flavor, use salted butter and skip or reduce the added salt.
- To make gluten-free rice krispie treats, use a certified gluten-free crisped rice cereal (check the label—some store brands are great for this).
- Vanilla is optional but lovely; if you have it, use it. If not, don’t stress—your treats will still be delicious.
- A quick note from experience: fresher marshmallows melt more smoothly. Very old, dried-out marshmallows tend to give you lumpy, less stretchy bars.

Step-by-Step Directions (With Helpful Tips)
-
Prep your pan.
Lightly grease a 9×13-inch baking pan with butter or nonstick spray.
For easier removal and clean cuts, line the pan with parchment paper, leaving a little overhang as “handles,” then grease the parchment too. -
Measure the cereal and extra marshmallows first.
Add 6 cups of rice cereal to a large mixing bowl and set aside. Measure 3 cups of mini marshmallows into a separate small bowl.
Having everything ready before the butter melts keeps the marshmallow mixture from sitting too long and firming up. -
Melt the butter low and slow.
In a large pot (a Dutch oven works great), melt 6 tablespoons of butter over low heat.
If you’d like a deeper, nutty flavor, let the butter cook a few minutes longer until it turns golden brown and smells toasty—just keep the heat on the low side and watch carefully. -
Add most of the marshmallows.
Stir in 7 cups of the mini marshmallows. Keep the heat on low and stir often with a heatproof spatula until the marshmallows are almost fully melted and smooth.
Remove from heat just before every last little lump disappears—this keeps the mixture from overheating, which is one main cause of hard, dry bars. -
Flavor the mixture.
Off the heat, stir in 1 teaspoon vanilla extract and 1/4 teaspoon salt.
Taste a tiny bit (careful, it’s hot) and adjust the salt if needed. You want it to taste pleasantly sweet with a little balance, not flat. -
Fold in the cereal.
Working fairly quickly, pour the melted marshmallow mixture over the cereal in the large bowl.
Use your spatula to fold and scoop from the bottom, coating every bit of cereal. Try not to crush the cereal; that light crunch is part of what makes good rice krispie snacks so satisfying. -
Add extra marshmallow pockets.
Once the cereal is mostly coated but still warm and sticky, gently fold in the reserved 3 cups of mini marshmallows.
These won’t fully melt; instead, they’ll leave those gorgeous stretchy, gooey bits in your finished bars. This is one of my favorite tricks for chewy rice krispie treats. -
Press into the pan (but don’t pack too hard).
Transfer the mixture to your prepared pan. Lightly grease your hands or a spatula, then gently press the mixture out into an even layer.
Here’s the key: don’t really mash it down. Firm pressure can compact the bars and make them dense and hard. Think gentle pats, not pounding. -
Cool and set.
Let the rice krispie dessert cool at room temperature for at least 30–45 minutes, or until set enough to cut cleanly.
If you’re in a hurry (we’ve all been there), you can chill them in the fridge for about 20 minutes, but don’t leave them in there for hours—they’ll get firmer and lose some chewiness. -
Slice and serve.
Use the parchment handles to lift the slab from the pan. With a sharp knife, cut into 16–24 squares, depending on how big you like your party dessert bars.
For extra neat edges, wipe the knife between cuts. Then enjoy that first, still-slightly-warm square—cook’s treat.
Servings & Timing
- Yield: About 16 large bars or up to 24 smaller bars
- Prep Time: 10 minutes
- Cook Time: 5–10 minutes on the stovetop
- Cooling Time: 30–45 minutes at room temperature
- Total Time: About 45–60 minutes, with most of that completely hands-off cooling time
These easy rice krispie treats are perfect when you need a quick dessert recipe that doesn’t keep you in the kitchen all afternoon.
Fun Variations on Classic Rice Krispie Treats
Once you’ve nailed the basic recipe, you can play a little. Here are some of my favorite spins that keep this family favorite dessert fun and seasonal.
- Chocolate-Drizzled Rice Krispie Treats – Melt 1/2 cup chocolate chips and drizzle over the cooled bars, then let set before cutting.
- Peanut Butter Rice Krispie Treats – Stir 1/2 cup creamy peanut butter into the melted marshmallow mixture for a richer, nutty cereal bar recipe.
- Birthday Cake Sprinkle Bars – Add 1/2 teaspoon almond extract and 1/3 cup rainbow sprinkles to the mixture, plus a few extra sprinkles on top.
- S’mores Rice Krispie Treats – Mix in 1 cup crushed graham crackers and 1/2 cup mini chocolate chips, then top with a few extra marshmallows and torch lightly if you feel fancy.
- Holiday Rice Krispie Treats – Use colored marshmallows or add seasonal candies (red and green for Christmas, pastel M&M’s for Easter, orange and black sprinkles for Halloween).
- Chocolate Cereal Twist – Swap 2 of the 6 cups of Rice Krispies for a cocoa-flavored cereal for a subtle chocolaty rice krispie snack bar.
You know what? It’s hard to go wrong here. If it tastes good with marshmallows, it probably belongs in these bars.
Storage & Make-Ahead Tips
Room Temperature Storage
- Store leftover rice krispie treats in an airtight container at room temperature for 2–3 days.
- Place parchment or wax paper between layers so they don’t stick together.
- If your kitchen is very warm or humid, they may soften a bit, but they’ll still be tasty.
Fridge Storage
- You can refrigerate them for up to 5 days, tightly covered.
- They’ll firm up in the fridge; let them sit at room temperature for 15–20 minutes before serving so they’re chewy again, not stiff.
Freezer Storage
- Cut bars and wrap each one tightly in plastic wrap, then place in a freezer bag or airtight container.
- Freeze for up to 1 month for best flavor and texture.
- Thaw wrapped bars at room temperature for about 30 minutes before eating; no reheating needed.
Make-Ahead Advice
- For parties, bake sales, or lunchbox planning, I like to make this rice krispie dessert a day ahead.
- Keep the whole slab in the pan, tightly covered, and cut into bars just before serving so the edges stay soft and fresh.
Personal Notes & Helpful Lessons From Testing
After making what feels like a few hundred pans of classic rice krispie treats over the years (PTA meetings, Halloween parties, youth group lock-ins—you name it), here are the main things I’ve learned:
- Low heat is non-negotiable. High heat can scorch the marshmallows and cook the sugar too much, giving you tough, dry bars instead of chewy rice krispie treats.
- Fresh ingredients matter more than you’d think. Fresh cereal stays crisp; stale cereal makes the bars oddly chewy in the wrong way. Same story with marshmallows.
- Extra marshmallows at the end are a game changer. That simple step is what takes you from “pretty good” to “oh my goodness, who made these?”
- Don’t pack them down hard. I know I said this already, but it’s worth repeating. Gentle pressing gives you soft, tender bars.
- Salt and vanilla “age up” this kids treat. Those tiny flavor details turn basic marshmallow rice krispie treats into something adults genuinely love.
- Use a big enough pot. Stirring everything in one roomy pot or a giant mixing bowl makes the process less messy and more enjoyable.
If you’re bringing these to a gathering, I recommend cutting a small “taste tester” corner and hiding it. Ask me how I know.
Frequently Asked Questions
1. How do I keep my rice krispie treats from getting hard?
Use low heat, don’t overcook the marshmallows, and avoid pressing the mixture too firmly into the pan—those three things are the main causes of hard bars.
2. Can I make this Rice Krispie Treats Recipe without butter?
You can use a neutral oil or coconut oil, but butter gives you the best flavor; if you must skip butter, choose refined coconut oil for a milder taste.
3. Can I use jumbo marshmallows?
Yes, just chop them into smaller pieces so they melt more evenly, and measure by cups rather than counting pieces.
4. How do I cut neat, clean squares?
Let the bars cool completely, then use a sharp knife greased lightly with butter or sprayed with nonstick spray, wiping the blade between cuts.
5. Are rice krispie treats gluten-free?
Classic marshmallows and plain rice cereal are often gluten-free, but some cereals contain barley malt, so always check the label if you’re serving someone with celiac or gluten sensitivity.
6. Can I double this recipe?
Yes, you can double it and use two 9×13 pans, or one large rimmed baking sheet; just work quickly when stirring, since the mixture cools faster in big batches.
7. Can I make vegan rice krispie treats?
Yes—use a vegan butter substitute and vegan marshmallows, and double-check that your cereal is vegan-friendly; texture may be slightly different, but it still works.
8. Why are my rice krispie treats too sticky to cut?
They may not have cooled long enough, or you may have added extra marshmallows; chill briefly in the fridge and grease your knife before slicing.
Wrapping It Up (And Grabbing a Square)
This Rice Krispie Treats Recipe gives you everything you want from a classic childhood dessert: chewy texture, gooey marshmallow pulls, a little crunch, and that buttery-sweet flavor that makes everyone reach for seconds. It’s a simple, no-bake, kids friendly dessert that works just as well for grown-up potlucks and office parties as it does for sleepovers.
If you try these homemade rice krispie treats, let me know how they turn out—leave a comment with your favorite variation or what your kids thought. And if you’re in the mood for more quick dessert recipes, next time you might enjoy my chocolate peanut butter bar recipe or a no-bake cheesecake; they all play nicely on a party dessert table.
Rice Krispie Treats
Ingredients
- 6 cups crisped rice cereal such as Rice Krispies
- 10 cups mini marshmallows divided; about two 10 oz bags (7 cups for melting, 3 cups stirred in at the end)
- 6 tablespoons unsalted butter use real butter, not margarine
- 1 teaspoon pure vanilla extract
- 1/4 teaspoon fine sea salt or to taste
- nonstick cooking spray or extra butter for greasing the pan and spatula
Instructions
- Lightly grease a 9x13-inch baking pan with butter or nonstick spray. For easier removal and clean cuts, line the pan with parchment paper, leaving some overhang as handles, then grease the parchment as well.
- Add 6 cups of crisped rice cereal to a large mixing bowl and set aside. Measure 3 cups of mini marshmallows into a separate small bowl. Having everything ready before melting the butter prevents the mixture from firming up while you work.
- In a large pot or Dutch oven, melt 6 tablespoons of butter over low heat. For a deeper, nutty flavor, you can cook the butter a few minutes longer until golden brown and fragrant, keeping the heat low and watching carefully.
- Stir 7 cups of the mini marshmallows into the melted butter. Keep the heat on low and stir often with a heatproof spatula until the marshmallows are almost fully melted and smooth. Remove from heat just before the last small lumps disappear to avoid overheating, which can make hard bars.
- Off the heat, stir in 1 teaspoon vanilla extract and 1/4 teaspoon fine sea salt. Taste a tiny bit carefully and adjust the salt if needed so the mixture tastes pleasantly sweet but balanced.
- Working fairly quickly, pour the warm melted marshmallow mixture over the cereal in the large bowl. Fold gently with a spatula, scooping from the bottom, until all the cereal is coated without crushing it.
- When the cereal is mostly coated and still warm and sticky, gently fold in the reserved 3 cups of mini marshmallows. They should stay mostly intact, creating gooey, stretchy pockets in the finished bars.
- Transfer the mixture to the prepared pan. Lightly grease your hands or a spatula and gently press the mixture into an even layer. Do not pack it down firmly—use light, even pressure so the bars stay soft and chewy.
- Let the treats cool at room temperature for 30–45 minutes, or until set enough to cut cleanly. If needed, you can chill them in the fridge for about 20 minutes to speed up setting, but avoid chilling for hours so they don’t become too firm.
- Use the parchment handles to lift the slab from the pan. With a sharp knife, cut into 16–24 squares, wiping the blade between cuts for neat edges. Serve and enjoy, ideally while they are still slightly warm.