Would you like to save this?
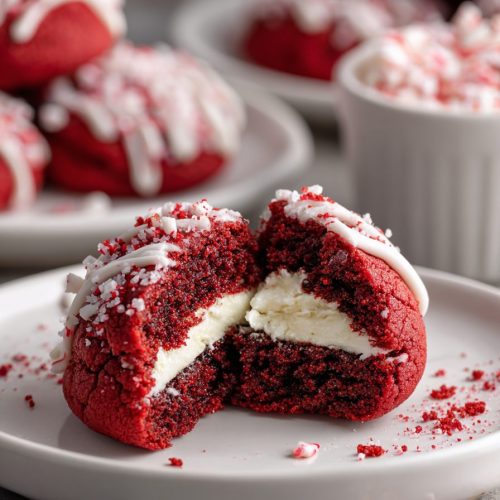
Red Velvet Stuffed Cookies Recipe
If you love soft bakery-style Cookies and creamy Cheesecake-style fillings, this Red Velvet Stuffed Cookies Recipe is about to become your new party trick.
These red velvet stuffed cookies are thick, tender cookies with a hint of cocoa and a rich cream cheese filling tucked right inside—like a mash-up of red velvet cake and a soft stuffed cookie, but in hand-held form. They’re gorgeous on holiday trays, perfect for Valentine’s Day, and honestly? My grown kids will devour a whole batch on a random Tuesday night if I’m not guarding the cooling rack.
I’ve tested this recipe over and over so you get that classic red velvet flavor, a gooey middle that doesn’t leak out, and those pretty crinkly tops you see in bakery style cookies. If you’ve ever wanted a homemade red velvet cookie recipe that feels special enough for gifting but easy enough for a weeknight bake, you’re in the right place.

What Makes These Red Velvet Stuffed Cookies So Special?
Red velvet can be a little mysterious. Is it chocolate? Is it vanilla? Is it just red cake with good PR? For these stuffed dessert cookies, I lean into that classic red velvet profile: a subtle cocoa note, a gentle tang, and a soft, slightly chewy texture.
Then we take it a step further with a simple cream cheese filling—sweet but not cloying—that bakes up like a little pocket of cheesecake in the center. The result is a red velvet dessert that looks like regular cookies from the outside, but when you break one open, there’s that creamy white surprise.
Here’s what else makes them special:
- They bake up thick and soft, not flat.
- The cream cheese filling stays tucked inside—no sad leaks on the pan.
- The dough can be chilled ahead, so they’re perfect for busy days.
- They freeze beautifully, both unbaked and baked.
I love making these for Christmas cookie tins, teacher gifts, and the occasional “Mom brought cookies” office visit. But they’re also fun for Valentine’s Day, anniversaries, or those weekends when you’re craving a bakery-style cookie without leaving your kitchen.
Why You’ll Love This Recipe
- Bakery-style look and texture – Thick, soft stuffed cookies with chewy edges and tender centers.
- Hidden cream cheese filling – A simple cream cheese filling turns each cookie into a tiny red velvet cheesecake.
- Perfect for holidays and gifting – That deep red velvet color looks beautiful on cookie trays and in gift boxes.
- No mixer drama – A standard hand mixer works just fine; no fancy gear needed.
- Make-ahead friendly – Both the filling and the cookie dough can be prepared and chilled in advance.
- Customizable – Easy to tweak with white chocolate chips, festive sprinkles, or a darker chocolate hit.
- Crowd-pleasing flavor – Familiar red velvet flavor with a fun, stuffed cookie twist.
- Tested for consistency – I’ve baked these on different pans and ovens so you get reliable, repeatable results.
Ingredients for Red Velvet Stuffed Cookies
Let’s break this down into two simple parts: the cream cheese filling and the red velvet cookie dough.
Cream Cheese Filling
- 6 oz cream cheese, softened (about ¾ of a standard 8 oz block; use full-fat for best texture)
- ¼ cup powdered sugar, sifted
- ½ teaspoon pure vanilla extract
Tip: Use brick-style cream cheese, not the whipped tub kind. It’s firmer and holds its shape better inside stuffed cookies.
Red Velvet Cookie Dough
- ½ cup (1 stick) unsalted butter, softened to room temperature
- ¾ cup packed light brown sugar
- ¼ cup granulated sugar
- 1 large egg
- 1 large egg yolk (adds richness and chew)
- 1½ teaspoons pure vanilla extract
- 1½ cups (about 180 g) all-purpose flour, spooned and leveled
- 2 tablespoons unsweetened cocoa powder (natural, not Dutch-processed, for a classic red velvet tone)
- 1 teaspoon cornstarch (helps keep the cookies soft and thick)
- ½ teaspoon baking soda
- ½ teaspoon fine sea salt
- 1–1½ tablespoons red gel food coloring
- If using liquid food color, you’ll need closer to 2–3 tablespoons
Optional but delicious add-ins:
- ½ cup white chocolate chips – stir into the dough or press a few into the tops before baking.
- 1–2 tablespoons buttermilk – only if your dough feels dry; it can boost that classic red velvet tang.
Ingredient Notes & Simple Swaps
- Butter: Salted butter works too—just reduce the added salt to a pinch.
- Food coloring: Gel food coloring (like AmeriColor or Wilton) gives you a bold red velvet color without thinning the dough.
- Sugar blend: The brown sugar helps keep the cookies moist and soft; I wouldn’t skip it.
- Gluten-free version: A 1:1 gluten-free baking flour that includes xanthan gum usually works well—just measure by weight (around 180 g).
- Cocoa powder: Don’t go over the 2 tablespoons or the cookies will look more brown than red and lose that traditional red velvet pop.
Step-by-Step Directions (With Mom-Level Tips)
1. Make the Cream Cheese Filling
-
Beat the cream cheese.
In a medium bowl, beat the softened cream cheese with a hand mixer on medium speed until smooth and lump-free. -
Sweeten and flavor.
Add the powdered sugar and vanilla. Beat again until creamy and thick. Scrape down the bowl so everything’s well combined. -
Portion and chill.
Scoop small mounds—about 2 teaspoons each—onto a parchment-lined plate or small tray. You’ll need about 14–16 portions.
Chill (or briefly freeze) these while you make the cookie dough; this makes stuffing much easier.
2. Make the Red Velvet Cookie Dough
-
Cream the butter and sugars.
In a large mixing bowl, beat the softened butter, brown sugar, and granulated sugar together on medium speed for 2–3 minutes, until light and fluffy. The mixture should look slightly lighter in color and a bit airy. -
Add the egg, yolk, and vanilla.
Beat in the egg, egg yolk, and vanilla extract until well combined. The dough will look glossy. -
Add the red color.
Add 1 tablespoon red gel food coloring and mix until the color is uniform. If the color looks too dull, add a bit more, a little at a time.
Tip: The color will lighten slightly as flour is added and cookies bake, so a deeper red dough is ideal. -
Combine dry ingredients.
In a separate bowl, whisk together the flour, cocoa powder, cornstarch, baking soda, and salt. -
Bring the dough together.
Add the dry ingredients to the wet mixture in two additions, mixing on low just until no dry streaks remain. If the dough seems very stiff or crumbly, you can mix in 1 tablespoon of buttermilk or milk—just enough to help it come together.
The dough should be soft but not sticky like cake batter; think thick brownie batter crossed with cookie dough.
3. Chill the Dough (Don’t Skip This)
-
Chill briefly.
Cover the bowl and chill the dough for 30–45 minutes. This helps the cookies hold their shape, especially since we’re stuffing them.Data nerd note from my kitchen tests:
- Unchilled dough spread more and sometimes exposed the filling.
- 30–45 minutes was the sweet spot—less spread, still easy to work with.
4. Preheat and Prep Your Baking Sheets
-
Heat the oven.
Preheat your oven to 350°F (175°C). Line two baking sheets with parchment paper or silicone baking mats. -
Get everything ready.
Take the cream cheese scoops out of the fridge or freezer. Have a small cookie scoop or tablespoon ready for the dough.
5. Shape and Stuff the Cookies
-
Portion the dough.
Scoop about 2 tablespoons of dough (around 40 g) for each cookie. You should get roughly 14–16 cookies. -
Flatten and fill.
Take one portion of dough and flatten it gently in your palm into a thick disc. Place one chilled cream cheese mound in the center. -
Seal carefully.
Wrap the dough up and around the filling, pinching the seams closed. Roll it gently into a ball so the cream cheese is completely enclosed.
Place stuffed dough balls on the prepared baking sheet, spacing them about 2 inches apart.Tip: If the dough gets too soft or sticky while you work, pop the tray in the fridge for 10 minutes and then continue.
-
Optional decorations.
If you’re using white chocolate chips or festive sprinkles, press a few onto the tops of the dough balls now for that bakery-style finish.
6. Bake to Soft Perfection
-
Bake the cookies.
Bake one sheet at a time for 11–13 minutes, or until the edges look set and the tops have those pretty crackly lines. The centers will still look a bit soft—this is perfect. -
Cool on the pan.
Let the cookies cool on the baking sheet for 10 minutes before moving them to a wire rack. They’re fragile while hot because of the soft center. -
Serve slightly warm or fully cooled.
When slightly warm, the cream cheese filling will be gooier; when fully cooled, it’s more like cheesecake. Both ways are heavenly.
Servings & Timing
- Yield: About 14–16 large stuffed cookies
- Prep Time: 25–30 minutes (including making filling and dough)
- Chill Time: 30–45 minutes for the dough, 20–30 minutes for the filling
- Bake Time: 11–13 minutes per tray
- Total Time: About 1 hour 30 minutes, mostly hands-off chilling and baking
If you’re planning for a party or cookie exchange, I like to double the recipe. Just keep the dough and filling chilled between batches.
Easy Variations on Red Velvet Stuffed Cookies
Here’s where you can have a little fun and make this Red Velvet Stuffed Cookies Recipe your own:
- White Chocolate Chip Version – Stir ½–¾ cup white chocolate chips into the dough for extra sweetness and texture.
- Sprinkle-Stuffed Red Velvet – Roll the stuffed cookie dough balls in red, pink, or holiday sprinkles before baking for a festive crust.
- Extra Tangy Cheesecake Center – Add 1–2 teaspoons of sour cream or plain Greek yogurt to the cream cheese filling for more tang.
- Chocolate Lovers’ Edition – Use mini semisweet chocolate chips instead of white chocolate and increase cocoa powder to 3 tablespoons (reduce flour by 1 tablespoon).
- Mini Cookies, Party Style – Make smaller cookies with about 1½ tablespoons of dough and 1 teaspoon of filling; reduce bake time by 1–2 minutes.
- Gluten-Free Twist – Use a cup-for-cup gluten-free flour blend and bake just until the edges set; they’ll still be soft but tender.
Storage & Reheating (Plus Make-Ahead Tips)
Room temperature:
- Store completely cooled cookies in an airtight container at room temperature for up to 1 day if your kitchen is cool. Because they contain cream cheese, I prefer not to leave them out longer than that.
Refrigerator:
- For longer storage, keep them in an airtight container in the fridge for 3–4 days.
- Let them sit at room temp for about 20–30 minutes before serving so the centers soften.
Freezer (unbaked):
- Assemble and stuff the cookie dough balls, then freeze them on a tray until firm.
- Transfer to a freezer bag or container and freeze for up to 2 months.
- Bake from frozen at 350°F; just add 1–2 extra minutes to the bake time.
Freezer (baked):
- Freeze fully cooled cookies in a single layer, then move them to a zip-top bag.
- Thaw at room temperature or warm in a 300°F oven for 5–7 minutes for that “freshly baked” texture.
Make-ahead strategy:
- Make the cream cheese filling up to 2 days ahead and keep it chilled.
- Make the red velvet cookie dough the night before and refrigerate.
- The next day, stuff, bake, and you’re set—this is how I handle holiday baking marathons without feeling frazzled.
Notes & Tested Tips From My Kitchen
- Use gel food coloring for a vivid red. Liquid color works, but you often need more, which can soften the dough. Gel keeps the dough firm and the color bold.
- Don’t overbake. These cookies should come out when the edges are set but the centers still look soft and slightly puffy; they’ll firm up as they cool.
- Seal the seams well. If you see cream cheese peeking through the dough before baking, pinch a bit of extra dough over that spot.
- Chill is your friend. Chilling both the filling and the dough makes stuffing so much easier and helps maintain that thick, bakery-style cookie height.
- Use light-colored pans if you can. Dark pans can brown the bottoms faster; if that’s what you have, bake on the middle rack and check toward the lower end of the time range.
- Line the pan. Parchment or silicone mats help prevent sticking, especially if any tiny bit of filling escapes.
If you’re curious about nutrition: a large cookie is roughly in the 250–280 calorie range, give or take, depending on mix-ins. So, like I tell my friends—this is a treat cookie, not a snack cookie, and that’s perfectly okay.
Frequently Asked Questions
1. Can I make these cookies without food coloring?
Yes. You’ll still get a soft cocoa cookie with cream cheese filling; it just won’t have that classic red velvet look.
2. Why is my dough too sticky to work with?
It might be a bit warm or slightly under-measured on flour. Chill the dough longer (another 20–30 minutes) and, if needed, gently stir in 1–2 extra tablespoons of flour.
3. My cream cheese filling leaked out—what went wrong?
Usually, either the filling wasn’t fully covered by dough or the dough was too thin in spots. Make sure you fully enclose the filling and seal seams well, and don’t skip the chill time.
4. Can I use a stand mixer instead of a hand mixer?
Absolutely. Use the paddle attachment and mix on medium speed, being careful not to overmix once the flour goes in.
5. Do I have to use cornstarch in the dough?
You can leave it out, but the cookies might spread a bit more and be slightly less soft. Cornstarch helps give that tender, bakery-style crumb.
6. Can I double or triple this Red Velvet Stuffed Cookies Recipe?
Yes, this recipe doubles well. If you’re tripling it, I suggest mixing in two batches so the dough doesn’t get overworked.
7. Can I make smaller, bite-size stuffed cookies?
Yes. Just use smaller portions of dough and filling, and reduce the bake time by a minute or two. Watch the edges—they’re your signal.
8. How do I know when the cookies are done if the centers still look soft?
Look for set, slightly firm edges and tops that have just started to crack. The cookies will continue to cook a bit on the hot pan after baking.
Final Thoughts on These Red Velvet Stuffed Cookies
These red velvet stuffed cookies feel like something you’d splurge on at a fancy bakery, but they’re simple enough for a cozy weekend bake at home. Soft, tender red velvet cookies on the outside, creamy cheesecake filling on the inside—what’s not to love?
If you try this Red Velvet Stuffed Cookies Recipe, let me know how it goes—leave a comment, share a photo, or tell me what twist you added. And if you’re building a dessert table, pair these with classic chocolate chip cookies or a simple sugar cookie for a beautiful, crowd-pleasing spread.
Red Velvet Stuffed Cookies
Ingredients
- 6 oz cream cheese softened, brick-style, full-fat
- 1/4 cup powdered sugar sifted
- 1/2 teaspoon pure vanilla extract
- 1/2 cup unsalted butter softened to room temperature (1 stick)
- 3/4 cup light brown sugar packed
- 1/4 cup granulated sugar
- 1 large egg
- 1 large egg yolk adds richness and chew
- 1 1/2 teaspoons pure vanilla extract
- 1 1/2 cups all-purpose flour about 180 g, spooned and leveled
- 2 tablespoons unsweetened cocoa powder natural, not Dutch-processed
- 1 teaspoon cornstarch
- 1/2 teaspoon baking soda
- 1/2 teaspoon fine sea salt
- 1–1 1/2 tablespoons red gel food coloring or 2–3 tablespoons liquid red food coloring
- 1–2 tablespoons buttermilk or milk optional, use only if dough seems dry
- 1/2 cup white chocolate chips optional; stir into dough or press on top
- festive sprinkles optional, for decorating tops
Instructions
- In a medium bowl, beat the softened cream cheese with a hand mixer on medium speed until smooth and lump-free. Add the powdered sugar and 1/2 teaspoon vanilla extract, then beat again until creamy and thick, scraping down the sides as needed. Scoop small mounds of filling, about 2 teaspoons each, onto a parchment-lined plate or tray (you should get about 14–16 portions). Chill or briefly freeze the filling portions while you prepare the cookie dough.6 oz cream cheese, 1/4 cup powdered sugar, 1/2 teaspoon pure vanilla extract
- In a large mixing bowl, beat the softened butter, brown sugar, and granulated sugar together on medium speed for 2–3 minutes, until light and fluffy. The mixture should look slightly lighter in color and a bit airy.1/2 cup unsalted butter, 3/4 cup light brown sugar, 1/4 cup granulated sugar
- Beat in the egg, egg yolk, and 1 1/2 teaspoons vanilla extract until well combined and glossy. Add about 1 tablespoon red gel food coloring and mix until the color is uniform. If the color looks too dull, add a bit more food coloring, a little at a time; the dough should be a deep red, as it will lighten slightly once the flour is added and during baking.1 large egg, 1 large egg yolk, 1 1/2 teaspoons pure vanilla extract, 1–1 1/2 tablespoons red gel food coloring
- In a separate bowl, whisk together the flour, cocoa powder, cornstarch, baking soda, and salt until well combined.1 1/2 cups all-purpose flour, 2 tablespoons unsweetened cocoa powder, 1 teaspoon cornstarch, 1/2 teaspoon baking soda, 1/2 teaspoon fine sea salt
- Add the dry ingredients to the wet mixture in two additions, mixing on low speed just until no dry streaks remain. If the dough seems very stiff or crumbly, mix in 1 tablespoon of buttermilk or milk, adding up to 1 additional tablespoon only if needed to help the dough come together. The dough should be soft and thick but not sticky like cake batter. If using, gently fold in the white chocolate chips.1 1/2 cups all-purpose flour, 2 tablespoons unsweetened cocoa powder, 1 teaspoon cornstarch, 1/2 teaspoon baking soda, 1/2 teaspoon fine sea salt, 1–2 tablespoons buttermilk or milk, 1/2 cup white chocolate chips
- Cover the bowl of dough and chill it in the refrigerator for 30–45 minutes. Chilling helps the stuffed cookies hold their shape and prevents excessive spreading during baking.
- Preheat your oven to 350°F (175°C). Line two baking sheets with parchment paper or silicone baking mats. Remove the chilled cream cheese filling portions from the refrigerator or freezer and have a small cookie scoop or tablespoon ready for portioning the dough.
- Scoop about 2 tablespoons (around 40 g) of dough for each cookie; you should get roughly 14–16 cookies. Working one at a time, flatten a portion of dough gently in your palm into a thick disc. Place one chilled cream cheese mound in the center, then wrap the dough up and around the filling, pinching the seams closed. Roll gently into a ball so the cream cheese is completely enclosed. Place stuffed dough balls on the prepared baking sheets, spacing them about 2 inches apart. If desired, press a few extra white chocolate chips or sprinkles onto the tops for decoration. If the dough becomes too soft or sticky while shaping, briefly chill the tray in the fridge for about 10 minutes before continuing.6 oz cream cheese, 1/2 cup unsalted butter, 3/4 cup light brown sugar, 1/4 cup granulated sugar, 1 large egg, 1 large egg yolk, 1 1/2 teaspoons pure vanilla extract, 1–1 1/2 tablespoons red gel food coloring, 1–2 tablespoons buttermilk or milk, 1/2 cup white chocolate chips, festive sprinkles
- Bake one sheet at a time in the preheated oven for 11–13 minutes, or until the edges look set and the tops have developed crackly lines. The centers should still look slightly soft and puffy; they will firm up as they cool.
- Allow the cookies to cool on the baking sheet for about 10 minutes, as they are fragile when hot due to the soft centers. Then transfer to a wire rack to cool completely. Serve slightly warm for a gooier cream cheese center, or fully cooled for a cheesecake-like texture.
Notes
Freezing unbaked: Assemble and stuff the cookie dough balls, freeze on a tray until firm, then transfer to a freezer-safe bag or container and freeze for up to 2 months. Bake from frozen at 350°F (175°C), adding 1–2 minutes to the bake time.
Freezing baked: Freeze cooled cookies in a single layer, then move to a zip-top bag. Thaw at room temperature or warm in a 300°F (150°C) oven for 5–7 minutes.
Tips: Use gel food coloring for a vivid red without over-thinning the dough. Don’t overbake; remove cookies when edges are set but centers still look soft. Seal seams well around the cream cheese filling to prevent leaks. Chilling both the filling and the dough helps create thick, bakery-style cookies.
Approximate nutrition: A large stuffed cookie is roughly in the 250–280 calorie range, depending on optional mix-ins.