Would you like to save this?
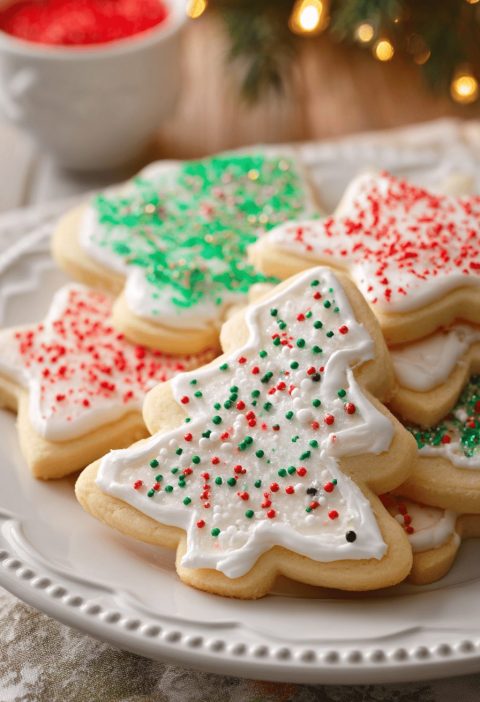
Danish Butter Cookies Recipe
This Danish Butter Cookies Recipe gives you those classic, golden, crisp little rings you remember from the blue tins—only better, because they’re homemade, real-butter rich, and flavored with vanilla. They’re perfect for Christmas cookie trays, gifting, or just a quiet afternoon with coffee.
This is a traditional danish Butter Cookies recipe made with simple pantry ingredients, shaped with a piping bag, and baked until the edges turn that beautiful light amber color. If you’ve been looking for an authentic danish Butter Cookies experience—crisp, buttery, and not too sweet—you’re in the right kitchen.
What Makes This Danish Butter Cookies Recipe So Special
There are a lot of “butter cookie” recipes out there, but true Danish butter cookies from scratch have a very specific personality:
- They’re crisp, not chewy.
- They’re rich, but not greasy.
- They keep their shape, whether you pipe them in swirls or bake them as simple rounds.
This version leans on classic European-style baking: real butter, a high butter-to-flour ratio, and just enough sugar and vanilla to highlight that buttery flavor instead of hiding it.
Growing up, those blue Danish cookie tins meant the holidays had officially started. I still remember my mom putting them out next to a pot of coffee when neighbors dropped by. Funny enough, the tin always ended up storing sewing supplies by January—but the memory of those classic butter cookies never left.
Now I bake these homemade danish butter cookies every December, and again in the spring when friends come for brunch. They’re lovely as part of a Danish Christmas cookies recipe spread, but they’re also simple enough for a weekday treat.
If you’ve ever wondered how to get that piped butter cookies recipe texture—those neat ridges that stay sharp after baking—this method will walk you through it with clear, friendly steps and tested tips.
Why You’ll Love This Danish Butter Cookies Recipe
- Classic bakery taste at home – These taste like fancy tin-style cookies, but you made them in your own oven.
- Short ingredient list – Just butter, sugar, egg, flour, and vanilla—no weird additives or mystery flavors.
- Perfect for gifting – Stack these in little bags or cookie tins; they stay crisp and pretty for days.
- Easy danish butter cookies for beginners – The steps are simple, and I’ll hold your hand through the piping.
- Great make-ahead cookie – The dough holds well in the fridge and freezer, so you can bake when you need them.
- Customizable flavor – Add lemon zest, almond extract, or dip them in chocolate without changing the base dough.
- Ideal coffee or tea cookie – They’re light, crisp, and not too sweet, which makes them perfect with a hot drink.
- Freezer-friendly – You can freeze the dough or baked cookies for quick, last-minute treats.
Ingredients For Homemade Danish Butter Cookies
You’ll be surprised by how few ingredients go into this rich butter cookies recipe. The key is quality—especially the butter.
For the Danish butter cookie dough
- 1 cup (226 g) unsalted butter, very soft but not melted
- Use European-style butter (like Kerrygold, Plugrá, or any 82% fat butter) for extra flavor and a richer crumb.
- 3/4 cup (150 g) granulated sugar
- You can use superfine sugar if you want the dough to pipe a touch smoother.
- 1 large egg, at room temperature
- 2 tsp pure vanilla extract
- For a stronger flavor, use 1 ½ tsp vanilla + 1/2 tsp almond extract.
- 1/4 tsp fine sea salt
- 2 cups (240 g) all-purpose flour, sifted
- Use a reliable brand like King Arthur or Gold Medal for consistent results.
Optional but recommended
- 1–2 Tbsp heavy cream or whole milk – Only if your dough is too stiff to pipe.
- Coarse sugar for sprinkling – For a little sparkle and extra crunch.
You know what? With a recipe this simple, the most important “ingredient” is actually temperature. Have your butter very soft (think spreadable, not glossy and oily) and your egg at room temp, so everything blends smoothly and gives you that lush danish butter cookie dough texture.

Step-by-Step Directions For This Danish Butter Cookies Recipe
Follow these steps and you’ll get those classic, picture-perfect Danish butter cookies from scratch.
1. Preheat your oven and prepare your pans
Preheat your oven to 350°F (175°C). Line 2 baking sheets with parchment paper or silicone baking mats. Parchment helps the cookies keep their shape and prevents the bottoms from over-browning.
2. Cream the butter and sugar
In a large mixing bowl (or the bowl of a stand mixer), add the soft butter and granulated sugar. Beat on medium speed for about 3–4 minutes, until the mixture is pale, fluffy, and lighter in volume. This step is crucial—proper creaming creates tiny air pockets that help your crisp butter cookies bake up light instead of dense.
3. Add egg, vanilla, and salt
Add the egg, vanilla extract, and salt. Beat again on medium speed until fully combined, scraping down the sides and bottom of the bowl. The mixture might look a little creamy and loose; that’s exactly what you want.
4. Add the flour
Sift the all-purpose flour right over the bowl, then mix on low speed just until no dry streaks remain. Don’t overmix here; too much mixing can make the cookies tough instead of tender-crisp.
If the dough seems very stiff and you know you plan to pipe it, add 1 tablespoon of heavy cream or milk and mix briefly. You want a smooth, thick dough that can still move through a piping tip with some pressure.
5. Check the dough for piping consistency
This step saves a lot of frustration. Scoop a little dough into a piping bag fitted with a large open star tip (like Wilton 1M or Ateco 827). Try piping a test swirl onto a piece of parchment.
- If it pipes smoothly and holds ridges, you’re good.
- If you have to squeeze very hard or the dough breaks, mix in another 1 tablespoon of cream or milk and test again.
Traditional danish butter cookies dough is thick, but not so thick it fights you every step of the way.
6. Pipe or shape the cookies
Transfer the dough to a piping bag fitted with a large star tip. Pipe 2-inch circles or “S” shapes onto your prepared baking sheets, leaving at least 1½ inches between cookies.
If piping isn’t your thing today, you can:
- Scoop 1-tablespoon portions, roll into balls, and flatten gently with the bottom of a glass.
- Use a cookie press with your favorite disk for a more “cookie tin” look.
7. Chill the shaped cookies (don’t skip this)
Place the baking sheets in the refrigerator for 20–30 minutes. This quick chill helps:
- The cookies keep their sharp piped edges.
- Prevents spreading, so your Danish butter cookies look like the ones from the tin.
While the first tray chills, you can pipe the second tray.
8. Bake until just golden at the edges
Bake one sheet at a time for 10–13 minutes, depending on your oven. Watch for:
- Pale tops
- Light golden edges
- Slight firmness when gently touched
They shouldn’t be fully browned; true authentic danish butter cookies are quite light.
9. Cool completely
Let the cookies cool on the baking sheet for 5 minutes, then move them to a wire rack to cool fully. They crisp up as they cool, so don’t judge their final texture while they’re still warm and soft.
10. Serve or decorate
Once cool, you can:
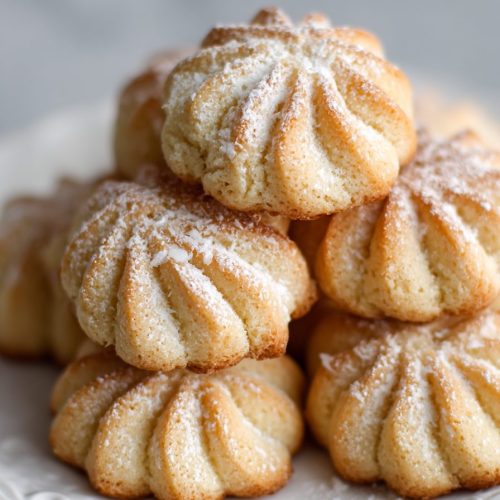
- Dust lightly with powdered sugar.
- Dip half of each cookie in melted dark or milk chocolate.
- Sprinkle with crushed nuts or coconut while the chocolate is still wet.
And just like that, your homemade danish butter cookies are ready for the cookie jar—or the gift box, if they make it that far.
Servings & Timing
- Yield: About 32–36 cookies, depending on size and shape
- Prep Time: ~20–25 minutes (a bit longer if you’re new to piping)
- Chill Time: 20–30 minutes
- Bake Time: 10–13 minutes per tray
- Total Time: About 1 hour–1 hour 15 minutes, including chilling
For holiday baking days, I like to double this Danish Butter Cookies Recipe and stagger my chill times so one tray is baking while another is chilling. It keeps things moving without feeling rushed.
Flavor Variations & Fun Twists
Once you’ve mastered the classic butter cookies recipe, it’s easy to play. Here are a few favorite variations:
- Almond Danish Butter Cookies – Replace 1 teaspoon of vanilla with almond extract and sprinkle sliced almonds on top before baking.
- Lemon Vanilla Butter Cookies – Add 1–2 teaspoons of fresh lemon zest to the dough for a bright, fresh twist.
- Chocolate-Dipped Danish Cookies – Dip cooled cookies in melted dark chocolate and drizzle with white chocolate for that “bakery case” look.
- Cinnamon Sugar Butter Cookies – Sprinkle a mix of sugar and cinnamon over the cookies before baking for a warm, cozy flavor.
- Espresso Butter Cookies – Stir 1–2 teaspoons of instant espresso powder into the dough for a coffee-lover’s cookie.
- Gluten-Friendly Version – Use a cup-for-cup gluten-free flour blend designed for baking; the texture will be slightly more delicate but still crisp.
Each variation keeps the spirit of traditional danish butter cookies while giving you something a little different for your cookie plates.
Storage, Freezing & Make-Ahead Tips
This recipe is very friendly for planners and busy holiday schedules.
Storing baked cookies
- Keep cooled cookies in an airtight container at room temperature.
- They’ll stay fresh and crisp for 7–10 days, especially in a cool, dry spot.
- If your kitchen is humid, add a small piece of parchment between layers to protect those pretty piped swirls.
Freezing baked cookies
- Place cookies in a single layer on a baking sheet and freeze until solid.
- Transfer to a freezer-safe bag or container with parchment between layers.
- Freeze for up to 2 months.
- Thaw at room temperature, uncovered, so they don’t pull in extra moisture.
Freezing danish butter cookie dough
You have two options:
- Freeze the dough in a log – Shape the dough into a log, wrap tightly in plastic, then in foil. Chill until firm, then freeze for up to 2 months. Slice and bake (thicker slices for more traditional rounds).
- Freeze piped shapes – Pipe the cookies onto a parchment-lined sheet, freeze until solid, then transfer to a container. Bake from frozen, adding about 1–2 minutes to the bake time.
Make-ahead for holidays
If you’re planning a big danish christmas cookies recipe assortment, make the dough up to 3 days ahead, keep it in the fridge, and bake the cookies the day before gifting. That way you get fresh flavor with less stress.
Notes From My Kitchen
I’ve tested this homemade danish cookie recipe a lot—both for the blog and for my own cookie tins. Here are a few things I’ve learned:
- Butter quality matters more than you think. Cheaper butter tends to have more water, which can lead to flatter cookies and less flavor. A mid-range European-style butter gives you that classic rich taste.
- Don’t skip the chill. I know, when the house smells like butter and vanilla, patience is hard. But chilling the piped cookies really is what turns this into a true authentic danish butter cookies experience.
- Piping takes practice. If your first few look wobbly or messy, don’t stress. Bake them anyway. They’ll still taste amazing, and your hands will get more comfortable with the motion as you go.
- Color is key. When you’re aiming for danish cookie tin style cookies, watch the edges closely. Too pale and they won’t have enough flavor; too brown and they’ll taste a little burnt. Light golden is the sweet spot.
- Different shapes, slightly different baking. Thicker swirls or larger “S” shapes may need an extra minute. Smaller rounds may be done faster. Use your eyes and nose more than the clock.
And a small personal tip: keep one “sacrificial cookie” on the edge of the pan. When you think they’re done, break that one in half. If the middle is set and the bottom is golden, you’re good.
Frequently Asked Questions About Danish Butter Cookies
Can I use salted butter instead of unsalted?
Yes—just reduce the added salt to a tiny pinch or leave it out. Taste the dough; it should be pleasantly buttery, not salty.
Why did my Danish butter cookies spread too much?
Most often, the butter was too soft, the dough wasn’t chilled, or the oven wasn’t hot enough. Next time, chill shaped cookies and make sure your oven is fully preheated.
My dough is too thick to pipe. What should I do?
Mix in 1–2 tablespoons of cream or milk, a little at a time, until it’s firm but pipeable. A large star tip helps, too.
Can I make these cookies without a piping bag?
Yes. Roll the dough into small balls and flatten slightly, or use a cookie press. The texture stays the same; only the look changes.
Are these cookies very sweet?
No. Traditional danish butter cookies are lightly sweet, with a strong butter and vanilla flavor. If you like them sweeter, sprinkle sugar on top before baking or dip them in chocolate.
How do I keep my cookies crisp?
Cool them completely before storing, use an airtight container, and avoid stacking them while they’re even slightly warm; residual steam softens them.
Can I make this recipe smaller or larger?
Absolutely. You can halve the recipe for a small batch or double it for gift tins. Just keep the ratios the same and bake in batches.
Are these cookies good for mailing?
Yes—these classic butter cookies recipe bakes up sturdy enough for shipping. Pack them tightly in a tin or box, with parchment between layers and some padding so they don’t rattle.
Final Thoughts On This Classic Danish Butter Cookies Recipe
These Danish butter cookies are simple, nostalgic, and quietly impressive—the kind of cookie that feels right at home on a holiday tray, next to a coffee mug, or tucked into a lunchbox. With just a handful of ingredients and a little care, you’ll get that authentic Danish bakery flavor without leaving your kitchen.
If you try this Danish Butter Cookies Recipe, I’d love to hear how it goes—tell me in the comments what shapes or flavors you chose. And if you’re building a full cookie spread, you might enjoy pairing these with my spritz cookies or chocolate crinkle cookies (just search for them on the blog). Happy baking, and save a few cookies for yourself. You deserve them.
Danish Butter Cookies
Ingredients
- 1 cup unsalted butter 226 g, very soft but not melted; European-style (about 82% fat) preferred
- 3/4 cup granulated sugar 150 g; superfine sugar also works
- 1 large egg at room temperature
- 2 teaspoons pure vanilla extract or 1 1/2 tsp vanilla + 1/2 tsp almond extract
- 1/4 teaspoon fine sea salt
- 2 cups all-purpose flour 240 g, sifted
- 1-2 tablespoons heavy cream or whole milk optional, only if dough is too stiff to pipe
- coarse sugar optional, for sprinkling on top before baking
Instructions
- Preheat your oven to 350°F (175°C). Line 2 baking sheets with parchment paper or silicone baking mats to help the cookies keep their shape and prevent over-browning on the bottoms.
- In a large mixing bowl or the bowl of a stand mixer, combine the very soft unsalted butter and granulated sugar. Beat on medium speed for 3–4 minutes, until the mixture is pale, fluffy, and slightly increased in volume.1 cup unsalted butter, 3/4 cup granulated sugar
- Add the egg, vanilla extract, and fine sea salt to the creamed butter mixture. Beat on medium speed until fully combined, scraping down the sides and bottom of the bowl as needed.1 large egg, 2 teaspoons pure vanilla extract, 1/4 teaspoon fine sea salt
- Sift the all-purpose flour over the bowl and mix on low speed just until no dry streaks remain. Do not overmix. If the dough is very stiff and you plan to pipe it, mix in 1 tablespoon of heavy cream or milk, adding up to 1 additional tablespoon only if needed for a thick but pipeable consistency.2 cups all-purpose flour, 1-2 tablespoons heavy cream or whole milk
- Transfer a small amount of dough to a piping bag fitted with a large open star tip (such as Wilton 1M or Ateco 827). Pipe a test swirl onto a piece of parchment. If it pipes smoothly and holds ridges, the dough is ready. If it is very hard to squeeze or breaks, mix in a bit more cream or milk and test again.1-2 tablespoons heavy cream or whole milk
- Fill a piping bag fitted with a large star tip with the dough. Pipe 2-inch circles or “S” shapes onto the prepared baking sheets, leaving about 1 1/2 inches between cookies. Alternatively, scoop 1-tablespoon portions, roll into balls, and flatten gently with the bottom of a glass, or use a cookie press.
- Place the baking sheets with the shaped cookies in the refrigerator for 20–30 minutes. Chilling helps the cookies hold their piped edges and prevents excessive spreading.
- If desired, sprinkle the cookies lightly with coarse sugar. Bake one sheet at a time for 10–13 minutes, or until the tops are pale, the edges are light golden, and the cookies feel slightly firm when gently touched. Do not let them brown all over.coarse sugar
- Let the cookies cool on the baking sheet for 5 minutes, then transfer them carefully to a wire rack to cool completely. They will crisp up as they cool.
- Once fully cooled, serve the cookies as is or decorate by dusting with powdered sugar, dipping half of each cookie in melted chocolate, and optionally sprinkling with crushed nuts or coconut while the chocolate is still wet.