Would you like to save this?
S’mores Fudge Recipe
If you love gooey campfire s’mores but don’t want to mess with smoke, bugs, and burnt marshmallows, this S’mores Fudge Recipe is your new favorite no-bake, party-ready treat.
Full Recipe Introduction
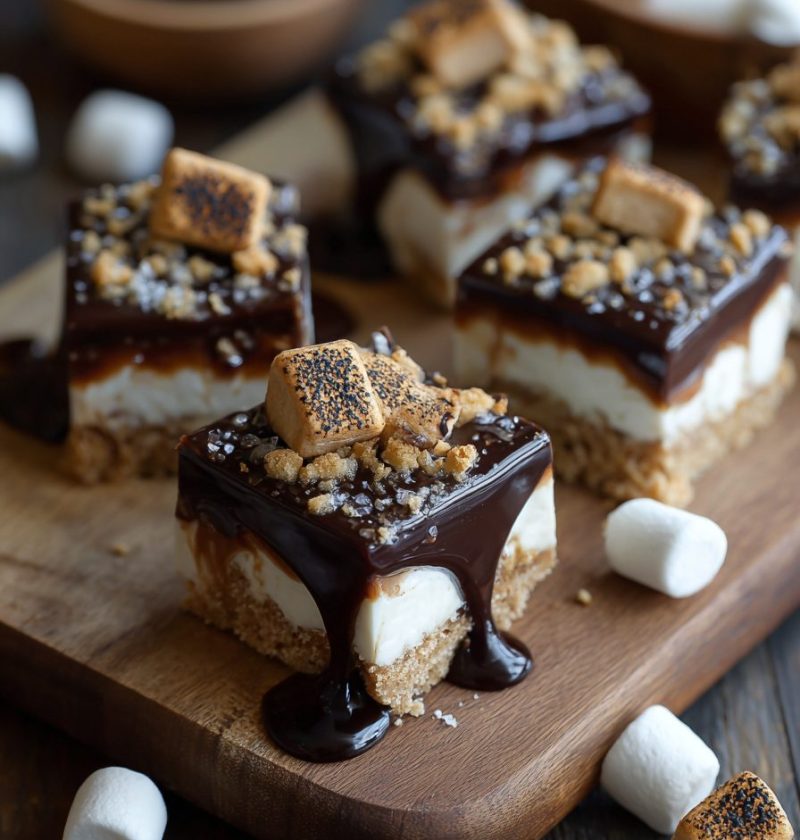
This S’mores Fudge Recipe takes everything we love about classic s’mores—the graham cracker crunch, rich chocolate, and soft, melty marshmallows—and tucks it into a creamy, layered chocolate fudge bar. Think of it as a campfire inspired dessert, without needing a firepit or even turning on the oven.
What makes this version extra fun is the texture: a Buttery graham cracker crust on the bottom, a silky, layered chocolate fudge center, and a toasted marshmallow topping that looks like it came right off a skewer. It’s still a rich chocolate treat, of course, but it’s also a no bake dessert that’s surprisingly easy to pull together, even on a busy weeknight.
I tend to make this for summer barbecues, birthday sleepovers, and—if I’m honest—those gray February days when everyone is tired of winter and we need something cheerful. It’s a very kid friendly dessert, but it always gets just as many “oohs” from the grown-ups. You can cut it into neat homemade fudge squares for a party dessert recipe or slice generous rectangles when it’s just family.
And if you grew up with campfire s’mores like I did, this fudge is a nostalgic little hug on a plate.

Why You’ll Love This S’mores Fudge Recipe
- No oven required – A true easy fudge recipe; perfect when it’s too hot to bake or you don’t feel like heating up the kitchen.
- Simple ingredients – Mostly pantry staples: chocolate chips, sweetened condensed milk, graham crackers, and marshmallows.
- Ready to chill in about 15 minutes – Active prep is quick; the fridge does the rest of the work.
- Perfect for parties and potlucks – Cuts into neat, layered chocolate fudge bars that travel well and look impressive.
- Fun for kids to help with – Little hands can press the graham cracker crust and sprinkle marshmallows on top.
- Customizable – Easy to make gluten-free, nutty, extra chocolatey, or even a bit “grown-up” with flavor twists.
- Make-ahead friendly – Keeps well in the fridge, so you can prep a day or two before your event.
- No Candy thermometer needed – We skip the fussy boiling stage; melted chocolate and condensed milk give foolproof results.
Ingredients for S’mores Fudge
Let’s walk through what you’ll need and how to choose the best ingredients for the creamiest chocolate fudge and the crunchiest graham cracker crust.
For the Graham Cracker Crust
- 1 ½ cups (about 12 full sheets) graham cracker crumbs
- Use regular honey graham crackers; if you’re gluten-free, use a GF graham-style cookie.
- 6 tablespoons unsalted butter, melted
- Salted butter works too—just reduce or skip any extra pinch of salt.
- 2 tablespoons granulated sugar
- Helps the crust set and adds a touch of sweetness.
- ¼ teaspoon fine sea salt
- Balances the sweetness and keeps the crust from tasting flat.
For the Chocolate Fudge Layer
- 3 cups semi-sweet chocolate chips (about two 12-ounce bags)
- You can mix semi-sweet and milk chocolate for a sweeter flavor or use dark chocolate (60–70%) for a deeper, less sweet chocolate fudge.
- 1 can (14 ounces) sweetened condensed milk
- Don’t swap with evaporated milk; it won’t set the same. Store brands usually work just fine.
- 2 tablespoons unsalted butter
- Adds richness and a smooth, silky texture.
- 2 teaspoons pure vanilla extract
- For warmth and balance; avoid imitation vanilla if you can.
- ¼ teaspoon fine sea salt
- Again, just enough to keep the chocolate from tasting one-note.
For the Marshmallow Topping
- 3–4 cups mini marshmallows
- Mini marshmallows melt and toast more evenly than large ones.
- Optional: ½ cup chopped milk chocolate or chocolate chips
- For extra chocolate drizzle or sprinkling on top for a layered chocolate fudge finish.
- Optional: extra graham cracker crumbs
- Sprinkle on top for more crunch and that classic graham flavor.
Pan & Tools
- 8×8-inch or 9×9-inch square baking pan (metal or glass)
- Parchment paper
- Microwave-safe bowl or heavy-bottomed saucepan
- Rubber spatula
- Knife for cutting (a long, sharp chef’s knife works best)
Step-by-Step Directions
Here’s the thing with fudge: a little patience goes a long way, but the steps themselves are simple. Follow these, and your S’mores Fudge Recipe will turn out thick, glossy, and sliceable every time.
1. Prepare Your Pan
- Line an 8×8 or 9×9-inch pan with parchment paper, leaving extra hanging over the edges for easy lifting later.
- Press the paper into the corners so the crust and fudge layer stay even. A light spray of cooking spray under the parchment can help it stay in place.
2. Make the Graham Cracker Crust
- In a medium bowl, mix the graham cracker crumbs, sugar, and salt.
- Pour in the melted butter and stir until the crumbs are evenly moistened and look like damp sand.
- Press the mixture firmly into the bottom of the prepared pan, using the bottom of a measuring cup or your hand.
- Really press it down; a tight crust holds together better when you cut the fudge into squares.
- Chill the crust in the fridge while you make the chocolate fudge layer.
3. Melt the Chocolate Fudge Base
You can use the microwave (my preference for ease) or the stovetop—whichever feels more comfortable.
- Add the chocolate chips, sweetened condensed milk, and butter to a large microwave-safe bowl.
- Microwave on 50% power for 60 seconds. Stir well.
- Continue microwaving in 20–30 second bursts at 50% power, stirring between each, until the chocolate is mostly melted and smooth.
- There should be no big lumps; a few tiny bits will melt as you stir.
- Once smooth, stir in the vanilla and salt until fully combined.
- The mixture should be thick, glossy, and spreadable—almost like warm brownie batter.
(If using the stovetop: place ingredients in a heavy-bottomed saucepan over very low heat, stirring constantly until melted and smooth.)
4. Layer the Fudge Over the Crust
- Remove the chilled graham cracker crust from the fridge.
- Pour the warm chocolate fudge mixture over the crust.
- Use a spatula to spread it evenly into the corners and smooth the top.
- Tap the pan gently on the counter to remove any air bubbles and help the fudge settle into a smooth layer.
5. Add the Marshmallow Topping
Now for the fun, gooey part.
- While the fudge is still warm, sprinkle the mini marshmallows evenly over the top, pressing them very lightly into the fudge so they stick.
- If using, scatter additional chocolate chips or chopped milk chocolate over the marshmallows, plus a pinch of extra graham cracker crumbs.
- Don’t press too hard or you’ll lose that fluffy marshmallow texture.
6. Toast the Marshmallows (Optional but Highly Recommended)
You have two choices here, and both work well.
Option A: Kitchen Torch (most control)
15. Use a kitchen torch to gently toast the marshmallows until they’re golden brown and slightly charred in spots—just like campfire s’mores.
Option B: Broiler (watch closely)
16. Preheat your oven broiler. Place the pan on the middle rack and broil for 30–90 seconds, watching the entire time.
- Rotate the pan as needed so the marshmallow topping browns evenly. Once browned, remove immediately to prevent burning.
Let the fudge cool to room temperature on the counter for about 30–45 minutes.
7. Chill Until Firm
- Once it’s no longer hot, transfer the pan to the fridge and chill for at least 2 hours, or until the chocolate fudge is fully set.
- If your kitchen is warm, 3–4 hours is even better. You want clean cuts and a firm, sliceable texture.
8. Slice Into Fudge Squares
- Use the parchment overhang to lift the entire block of s’mores fudge out of the pan and onto a cutting board.
- Run a sharp knife under hot water, wipe it dry, and cut the fudge into squares or bars.
- For party dessert trays, 1–1½ inch squares work perfectly.
- Wipe the knife between cuts for those neat, bakery-style edges.
Servings & Timing
- Yield: About 25–36 pieces, depending on how large you cut the squares
- Prep Time: 15–20 minutes
- Chill Time: 2–4 hours
- Total Time: 2½–4½ hours (mostly chilling time)
If you’re making this for an event, I recommend starting it in the morning or the night before so it has plenty of time to firm up.
Variations: Fun Twists on This Campfire Inspired Dessert
You know what? Once you get comfortable with the base S’mores Fudge Recipe, it becomes a canvas for all sorts of flavor ideas.
- Peanut Butter S’mores Fudge – Swirl ½ cup warmed peanut butter into the chocolate layer before adding marshmallows.
- Gluten-Free S’mores Fudge – Use gluten-free graham crackers or crunchy GF cookies for the crust.
- Dark Chocolate Espresso Fudge – Use dark chocolate chips and stir in 1–2 teaspoons instant espresso for a grown-up twist.
- Salted Caramel S’mores Fudge – Drizzle ⅓ cup thick caramel sauce over the chocolate layer, swirl lightly, and add a sprinkle of flaky sea salt on top.
- Nutty S’mores Fudge – Fold ½–1 cup chopped toasted almonds, pecans, or peanuts into the fudge before spreading it over the crust.
- Holiday S’mores Fudge – Use red, white, and green mini marshmallows for Christmas, or pastel ones for Easter; add festive sprinkles on top.
Storage & Make-Ahead Tips
Good news: this homemade fudge is just as practical as it is pretty.
How to Store
- In the fridge:
- Place cut fudge squares in an airtight container, with parchment or wax paper between layers.
- Store in the refrigerator for up to 7 days.
- On the counter:
- If your kitchen is cool, the fudge can sit at room temperature for a few hours during a party, but for longer storage, it’s safer and firmer in the fridge.
Freezer Instructions
- Arrange fudge squares on a baking sheet and freeze until solid.
- Transfer to a freezer-safe bag or container, with parchment between layers, and freeze for up to 2 months.
- To serve: Thaw in the fridge for several hours or overnight; the texture holds up very well.
Reheating or Softening
- If the fudge feels too firm straight from the fridge, let it sit at room temperature for 10–15 minutes before serving for the best, creamy texture.
- Don’t microwave the fudge to soften it—it can melt and lose that clean layered look.
Make-Ahead Advice
- This is an excellent make-ahead party dessert recipe.
- You can make the entire batch 1–2 days in advance and keep it covered in the pan in the fridge, then slice shortly before serving.
Notes from My Kitchen (What I Learned Testing This Recipe)
-
Crust thickness matters.
I tested this with both 1 cup and 1½ cups of graham cracker crumbs; the 1½ cups gives a sturdier crust that doesn’t crumble when you pick up a square. -
Chocolate choice changes the sweetness.
Using only milk chocolate chips made the fudge too sweet for most adults in my taste tests, but kids loved it. Semi-sweet gives a nice balance; a mix of semi-sweet and dark is my personal favorite. -
Don’t skip the salt.
It might seem small, but that little pinch brings out the chocolate flavor and keeps the whole dessert from tasting overly sugary. -
Watch the broiler like a hawk.
Marshmallows can go from golden to burnt in seconds. I set a timer for 30 seconds and keep the oven light on; no walking away, not even to check a text. -
Clean cuts are all about patience.
Fully chilled fudge, a hot knife, and a quick wipe between cuts make all the difference. If your fudge smears or squishes, chill it longer. -
Bring it almost to room temp before serving to kids.
Straight from the fridge, the marshmallow topping is a bit chewy; 10–15 minutes on the counter makes it softer and more “campfire-like.”
FAQs About This S’mores Fudge Recipe
1. Can I use marshmallow fluff instead of mini marshmallows?
You can, but it will be stickier and less defined; it won’t give you the same toasted, puffy marshmallow topping as mini marshmallows.
2. My fudge didn’t set—what went wrong?
Most often, it either didn’t chill long enough or the ratio of chocolate to sweetened condensed milk was off; be sure you use a full 14-ounce can and at least 3 cups of chocolate chips.
3. Can I make this S’mores Fudge Recipe dairy-free?
Yes—use dairy-free chocolate chips, coconut oil or vegan butter in place of butter, and a dairy-free sweetened condensed milk (there are coconut-based versions on the market now).
4. Do I have to toast the marshmallows?
No, but toasting adds that classic campfire flavor and a prettier finish; if you skip it, the dessert will still be tasty, just a little less “s’mores-like.”
5. How small should I cut the fudge squares for a party?
For a dessert table with other sweets, 1–1¼ inch squares are perfect; for a smaller gathering, you can cut larger bars, about 2×2 inches.
6. Can I double this recipe?
Yes—double all ingredients and use a 9×13-inch pan; chilling time may be a bit longer with the thicker batch.
7. Will the graham cracker crust get soggy?
No, as long as you press it firmly and chill the finished fudge; the butter and sugar help the crust set and stay crisp under the chocolate layer.
8. Can I make this as individual cups instead of one big pan?
Absolutely—press a small amount of crust into lined muffin tins, add the chocolate fudge layer, top with mini marshmallows, and chill; they make adorable, portable s’mores fudge cups.
Conclusion: A No-Bake Treat That Feels Like Summer All Year
This S’mores Fudge Recipe brings the spirit of the campfire right into your kitchen—no sticks, no smoke, just layers of graham cracker crust, creamy chocolate fudge, and gooey marshmallow topping. It’s a no bake dessert that looks impressive, cuts beautifully into homemade fudge squares, and works as well for kids’ sleepovers as it does for office potlucks.
If you try this recipe, I’d love to hear how it turned out—tell me in the comments how you served it, or which variation you tried. And if you enjoy campfire inspired desserts, take a look around my other chocolate fudge and bar recipes on the site for more rich chocolate treats to add to your dessert rotation.

S'mores Fudge
Ingredients
- 1 1/2 cups graham cracker crumbs about 12 full sheets; use gluten-free graham-style cookies if needed
- 6 tablespoons unsalted butter melted; salted butter is fine, reduce added salt
- 2 tablespoons granulated sugar
- 1/4 teaspoon fine sea salt for the graham cracker crust
- 3 cups semi-sweet chocolate chips about two 12-ounce bags; may mix with milk or dark chocolate
- 14 ounces sweetened condensed milk 1 standard can; do not substitute evaporated milk
- 2 tablespoons unsalted butter for the fudge layer
- 2 teaspoons pure vanilla extract
- 1/4 teaspoon fine sea salt for the fudge layer
- 3-4 cups mini marshmallows
- 1/2 cup chopped milk chocolate or chocolate chips optional, for sprinkling on top
- extra graham cracker crumbs optional, for sprinkling on top
Instructions
- Line an 8x8-inch or 9x9-inch square baking pan with parchment paper, leaving some overhang on the sides for easy lifting. Press the parchment into the corners; a light spray of cooking spray under the parchment can help it stay in place.
- In a medium bowl, combine the graham cracker crumbs, granulated sugar, and 1/4 teaspoon fine sea salt. Pour in the 6 tablespoons melted butter and stir until the crumbs are evenly moistened and resemble damp sand.1 1/2 cups graham cracker crumbs, 6 tablespoons unsalted butter, 2 tablespoons granulated sugar, 1/4 teaspoon fine sea salt
- Press the crumb mixture firmly and evenly into the bottom of the prepared pan, using the bottom of a measuring cup or your hand. Press well so the crust holds together when sliced. Chill the crust in the refrigerator while you prepare the fudge layer.
- Place the chocolate chips, sweetened condensed milk, and 2 tablespoons butter in a large microwave-safe bowl. Microwave on 50% power for 60 seconds, then stir well. Continue microwaving in 20–30 second bursts at 50% power, stirring between each, until the chocolate is mostly melted and smooth with no large lumps.3 cups semi-sweet chocolate chips, 14 ounces sweetened condensed milk, 2 tablespoons unsalted butter
- Once the mixture is smooth, stir in the vanilla extract and 1/4 teaspoon fine sea salt until fully combined. The fudge should be thick, glossy, and spreadable, similar to warm brownie batter.2 teaspoons pure vanilla extract, 1/4 teaspoon fine sea salt
- If preferred, combine the chocolate chips, sweetened condensed milk, and butter in a heavy-bottomed saucepan over very low heat. Stir constantly until melted and smooth, then remove from heat and stir in the vanilla and salt.3 cups semi-sweet chocolate chips, 14 ounces sweetened condensed milk, 2 tablespoons unsalted butter, 2 teaspoons pure vanilla extract, 1/4 teaspoon fine sea salt
- Remove the chilled graham cracker crust from the fridge. Pour the warm chocolate fudge mixture over the crust and spread it evenly into the corners with a spatula. Tap the pan gently on the counter to release any air bubbles and level the surface.
- While the fudge is still warm, sprinkle the mini marshmallows evenly over the top, pressing them very lightly into the fudge so they adhere but stay fluffy. If desired, sprinkle chopped milk chocolate or chocolate chips and a pinch of extra graham cracker crumbs over the marshmallows.3-4 cups mini marshmallows, 1/2 cup chopped milk chocolate or chocolate chips, extra graham cracker crumbs
- Using a kitchen torch, gently toast the marshmallows until they are golden brown and lightly charred in spots, rotating the pan as needed for even browning.
- Alternatively, preheat your oven broiler. Place the pan on the middle rack and broil for 30–90 seconds, watching constantly so the marshmallows do not burn. Rotate the pan as needed for even toasting, then remove immediately once golden.
- Let the pan cool at room temperature for about 30–45 minutes. Once no longer hot, transfer to the refrigerator and chill for at least 2 hours, or up to 3–4 hours, until the fudge layer is fully set and firm enough to slice cleanly.
- Use the parchment overhang to lift the entire slab of s'mores fudge from the pan onto a cutting board. Run a sharp knife under hot water, wipe dry, and cut into squares or bars (about 1–1 1/2 inches for party-size pieces). Wipe the knife clean between cuts for neat edges.
Notes
Prep Time: 15–20 minutes active.
Chill Time: 2–4 hours.
Total Time: about 2 1/2–4 1/2 hours, mostly chilling. Variations:
- Peanut Butter S’mores Fudge: Swirl 1/2 cup warmed peanut butter into the chocolate fudge layer before adding marshmallows.
- Gluten-Free S’mores Fudge: Use gluten-free graham crackers or crunchy GF cookies for the crust.
- Dark Chocolate Espresso Fudge: Use dark chocolate chips and stir 1–2 teaspoons instant espresso into the fudge mixture.
- Salted Caramel S’mores Fudge: Drizzle 1/3 cup thick caramel sauce over the fudge layer, swirl lightly, and finish with flaky sea salt.
- Nutty S’mores Fudge: Fold 1/2–1 cup chopped toasted nuts (almonds, pecans, or peanuts) into the fudge before spreading.
- Holiday S’mores Fudge: Use colored mini marshmallows and festive sprinkles. Storage: Store cut fudge in an airtight container with parchment between layers. Refrigerate up to 7 days. For longer storage, freeze pieces on a baking sheet, then transfer to a freezer-safe container for up to 2 months. Thaw in the refrigerator. For best texture, let chilled fudge sit at room temperature 10–15 minutes before serving. Tips: Don’t skip the salt in both crust and fudge—it balances sweetness and boosts chocolate flavor. Watch marshmallows closely under the broiler, as they can burn quickly. For the cleanest cuts, ensure the fudge is fully chilled and use a hot, wiped knife.