Would you like to save this?
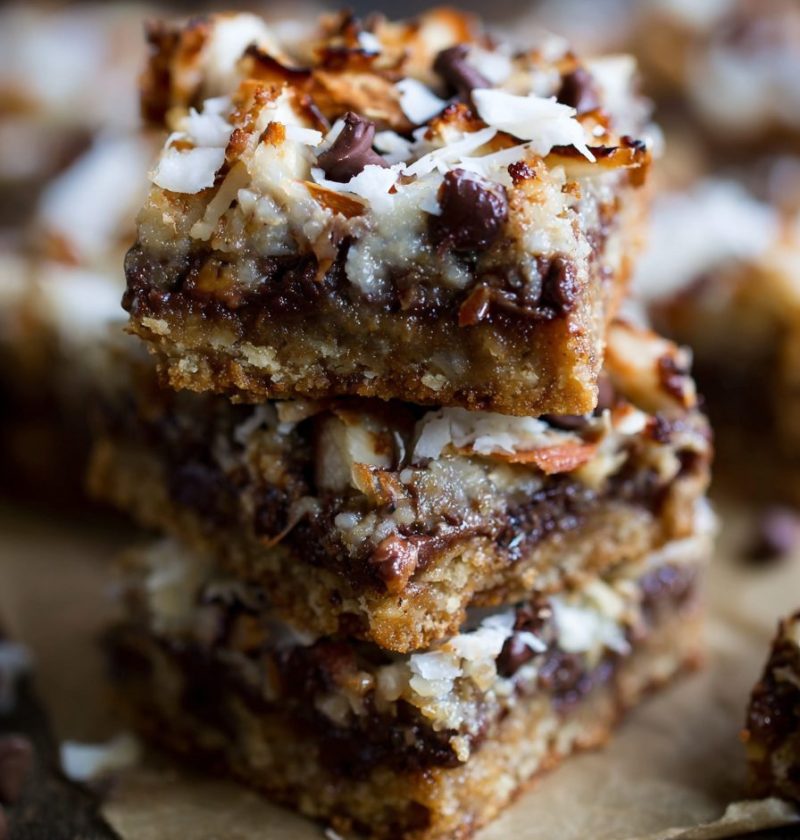
Paleo Magic Cookie Bars Recipe
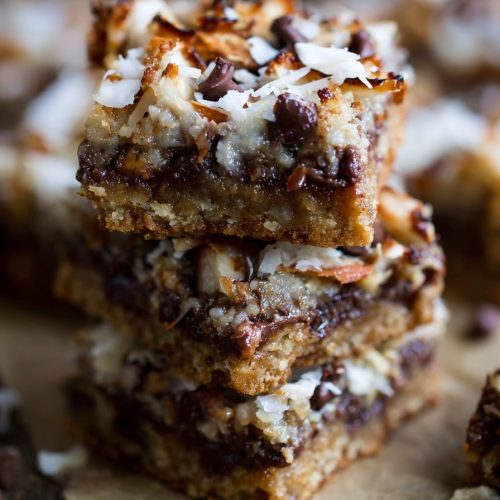
This Paleo Magic Cookie Bars Recipe gives you all the gooey, coconut‑chocolate goodness of classic magic bars—only these are grain free, gluten free, dairy free, and made with real, wholesome ingredients you can feel good about.
These paleo magic cookie bars are my answer to that craving for something rich and “bakery special” without grabbing a box mix or a sugar bomb from the store. They’ve got a buttery almond flour crust, a luscious coconut milk caramel, dark chocolate, and toasty coconut on top. Think of them as a healthier magic bar that still tastes like a celebration.
I tend to pull this paleo dessert recipe out for holidays, bake sales, and Sunday dinners—any time I want a crowd-pleasing treat that just happens to be a clean eating dessert recipe. And you know what? No one ever guesses they’re gluten free cookie bars or refined sugar free dessert squares. They just taste like really good Coconut Chocolate Bars.

Why You’ll Love This Paleo Magic Cookie Bars Recipe
Here’s why these healthy magic bars earn a permanent spot in your recipe box:
- Naturally gluten free and grain free – Almond flour and coconut flour stand in for regular flour, so they’re perfect for friends who avoid gluten.
- Dairy free but still rich – Full-fat coconut milk gives you that Creamy “condensed milk” vibe without any dairy at all.
- No refined sugar – Sweetened with coconut sugar and maple syrup, these bars are a refined sugar free dessert that still satisfies a serious sweet tooth.
- Simple pantry ingredients – Everything is easy to find in a regular grocery store; no weird specialty items.
- Great make-ahead dessert – These paleo magic cookie bars actually taste better after chilling, so they’re perfect for parties or holidays.
- Freezer-friendly – You can stash extras in the freezer for those late‑night chocolate emergencies.
- Customizable – Easy to tweak for nut-free, extra chocolatey, or even “trail mix” style versions.
- Crowd tested – Kids, teens, and skeptical husbands have all approved these at my house, many times.
What Makes These Paleo Magic Cookie Bars So Special?
Let me explain what we’re doing here, because these aren’t just any chocolate chip cookie bars paleo folks can eat. We’re rebuilding that nostalgic “seven layer bar” feeling with clean ingredients and a few smarter baking tricks.
Classic magic cookie bars use a graham cracker crust, sweetened condensed milk, regular chocolate chips, and usually a good amount of butter. Delicious, yes. Friendly for someone who eats paleo or dairy free? Not so much.
These paleo friendly sweets flip the script:
- Almond flour crust instead of graham crackers
- Coconut oil instead of butter
- Homemade coconut milk “caramel” instead of condensed milk
- Dairy free dark chocolate chips instead of milk chocolate chips
- Coconut sugar and maple syrup instead of white sugar
The result is a pan of almond flour cookie bars that’s rich, chewy, and caramel-y, but made with ingredients that support a cleaner way of eating.
I like to bake a batch on a Friday afternoon, let them chill overnight, and slice them Saturday morning for coffee with neighbors or family. They also travel well in lunchboxes, cookie boxes, and care packages—just tuck parchment or wax paper between layers so they don’t stick.
Ingredients for the Best Paleo Magic Cookie Bars
Here’s everything you’ll need for this Paleo Magic Cookie Bars Recipe. I’m adding little notes so you can choose the right versions and know where you can swap.
Almond Flour Crust
- 1 ½ cups fine blanched almond flour
- Look for “super fine” almond flour (Bob’s Red Mill or Kirkland work well) for a tender, not gritty, crust.
- ¼ cup coconut flour
- Helps the crust hold together; coconut flour is very absorbent, so measure carefully.
- ¼ cup melted coconut oil
- Use refined coconut oil if you don’t want a strong coconut flavor; unrefined if you love coconut.
- 3 tablespoons pure maple syrup
- This binds the crust and adds gentle sweetness; use Grade A amber for a nice, rich flavor.
- ½ teaspoon pure vanilla extract
- Adds that classic cookie flavor to the crust.
- ¼ teaspoon fine sea salt
- Balances sweetness and brings all the flavors forward.
Coconut “Condensed Milk” Caramel Layer
- 1 (13.5–14 ounce) can full-fat coconut milk
- Shake the can before opening. Full fat is important; light coconut milk won’t thicken enough.
- ⅓ cup coconut sugar
- Gives a deep, caramel flavor and a beautiful golden color.
- 2 tablespoons coconut oil
- Adds gloss and richness to the caramel layer.
- 1 teaspoon pure vanilla extract
- Stir this in off the heat so the flavor stays bright.
- Pinch of fine sea salt
- Just a pinch; it keeps the caramel from tasting flat.
Topping Layers
- 1 cup unsweetened shredded coconut or coconut flakes
- Either works; flakes give a chewier texture, shredded gives a more even layer.
- 1 cup dairy free dark chocolate chips or chopped dark chocolate
- Look for 60–70% cacao and check that it’s dairy free if needed (Enjoy Life, Hu, or Trader Joe’s often work).
- ½ cup chopped nuts (pecans, walnuts, or almonds)
- For crunch and flavor; lightly toast them first if you have time for extra depth.
- Optional: 2–3 tablespoons extra coconut sugar for sprinkling on top
- Helps create those caramelized, shiny pockets on the surface.
How to Make Paleo Magic Cookie Bars
Here’s the thing: these grain free cookie bars look fancy, but the steps are very basic. You’ll make the coconut caramel, press in a simple crust, layer the goodies, and bake.
1. Prep your pan and oven
- Preheat your oven to 350°F (175°C).
- Line an 8 x 8‑inch baking pan with parchment paper, leaving an overhang on two sides so you can lift the bars out later.
- Lightly grease the exposed sides with a bit of coconut oil so nothing sticks.
2. Make the coconut milk caramel
- In a medium saucepan, combine: coconut milk, coconut sugar, and 2 tablespoons coconut oil.
- Bring to a gentle simmer over medium heat, whisking until the coconut sugar dissolves.
- Lower the heat to medium-low and let it simmer 15–20 minutes, stirring every couple of minutes.
- You’re looking for it to reduce by about a third and thicken to a pourable caramel consistency. It should coat the back of a spoon.
- Remove from the heat, stir in vanilla and a pinch of salt, then set aside to cool slightly while you make the crust.
- It will thicken more as it cools, so don’t worry if it still seems a bit loose.
3. Mix the almond flour crust
- In a mixing bowl, whisk together almond flour, coconut flour, and salt.
- Add melted coconut oil, maple syrup, and vanilla.
- Stir with a fork or spatula until the mixture looks like slightly damp sand and holds together when you press it between your fingers.
- If it seems too dry and crumbly, add 1 more teaspoon of maple syrup at a time; if it’s too wet, sprinkle in an extra tablespoon of almond flour.
4. Press and pre-bake the crust
- Transfer the crust mixture to your lined pan.
- Press it down firmly with your fingers or the bottom of a measuring cup, compacting it evenly into all corners.
- Bake the crust for 10–12 minutes, just until the edges are lightly golden.
- This helps the crust stay together under the caramel and toppings.
5. Layer the toppings
- Remove the pan from the oven and leave the oven on at 350°F.
- Sprinkle the baked crust evenly with shredded coconut, then chopped nuts, then chocolate chips.
- I like to keep some chocolate back to scatter on top after the caramel, so you get a pretty speckled top.
- Give your coconut caramel a quick stir. If it has thickened too much to pour, warm it gently over low heat for a minute or two.
6. Pour on the coconut caramel
- Slowly pour the warm coconut caramel over the layered toppings, trying to cover as much of the surface as you can.
- Use a spatula to nudge it into the corners and help it seep down.
- Sprinkle any remaining chocolate chips over the top, plus a little extra shredded coconut or a spoonful of coconut sugar if you like a more caramelized top.
7. Bake until set and golden
- Return the pan to the oven and bake for 18–22 minutes, until the top looks set, the edges are bubbling slightly, and the coconut is gently golden.
- Keep an eye on it during the last 5 minutes; if the coconut browns too fast, tent loosely with foil.
8. Cool, chill, and slice
- Remove the pan from the oven and let the bars cool on a wire rack until they reach room temperature.
- Once cooled, transfer the pan to the fridge and chill for at least 2 hours, or until fully set.
- This step is key—if you slice too soon, they’ll be soft and messy. Still delicious, but messy.
- Use the parchment overhang to lift the slab out of the pan. Place it on a cutting board and slice into 16 small or 9 larger bars with a sharp knife.
- Wipe the knife with a warm, damp cloth between cuts for clean edges.
Servings & Timing
Yield:
- About 16 small bars or 9 generous bars
Timing:
- Prep time: ~25 minutes (including caramel and crust)
- Bake time: 30–35 minutes total
- Chill time: at least 2 hours
- Total time: About 3 hours, most of it hands-off while the bars cool and chill
These are a perfect make-ahead paleo baking recipe: you can do all the work in the morning or the day before and forget about dessert while you handle the rest of your menu.
Fun Variations for Your Paleo Magic Cookie Bars
Once you’ve made the classic version, you’ll probably start thinking up your own twists. Here are some ideas to get you started.
- Extra-Nutty Magic Bars – Double the nuts and use a mix of pecans, almonds, and hazelnuts for more crunch and a “candied nut” vibe.
- Nut-Free School-Friendly Bars – Swap the almond flour crust for a sunflower seed flour blend and leave off the nut topping, adding extra coconut and seeds for texture.
- Mocha Magic Bars – Stir 1–2 teaspoons of instant espresso powder into the coconut caramel and use extra dark chocolate for a coffee‑shop flavor.
- Salted Caramel Bars – Sprinkle flaky sea salt over the top right after baking for that sweet‑salty contrast.
- Berry-Chocolate Bars – Press a handful of freeze‑dried raspberries or strawberries over the chocolate layer before baking for a pretty, tangy twist.
- Holiday Spice Version – Add ½ teaspoon cinnamon and a pinch of nutmeg to the crust, and top finished bars with a drizzle of melted dark chocolate for a festive dessert tray.
Storage, Freezing & Make-Ahead Tips
These coconut chocolate bars are very forgiving, which makes them wonderful for hosting and gifting.
Room temperature:
- Keep sliced bars in a covered container at cool room temperature for up to 1 day if your kitchen isn’t hot. They’ll be softer but still hold.
Refrigerator:
- Store in an airtight container for 5–6 days.
- Place parchment or wax paper between layers to prevent sticking.
- The texture stays chewy and the flavors meld together even more after a day or two.
Freezer:
- Arrange bars on a baking sheet to freeze solid, then transfer to a freezer bag or container.
- They keep well for up to 2 months.
- Let them thaw in the fridge for a few hours or at room temperature for 20–30 minutes before serving. I actually like them slightly chilled; they taste like fudge meets cookie bar.
Make-ahead:
- You can bake the whole pan 1–2 days ahead, chill, and keep it uncut in the fridge, then slice just before serving for clean edges and a fresh look.
- For holiday platters, I often bake a double batch in two pans, freeze one, and bring it out the morning of the event.
Notes from My Kitchen (Little Things That Make a Big Difference)
- Don’t rush the caramel. If the coconut milk mixture doesn’t cook long enough, your bars will still taste good, but the texture will be softer and less “set.” Look for that thicker, syrupy consistency.
- Use the right pan size. An 8 x 8‑inch pan gives a nice thick bar. A 9 x 9‑inch pan works too, but the bars will be a bit thinner and may bake a few minutes faster.
- Taste your chocolate. Since chocolate is a star in these dairy free cookie bars, use one you’d enjoy nibbling on its own. A chalky or too-sweet chocolate will change the whole dessert.
- Let them chill completely. I know, it’s hard to wait. But chilling helps everything set into neat layers—you’ll get those pretty squares you can stack on a platter.
- Adjust sweetness for your crowd. If your family is used to very sweet desserts, you can add an extra tablespoon of maple syrup to the crust or a spoonful more coconut sugar to the caramel as you simmer it.
- Don’t worry about perfection. If the caramel doesn’t cover every bit perfectly, or the top looks a little rustic, that’s fine. These are meant to look homemade and inviting, not like they came from a factory.
Sometimes I’ll even keep a bag of these in the freezer for those evenings when I want something with my tea, but not a full‑on sugar crash. One little bar feels like such a treat.
FAQs About Paleo Magic Cookie Bars
1. Can I make these completely nut free?
Yes—use a seed-based crust (sunflower seed flour or ground sunflower seeds in place of almond flour) and skip the nut topping, adding extra coconut and maybe pumpkin seeds for crunch.
2. Are these vegan as well as paleo?
They’re naturally egg free and dairy free, so if you use truly vegan dark chocolate chips and maple syrup or coconut sugar, they can fit into a vegan dessert lineup.
3. How do I know when the coconut caramel is thick enough?
It should coat the back of a spoon and leave a clean line if you run your finger through it (careful, it’s hot). You should also see the volume in the pan reduced by about a third.
4. My crust is crumbly—what went wrong?
Usually that means the mixture was a bit too dry. Next time, add another teaspoon or two of maple syrup or a splash more melted coconut oil until it presses together easily before baking.
5. Can I reduce the sugar even more?
You can slightly cut back on the coconut sugar in the caramel (try ¼ cup) and still get a nice result, though the caramel will be less sweet and a bit lighter. Keep in mind the chocolate also brings sweetness.
6. Can I use a different sweetener instead of coconut sugar?
Maple sugar or date sugar can work in the caramel, but they may change the flavor and color slightly. I don’t recommend granulated erythritol or stevia in this recipe; they don’t give the same gooey texture.
7. Can I make these chocolate chip cookie bars paleo with white chocolate?
Most white chocolate contains dairy and refined sugar, so it’s usually not paleo friendly. If you find a dairy free, cleaner white-style chocolate, you can mix a little into the dark chocolate layer, but it’s more of an indulgence than a strict paleo choice.
8. Do these travel well for parties or potlucks?
They do. Chill them well first, then pack them in a flat container with parchment between layers. Keep them cool if possible, especially on hot days, so the coconut caramel stays firm.
Wrapping It Up (And Passing the Plate)
This Paleo Magic Cookie Bars Recipe gives you all the comfort of a classic magic bar—gooey coconut, rich chocolate, a crumbly cookie base—without the grains, gluten, dairy, or refined sugar. They’re the kind of paleo dessert recipe that feels special enough for holidays but simple enough for a random Tuesday you need a little sweetness.
If you make these grain free cookie bars, I’d love to hear how they turned out—did your family guess they were a healthier version? Leave a comment, share your favorite variation, or try them alongside other paleo baking recipes like brownies or lemon bars for a full dessert spread. Pull out a plate, pour some coffee or tea, and enjoy every bite.
Paleo Magic Cookie Bars
Ingredients
- 1 1/2 cups blanched almond flour super fine
- 1/4 cup coconut flour
- 1/4 cup coconut oil melted; use refined for less coconut flavor
- 3 tablespoons pure maple syrup plus more as needed to adjust crust texture
- 1/2 teaspoon pure vanilla extract
- 1/4 teaspoon fine sea salt for crust
- 13.5-14 oz full-fat coconut milk 1 can; shaken well
- 1/3 cup coconut sugar for coconut caramel, plus extra for topping if desired
- 2 tablespoons coconut oil for coconut caramel
- 1 teaspoon pure vanilla extract for coconut caramel
- fine sea salt pinch, for coconut caramel
- 1 cup unsweetened shredded coconut or coconut flakes
- 1 cup dairy free dark chocolate chips or chopped dark chocolate (60–70% cacao)
- 1/2 cup chopped nuts pecans, walnuts, or almonds; lightly toasted if desired
- 2-3 tablespoons coconut sugar optional, for sprinkling on top
- coconut oil for greasing pan
Instructions
- Preheat the oven to 350°F (175°C). Line an 8×8-inch baking pan with parchment paper, leaving an overhang on two sides for easy lifting. Lightly grease any exposed sides of the pan with coconut oil.coconut oil
- In a medium saucepan, combine the full-fat coconut milk, 1/3 cup coconut sugar, and 2 tablespoons coconut oil. Bring to a gentle simmer over medium heat, whisking until the coconut sugar dissolves.13.5-14 oz full-fat coconut milk, 1/3 cup coconut sugar, 2 tablespoons coconut oil
- Reduce heat to medium-low and simmer for 15–20 minutes, stirring every couple of minutes, until the mixture has reduced by about one-third and is thick enough to coat the back of a spoon. Remove from heat and stir in 1 teaspoon vanilla and a pinch of sea salt. Set aside to cool slightly; it will thicken more as it cools.1 teaspoon pure vanilla extract, fine sea salt
- In a mixing bowl, whisk together the almond flour, coconut flour, and 1/4 teaspoon sea salt. Add the melted 1/4 cup coconut oil, 3 tablespoons maple syrup, and 1/2 teaspoon vanilla. Stir until the mixture resembles slightly damp sand and holds together when pressed between your fingers. If too dry, add maple syrup 1 teaspoon at a time; if too wet, sprinkle in a bit more almond flour.1 1/2 cups blanched almond flour, 1/4 cup coconut flour, 1/4 teaspoon fine sea salt, 1/4 cup coconut oil, 3 tablespoons pure maple syrup, 1/2 teaspoon pure vanilla extract
- Transfer the crust mixture to the prepared pan. Press it firmly and evenly into the bottom of the pan, compacting it well. Bake for 10–12 minutes, until the edges are just lightly golden. Leave the oven on at 350°F.
- Remove the crust from the oven. Sprinkle evenly with shredded coconut, then chopped nuts, then most of the dark chocolate chips, reserving a small handful of chocolate to scatter on top later.1 cup unsweetened shredded coconut or coconut flakes, 1/2 cup chopped nuts, 1 cup dairy free dark chocolate chips
- Stir the coconut caramel. If it has thickened too much to pour, gently warm it over low heat for a minute or two. Slowly pour the warm caramel evenly over the coconut, nuts, and chocolate, using a spatula to nudge it into the corners so it seeps down into the layers.
- Sprinkle the reserved chocolate chips over the top, along with a little extra shredded coconut or 2–3 tablespoons coconut sugar if you like a more caramelized, shiny top.1 cup dairy free dark chocolate chips, 1 cup unsweetened shredded coconut or coconut flakes, 2-3 tablespoons coconut sugar
- Return the pan to the oven and bake for 18–22 minutes, until the top looks set, the edges are bubbling slightly, and the coconut is lightly golden. Check during the last 5 minutes; if the coconut is browning too quickly, tent the pan loosely with foil.
- Place the pan on a wire rack and let the bars cool completely to room temperature. Once cooled, transfer to the refrigerator and chill for at least 2 hours, or until fully set.
- Use the parchment overhang to lift the slab out of the pan and onto a cutting board. Slice into 16 smaller bars or 9 larger bars with a sharp knife, wiping the knife with a warm, damp cloth between cuts for clean edges. Serve chilled or at cool room temperature.