Would you like to save this?
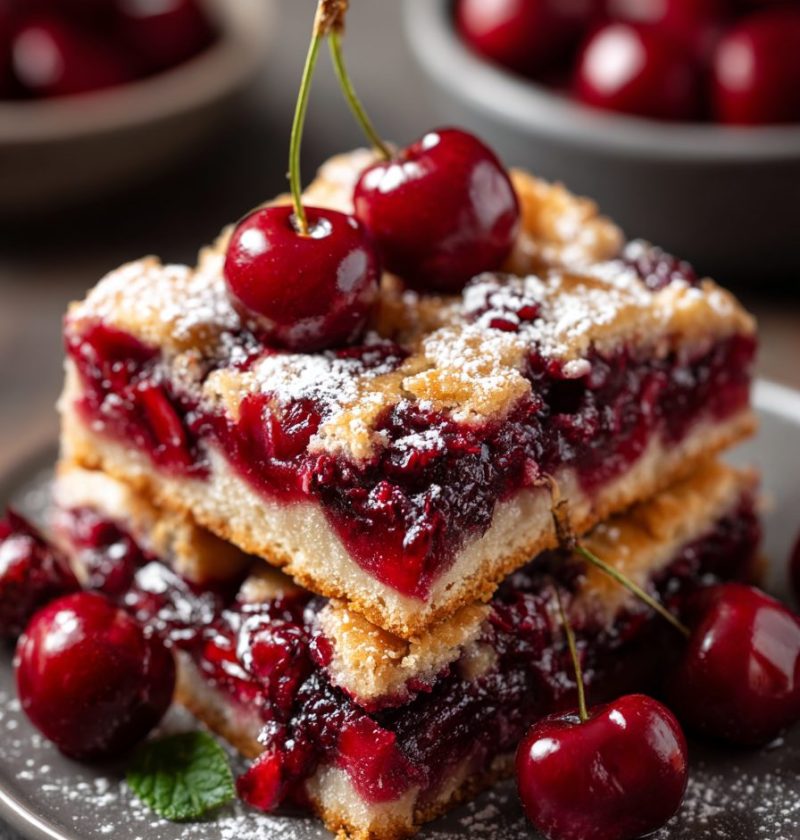
Cherry Pie Bars Recipe (Buttery, Easy, and Perfect for Sharing)
This Cherry Pie Bars Recipe gives you all the comfort of a classic cherry pie, baked into buttery, handheld cherry dessert bars that are perfect for potlucks, holidays, and “just because” afternoons.

What Makes This Cherry Pie Bars Recipe So Special?
If you love old-fashioned cherry pie but don’t always feel like rolling out crust, these cherry Pie Bars are going to be your new favorite trick. Think soft, buttery cookie bars on the bottom, a thick layer of glossy cherry pie filling in the middle, and little golden dollops of crust baked on top. They slice into neat cherry bar squares that travel well and look like you fussed all afternoon.
I started making these homemade cherry bars when my kids were teenagers. They’d bring home a sign-up sheet for the school bake sale at 9:00 p.m. and say, “Mom, I need something for tomorrow.” A full pie was risky and messy. But easy cherry bars? Those I could pull off, even on a weeknight.
These cherry pastry bars are:
- Easier than pie (no rolling, no crimping, no stress)
- Faster to bake than a traditional fruit bar recipe with multiple layers
- Flexible enough to use canned cherry pie filling or a quick homemade filling
You can dress them up for Christmas with a simple glaze, or serve them at a summer cookout next to the potato salad and burgers. I’ve carried them to church gatherings, book clubs, and neighborhood block parties, and I’ve yet to bring any home. That’s my personal benchmark for a true crowd pleasing dessert.
They’re not “health food” by any stretch, but they are a little lighter than a deep-dish pie slice—thinner layers and easy portion control. You can also tweak the sugar and flour if you want slightly lighter cherry crumb bars. I’ll walk you through that further down.
Let me explain how to pull these cherry cookie bars together without any fuss.
Why You’ll Love This Cherry Pie Bars Recipe
- Effortless but impressive – Looks bakery-level fancy, tastes like grandma’s, but uses simple pantry ingredients.
- No rolling pin required – The buttery crust bars are mixed like cookie dough and pressed right into the pan.
- Great for feeding a crowd – One 9×13 pan makes a big batch of potluck dessert bars for parties or picnics.
- Flexible with fillings – Use canned cherry pie filling or your favorite fruit filling for easy dessert bars.
- Freezer-friendly – These cherry bar squares freeze well, so you can bake ahead for holidays or busy weeks.
- Kid and adult approved – Sweet, buttery, and nostalgic, with that classic cherry pie flavor everyone recognizes.
- Easy to transport – No wobbly pie slices; these sturdy cherry dessert bars travel well in a tight-fitting container.
- Customizable – Turn them into cherry crumb bars, add a glaze, or mix in almond extract for a bakery-style twist.
Ingredients for the Best Cherry Pie Bars
Here’s everything you’ll need for this Cherry Pie Bars Recipe. I’ll give you a few tips and swaps, too. Measurements are in U.S. cups and spoons.
For the buttery crust and topping
- 1 cup (2 sticks / 226 g) unsalted butter, softened
Soft, but not greasy or melted—this gives you that tender, cookie-like base. - 1 ¾ cups (350 g) granulated sugar
- 4 large eggs, room temperature
- 2 tsp vanilla extract (pure vanilla if you can)
- ½ tsp almond extract (optional but highly recommended for cherry flavor)
- 3 cups (360 g) all-purpose flour, spooned and leveled
- 1 tsp baking powder
- ½ tsp fine sea salt
You can use salted butter—just cut the added salt down to a pinch. If you bake a lot, I like King Arthur and Gold Medal flours for consistent results.
For the cherry filling
You’ve got two main paths here: canned cherry pie filling or a quick homemade version. Both work beautifully.
Easiest version (what I usually do on a busy day):
- 2 cans (21 oz each) cherry pie filling
Look for a good-quality brand with plenty of fruit. You can mix one can cherry and one can mixed berry for a fun twist on fruit bar recipes.
Quick homemade cherry filling (if you’re feeling a little extra):
- 4 cups pitted cherries, fresh or frozen (no need to thaw frozen)
- ⅔ cup granulated sugar (adjust to taste if your cherries are very sweet or very tart)
- 3 tbsp cornstarch
- 2 tbsp lemon juice
- ½ tsp vanilla extract
- Pinch of salt
Cook the cherries, sugar, and salt in a saucepan over medium heat until juicy. Stir in cornstarch mixed with lemon juice and cook until thick and glossy, then stir in vanilla and let it cool slightly before using.
Either way, you’re creating rich cherry pastry bars with that classic jammy middle.
Optional glaze (for a bakery-style finish)
- 1 cup powdered sugar, sifted
- 2–3 tbsp milk or heavy cream
- ½ tsp vanilla or almond extract
Whisk until smooth and drizzle over cooled bars.
Step-by-Step Directions
Let’s walk through this Cherry Pie Bars Recipe together. You’ll see it’s really just a big pan of soft cookie dough dressed up like cherry dessert bars.
-
Preheat and prep the pan
Preheat your oven to 350°F (175°C). Line a 9×13-inch baking pan with parchment paper, letting it hang over the long sides like little handles. Lightly grease the parchment. This makes it easy to lift the cherry bars out and cut nice, clean squares. -
Cream the butter and sugar
In a large mixing bowl (or with a stand mixer), beat the softened butter and granulated sugar together on medium speed until light and fluffy, about 2–3 minutes. It should look pale and a bit airy—this helps the crust stay tender instead of tough. -
Add the eggs and flavorings
Add the eggs one at a time, mixing well after each addition and scraping down the bowl as needed. Mix in the vanilla extract and almond extract. At this stage the batter will look smooth and a bit thick, almost like cake batter. -
Whisk the dry ingredients
In a separate bowl, whisk together the flour, baking powder, and salt. This keeps the baking powder from clumping in one spot, so your cherry cookie bars rise evenly. -
Combine wet and dry
Add the dry ingredients to the butter mixture in two or three rounds, mixing on low speed just until combined. Stop as soon as no dry streaks remain. Overmixing can make your buttery crust bars tough instead of soft. -
Reserve the topping dough
Scoop out about 1½ cups of the dough and set it aside in a small bowl. This will be your topping that bakes into little golden islands over the cherry filling. -
Press the crust into the pan
Spread the remaining dough into your prepared pan. Use a spatula or your fingers (lightly floured or sprayed with nonstick spray) to press it into an even layer. Try to push it slightly up the edges; this helps cradle the cherry pie filling so it doesn’t leak. -
Layer on the cherry filling
Spread the cherry pie filling evenly over the crust. If you’re using canned filling, I like to stir it briefly in a bowl first so it distributes easily and doesn’t come out in big clumps. Make sure you reach all the corners; you want every bite of these cherry dessert bars to have fruit. -
Dot with the reserved dough
Take the reserved dough and tear off small pieces with your fingers—think nickel or quarter-size—and scatter them over the cherry filling. You don’t need to cover the entire surface. Those little exposed cherry pockets will bubble up and look very pretty. -
Bake until golden and set
Bake for 35–40 minutes, or until the top is lightly golden and the edges are set. The center should be just barely jiggly but not liquid. Every oven runs a little different, so start checking around 32 minutes. -
Cool completely (hard, but worth it)
Let the bars cool in the pan on a wire rack for at least 1–2 hours. For the cleanest cuts, cool them to room temperature, then chill for 30–60 minutes. I know that sounds like forever, but it helps the cherry filling set and keeps these cherry bar squares neat instead of messy. -
Add glaze (optional) and slice
If using the glaze, whisk together the powdered sugar, milk or cream, and extract until smooth. Drizzle over the cooled bars. Use the parchment handles to lift the whole slab out of the pan, then cut into squares or rectangles. Wipe your knife between cuts for tidy edges.
Now you’ve got a full pan of homemade cherry bars ready for sharing—or hiding in the back of the fridge. I’m not judging.
Servings & Timing
- Yield: About 24 cherry bar squares (or 18 larger bars)
- Prep Time: 20 minutes
- Bake Time: 35–40 minutes
- Cooling Time: 1–2 hours (plus up to 1 hour chilling if you want super clean slices)
- Total Time: About 2½–3 hours, mostly hands-off while they cool
You can absolutely bake these the night before and let them cool completely on the counter, covered lightly. In the morning you’ll have easy dessert bars ready for school lunches, potluck dessert bars, or coffee with a friend.
Tasty Variations and Twists
Here’s the thing: once you’ve made this Cherry Pie Bars Recipe once or twice, you’ll probably start playing with it. That’s half the fun.
- Almond Bakery-Style Cherry Bars – Add an extra ½ teaspoon almond extract to the dough and top the cooled bars with sliced toasted almonds.
- Cherry Crumb Bars – Stir ½ cup rolled oats and ¼ cup chopped nuts into the reserved dough before scattering it over the cherries for a crumbly, rustic topping.
- Gluten-Free Cherry Dessert Bars – Use a good 1:1 gluten-free baking flour blend and check that your pie filling is gluten-free; bake time may vary by a few minutes.
- Cheesecake Swirl Cherry Bars – Spread a layer of sweetened cream cheese (8 oz cream cheese + ⅓ cup sugar + 1 egg yolk) over the crust, then add the cherry filling and bake as directed.
- Mixed Berry Cherry Bars – Replace 1 can of cherry pie filling with mixed berry or blueberry for a fun twist that still feels familiar.
- Lemon-Cherry Cookie Bars – Add 1 tablespoon lemon zest to the crust and 1–2 tablespoons lemon juice to the glaze for a bright, tangy note.
You know what? If you fall in love with this method, you can use the same base for all kinds of fruit bar recipes—blueberry, apple, raspberry, even peach.
How to Store, Freeze, and Reheat
One of the reasons I love these cherry pastry bars is that they store beautifully. They’re the kind of dessert you can make ahead and forget about until the guests ring the bell.
Room temperature:
- Keep the cooled bars in an airtight container at room temperature for up to 2 days.
- If your kitchen runs warm or humid, I recommend the fridge instead so the cherry filling stays fresh.
Refrigerator:
- Store sliced bars in a covered container in the fridge for up to 5 days.
- Layer with parchment or wax paper if you need to stack them.
- Serve chilled or let them sit out for 15–20 minutes so the crust softens slightly.
Freezer:
- Freeze the cut bars on a baking sheet until firm, then transfer them to a freezer bag or container.
- They’ll keep well for 2–3 months.
- Thaw overnight in the fridge, or at room temperature for about an hour.
If you like them a touch warm, you can microwave a bar for 10–15 seconds. It’s lovely with a scoop of vanilla ice cream—suddenly your cherry dessert bars feel like cherry pie à la mode.
Notes from My Kitchen
A few little things I’ve learned over many pans of cherry pie bars:
- Don’t rush the cooling. Warm bars will seem too soft and messy. As they cool, the filling sets and the crust firms up. Patience here really does pay off.
- Almond extract is magic with cherries. If you’ve always wondered why bakery cherry bars taste richer or more “cherry,” it’s usually the almond. Start with ½ teaspoon and see what you think.
- Watch the edges. If the center still looks pale but the edges are getting brown, tent the pan loosely with foil for the last 5–10 minutes of baking.
- Use parchment paper. It feels like an extra step, but being able to lift the whole slab out and slice on a cutting board makes a huge difference for clean presentation.
- Customize the sweetness. If you’re sweet-sensitive, you can cut the sugar in the crust by ¼ cup without affecting texture much, especially if your cherry pie filling is on the sweeter side.
- Pan size matters. If you use a smaller pan, the bars will be thicker and may need more time to bake; a larger pan will make thinner bars that bake faster and may brown sooner.
Honestly, once you’ve made these a couple times, they become one of those “throw-together” desserts you barely need a recipe for—kind of like your favorite cookie dough but dressed up as cherry crumb bars.
Cherry Pie Bars Recipe FAQs
Can I use homemade cherry pie filling instead of canned?
Yes, absolutely. Use about 4 cups of thick homemade cherry filling; just make sure it’s not too runny or the bars may be soggy.
Can I use frozen cherries?
Yes. If making your own filling, use frozen cherries straight from the freezer and cook them down with sugar and cornstarch as described; don’t thaw first.
My bars seem underbaked in the middle—what should I do?
If the center looks wet and jiggles a lot when you gently shake the pan, bake for another 5–10 minutes, checking often; some ovens simply need more time.
Can I make these cherry dessert bars the night before serving?
Yes, they’re actually better the next day, once fully cooled and set—just cover them and keep at room temperature or in the fridge.
How do I keep the crust from getting too brown?
If the top and edges are browning faster than you’d like, loosely cover the pan with foil during the last part of baking to protect the surface.
Can I use another fruit filling instead of cherry?
Definitely. This recipe works well with blueberry, apple, raspberry, or mixed berry fillings—think of it as a flexible fruit bar recipe base.
Do these cherry bar squares need to be refrigerated?
They can sit at room temperature for a day or two, but for longer storage or in warm weather, keep them in the fridge for best texture and freshness.
Can I cut the recipe in half?
Yes. Bake in an 8×8 or 9×9 pan and start checking around 25–28 minutes, as smaller pans can bake a little faster.
Final Thoughts on This Cherry Pie Bars Recipe
These easy cherry bars bring together everything I love in a dessert: buttery crust, bright cherry filling, simple ingredients, and a big payoff when you set the pan on the table. They’re cozy enough for a Sunday dinner and sturdy enough for a crowd, which is why they’ve become one of my go-to potluck dessert bars.
If you try this Cherry Pie Bars Recipe, let me know how it goes—leave a comment, share your own twists, or tell me if you turned them into another fruit bar flavor. And if you enjoy these, you might also like my lemon bar and blueberry crumb bar recipes for more easy dessert bars that feel special without a lot of fuss.

Cherry Pie Bars
Ingredients
- 1 cup unsalted butter softened (2 sticks / 226 g)
- 1 3/4 cups granulated sugar
- 4 large eggs room temperature
- 2 teaspoons vanilla extract use pure vanilla if possible
- 1/2 teaspoon almond extract optional but recommended for cherry flavor
- 3 cups all-purpose flour spooned and leveled (360 g)
- 1 teaspoon baking powder
- 1/2 teaspoon fine sea salt
- 42 oz cherry pie filling 2 cans (21 oz each); or use about 4 cups thick homemade cherry filling
- 1 cup powdered sugar sifted, for optional glaze
- 2-3 tablespoons milk or heavy cream for optional glaze
- 1/2 teaspoon vanilla or almond extract for optional glaze
Instructions
- Preheat your oven to 350°F (175°C). Line a 9×13-inch baking pan with parchment paper, letting it hang over the long sides to create handles. Lightly grease the parchment to make it easy to lift the bars out after baking.
- In a large mixing bowl or stand mixer, beat the softened butter and granulated sugar together on medium speed until light and fluffy, about 2–3 minutes. The mixture should look pale and airy.1 cup unsalted butter, 1 3/4 cups granulated sugar
- Add the eggs one at a time, mixing well after each addition and scraping down the bowl as needed. Mix in the vanilla extract and almond extract. The batter will be smooth and thick, similar to cake batter.4 large eggs, 2 teaspoons vanilla extract, 1/2 teaspoon almond extract
- In a separate bowl, whisk together the flour, baking powder, and salt. Add the dry mixture to the butter mixture in 2–3 additions, mixing on low speed just until no dry streaks remain to avoid overmixing.3 cups all-purpose flour, 1 teaspoon baking powder, 1/2 teaspoon fine sea salt
- Scoop out about 1 1/2 cups of the dough and set it aside in a small bowl. This portion will be used to dot over the cherry filling as a topping.
- Spread the remaining dough into the prepared pan. Use a spatula or your fingers (lightly floured or sprayed with nonstick spray) to press it into an even layer, pushing slightly up the edges to help hold in the filling.
- Spread the cherry pie filling evenly over the crust, reaching all the corners so every bar has fruit. If using canned filling, stir it briefly in a bowl first so it spreads evenly.42 oz cherry pie filling
- Tear the reserved dough into small pieces (about nickel- to quarter-sized) and scatter them over the cherry filling. You do not need to cover the surface completely; some exposed cherry will bubble up attractively.
- Bake for 35–40 minutes, or until the top is lightly golden and the edges are set. The center should be just barely jiggly but not wet. Start checking around 32 minutes, as oven temperatures can vary.
- Let the bars cool in the pan on a wire rack for at least 1–2 hours. For the cleanest slices, cool to room temperature, then chill for 30–60 minutes so the filling can fully set.
- For the glaze, whisk together the powdered sugar, 2–3 tablespoons of milk or heavy cream, and vanilla or almond extract until smooth and pourable.1 cup powdered sugar, 2-3 tablespoons milk or heavy cream, 1/2 teaspoon vanilla or almond extract
- Drizzle the glaze over the cooled bars. Use the parchment handles to lift the slab from the pan onto a cutting board, then cut into 24 squares (or 18 larger bars), wiping the knife between cuts for neat edges.