Would you like to save this?
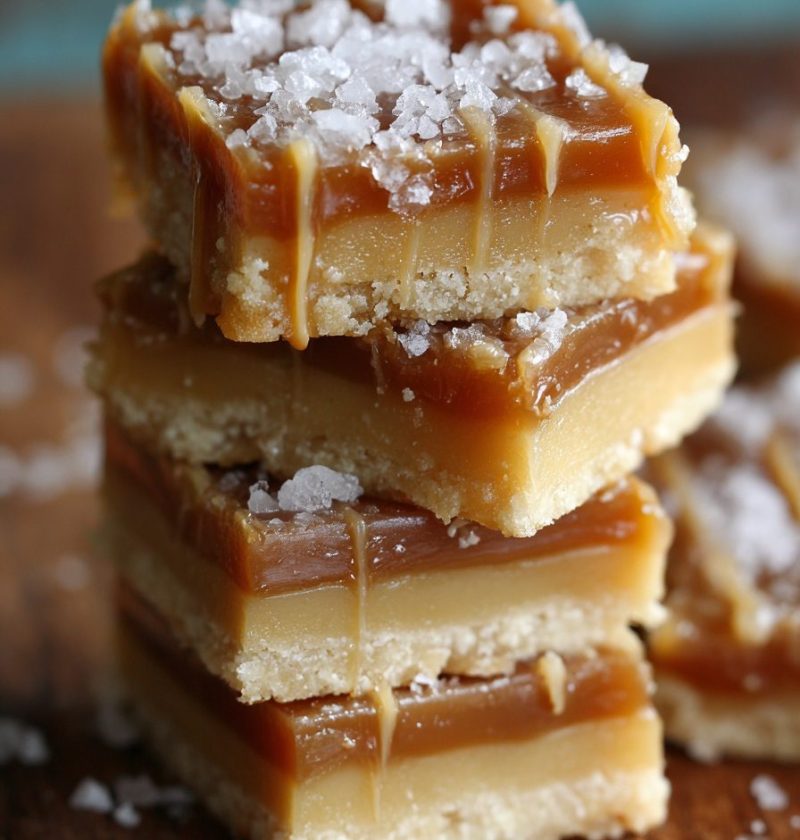
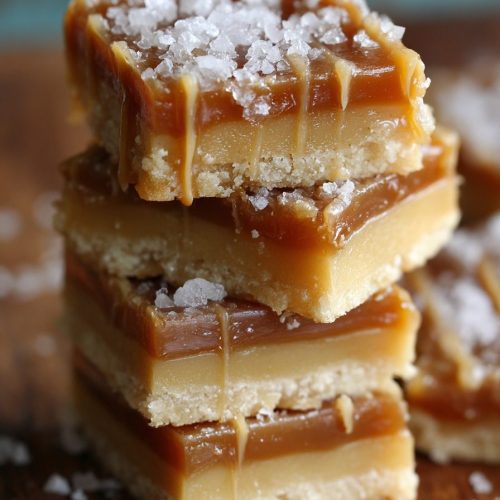
Salted Caramel Butter Bars Recipe
If you’re craving a sweet and salty dessert bar that tastes like a bakery treat but comes straight from your own oven, this Salted Caramel Butter Bars Recipe is about to become your new signature dessert.
These rich caramel cookie bars start with a buttery shortbread crust, get filled with a thick layer of homemade salted caramel filling, and are finished with more buttery crumbs and flaky sea salt on top. They’re easy enough for a weeknight but special enough for holidays, potlucks, and those “just because” baking days we all secretly love.
What Makes These Salted Caramel Butter Bars So Special?
Let me explain why these salted caramel butter bars have such a devoted fan club in my family.
We’re basically building a layered caramel butter bar: a sturdy but tender shortbread base, a silky caramel center, and a crumbly, golden top. Think of it as a cross between caramel Shortbread Bars and a cookie bar—sweet, salty, and utterly buttery.
I started making this caramel butter bars recipe when my kids were in middle school. It was my “bribe dessert” for science fair projects and late-night poster boards on the dining room table. Now they’re grown, but when they come home, one of the first questions is, “Mom, are you making those salted caramel dessert bars?”
This version is a little more balanced than the originals you might see online. I pull back the sugar just a bit, add good vanilla and flaky sea salt, and use a simple stovetop caramel that’s thicker and less sweet than the canned stuff. It’s still indulgent—this is not health food—but you know what? It’s real butter, real Cream, and real joy.
Whether you’re making these for a bake sale, Thanksgiving dessert table, or a random Tuesday when you need a pick‑me‑up, this Salted Caramel Butter Bars Recipe gives you a reliable, easy dessert bar recipe that turns out beautifully every single time.
Why You’ll Love This Salted Caramel Butter Bars Recipe
- Rich, bakery-style flavor with simple pantry ingredients
- Sweet and salty dessert bars that please both “team caramel” and “team cookie”
- Buttery shortbread crust that mixes up in one bowl—no mixer required
- Homemade salted caramel filling that doesn’t need a candy thermometer
- Perfect make-ahead dessert—actually tastes better the next day
- Freezer-friendly caramel shortbread bars for stress-free entertaining
- Crowd-pleasing for holidays, potlucks, office parties, and school events
- Easy to customize with chocolate, nuts, or spice variations
- Slices cleanly into neat squares—great for gifting or cookie trays
- Reliable, tested recipe even if you’re new to baking rich caramel cookie bars
Ingredients for Your Salted Caramel Butter Bars
You’ll need two main components for these salted caramel butter bars: a buttery shortbread crust and a homemade salted caramel filling.
For the buttery shortbread crust & topping:
- 1 cup (2 sticks / 226 g) unsalted butter, softened to room temperature
- 1 cup (200 g) granulated sugar
- ½ cup (100 g) light brown sugar, packed
- 1 large egg, room temperature
- 2 tsp pure vanilla extract
- 3 cups (360 g) all-purpose flour
- ½ tsp baking powder
- ½ tsp fine sea salt
Ingredient notes for the crust:
- Butter: Use real, unsalted butter for the best flavor. If you only have salted butter, reduce the added salt by about half.
- Flour: Regular all-purpose flour works best. Avoid cake flour here—your bars may get too delicate.
- Sugar combo: The mix of white and brown sugar gives these caramel butter bars a nice chew and deeper flavor.
For the homemade salted caramel filling:
- ½ cup (1 stick / 113 g) unsalted butter
- ½ cup (100 g) light brown sugar, packed
- ⅓ cup (80 ml) heavy cream
- ¼ cup (60 ml) light corn syrup (helps keep the caramel smooth and sliceable)
- 1 tsp pure vanilla extract
- ½–¾ tsp flaky sea salt (plus more for sprinkling on top)
Ingredient notes for the caramel:
- Corn syrup: This isn’t the same as high-fructose corn syrup; a small amount helps prevent the caramel from crystallizing and makes these layered caramel butter bars easier to slice.
- Heavy cream: Don’t swap with milk here—it won’t thicken the same way.
- Salt: Use flaky sea salt (like Maldon) for finishing; it gives those pretty little crystals and a gentle crunch.
Optional add-ins & toppings:
- ½ cup chopped pecans or walnuts (sprinkled over the caramel layer)
- ½ cup mini chocolate chips (on top of the hot caramel)
- Extra flaky sea salt for garnish

Step-by-Step Directions
1. Prep your pan and oven.
Preheat your oven to 325°F (165°C). Line a 9×13-inch baking pan with parchment paper, leaving a bit of overhang on the long sides so you can lift the bars out later. Lightly spray the parchment with nonstick spray. This little insurance policy makes clean slices much easier.
2. Make the buttery shortbread dough.
In a large mixing bowl, beat together the softened butter, granulated sugar, and brown sugar until smooth and creamy. You can use a hand mixer, stand mixer, or a sturdy wooden spoon—this is a forgiving dough. Mix in the egg and vanilla until combined.
In a separate bowl, whisk together the flour, baking powder, and salt. Add the dry ingredients to the butter mixture and stir until you get a soft, crumbly dough. It will look a bit sandy but should hold together when pressed with your fingers.
3. Press in the base layer.
Scoop about ⅔ of the dough into your prepared pan. Press it firmly and evenly into the bottom using your fingertips or the bottom of a measuring cup. Try to get an even layer all the way to the corners so your caramel shortbread bars bake uniformly.
Set the remaining ⅓ of the dough aside in the fridge; this will be your crumble topping.
4. Bake the crust.
Bake the base layer for 18–20 minutes, or until it’s just starting to turn lightly golden around the edges. You don’t want a deep brown color yet—it will go back in the oven later. While that bakes, you’ll make the homemade salted caramel filling.
5. Cook the caramel filling.
In a medium saucepan, combine the butter, brown sugar, heavy cream, and corn syrup. Cook over medium heat, stirring frequently, until the mixture starts to bubble gently around the edges. Once it’s bubbling, cook for about 3–4 minutes, stirring the whole time, until it slightly thickens and looks glossy.
Remove from heat and stir in the vanilla and ½ teaspoon flaky sea salt. Taste carefully (it’s hot!) and add a bit more salt if you like a bolder sweet-and-salty dessert bar. Let the caramel cool for 5 minutes; it will thicken as it sits.
6. Layer the caramel over the crust.
Pour the warm caramel sauce evenly over the partially baked crust. If you’re adding nuts or chocolate chips, sprinkle them now over the caramel layer. This is what turns these into gorgeous layered caramel butter bars.
7. Crumble on the topping.
Take the reserved dough from the fridge and crumble it evenly over the caramel. You want little clumps and crumbs—don’t flatten it. Some caramel peeking through is totally fine and actually pretty.
8. Bake until golden and set.
Return the pan to the oven and bake for 22–28 minutes, or until the top is light golden and the edges are bubbling slightly. The center may still look a bit soft; it will firm up as it cools.
If the top is browning too quickly, you can loosely tent the pan with foil for the last 5 minutes.
9. Cool completely (this is the hard part).
Remove the pan from the oven and place it on a wire rack. While the bars are still warm, sprinkle the top with more flaky sea salt. Let the salted caramel butter bars cool completely in the pan—this can take 2–3 hours at room temperature.
For super neat squares, you can chill the cooled bars in the fridge for 45–60 minutes before slicing.
10. Slice and serve.
Use the parchment overhang to lift the entire slab out of the pan. Place on a cutting board and use a sharp knife to cut into 24 small bars or 16 larger ones. Wipe the knife between cuts for extra-clean edges. Serve at room temperature and watch them disappear.
Servings & Timing
- Yield: About 16 large bars or 24 smaller bars
- Prep Time: 20 minutes
- Cook Time: 40–45 minutes total
- Cooling Time: 2–3 hours (plus optional 1-hour chill for super neat slices)
- Total Time: About 3½–4 hours, mostly unattended cooling time
These salted caramel dessert bars are a great “bake the day before” recipe. You do the work once, let them cool, and they’re ready to serve when guests walk through the door.
Fun Variations on Salted Caramel Butter Bars
Here’s the thing: once you’ve nailed the base Salted Caramel Butter Bars Recipe, you can play a bit.
- Chocolate Drizzle Bars: After the bars cool, drizzle melted dark or semisweet chocolate over the top and let it set before slicing.
- Pecan Pie Caramel Bars: Stir ½–¾ cup chopped pecans into the caramel for a nutty twist that tastes like a cross between pecan pie and caramel shortbread bars.
- Espresso Caramel Bars: Add 1–2 teaspoons instant espresso powder to the caramel for a grown-up, coffee-kissed flavor.
- Salted Caramel Turtle Bars: Sprinkle chopped pecans and mini chocolate chips over the caramel before adding the crumble topping—like turtle candy meets buttery shortbread crust.
- Cinnamon Toast Version: Add 1 teaspoon ground cinnamon to the dough and a light sprinkle of cinnamon sugar over the top before baking.
- Gluten-Free Salted Caramel Bars: Use a good 1:1 gluten-free baking flour blend in place of the all-purpose flour; check the package for cup-for-cup measurement notes.
Storage, Freezing & Make-Ahead Tips
Counter:
These caramel butter bars can sit at room temperature for about 2 days in a sealed container. If your kitchen runs warm, they’ll hold up better in the fridge.
Fridge:
Store in an airtight container in the refrigerator for up to 5 days. The caramel firms up a bit when cold, so let the bars sit at room temperature for 20–30 minutes before serving for the best texture.
Freezer:
For longer storage, freeze the sliced bars on a baking sheet until firm, then transfer them to a freezer bag or container with parchment between layers. They’ll keep well for up to 2 months. Thaw in the fridge overnight or on the counter for 30–45 minutes.
Make-ahead note:
Honestly, these rich caramel cookie bars almost taste better the next day. The flavors blend, the caramel settles, and the bars slice cleaner. If you’re hosting a party, bake them the day before and cross “dessert” off your list early.
Notes from My Kitchen
- Don’t rush the cooling. I know the smell makes you want to cut them right away, but warm salted caramel filling will ooze and the bars will fall apart. Fully cooled bars give you those bakery-style squares.
- Use good vanilla and salt. This recipe doesn’t have a long ingredient list, so every ingredient matters. Real vanilla extract and a pinch of nice flaky salt take these sweet and salty dessert bars from “good” to “who made these?!”
- Watch the caramel, not the clock. Stoves vary. You want a gently bubbling caramel that thickens slightly and coats the back of a spoon. If it seems very thin after 4 minutes, cook another minute or two, stirring constantly.
- Don’t overbake the crust. The first bake is just to set the shortbread. If it gets too brown, the final bars may end up a bit dry at the edges. Lightly golden is perfect.
- Pan size matters. A 9×13-inch pan works best. A smaller pan will make the bars too thick and throw off the timing; a larger pan will make the layers too thin.
- Use parchment, not just spray. I’ve tried it both ways over the years. Parchment makes such a difference for lifting and slicing; it’s worth the extra minute.
You know what? After making these for over a decade, I still set out the ingredients before I start—little “mise en place” moments keep me from forgetting the baking powder or leaving the butter in the microwave.
FAQs About Salted Caramel Butter Bars
1. Can I use store-bought caramel sauce instead of homemade?
Yes, but choose a thick, high-quality caramel, and use about 1½ to 2 cups. Warm it slightly so it spreads easily, then proceed with the recipe. The flavor will be a bit sweeter and less buttery than homemade.
2. My caramel looks grainy—what happened?
Grainy caramel usually comes from cooking it too hot or not stirring enough. For this caramel butter bars recipe, keep the heat at medium, stir often, and avoid letting it boil hard for a long time.
3. How do I know when the bars are done baking?
The top should be light golden, especially around the edges, and the caramel will be bubbling slightly. The center may still look a touch soft but should not be liquid. It will set as it cools.
4. Can I make these salted caramel dessert bars without corn syrup?
You can swap the corn syrup with honey or leave it out, but the caramel may be a bit stickier and less smooth. The bars will still taste good, just a little messier to slice.
5. How do I cut neat squares without the caramel sticking?
Chill the fully cooled bars in the fridge for about an hour, then use a sharp knife, wiping it clean between cuts. A long chef’s knife works better than a small one here.
6. Can I halve the recipe?
Yes, you can bake a half batch in an 8×8-inch pan. Start checking a few minutes earlier during both baking stages, since smaller pans sometimes bake a bit faster.
7. Are these salted caramel butter bars very sweet?
They’re definitely rich and sweet, but the flaky sea salt and buttery shortbread crust help balance the flavor. If you’re sensitive to sweetness, cut smaller squares and don’t skimp on the salt.
8. Can I ship these in a holiday cookie box?
You can. Chill them first so the caramel is firm, wrap each bar in wax paper or parchment, and pack them snugly in a tin. They travel fairly well, especially in cooler weather.
Final Thoughts
These Salted Caramel Butter Bars bring together everything I love in a dessert: a tender, buttery shortbread crust, a thick layer of homemade salted caramel filling, and that magical sweet-and-salty finish that makes you reach for “just one more” square. They’re simple enough for beginner bakers, but impressive enough to share at any gathering.
If you try this Salted Caramel Butter Bars Recipe, let me know how it goes—tell me if you added nuts, chocolate, or your own twist. And if you’re on a dessert bar kick, you might also enjoy exploring other easy dessert bar recipes like brownie bars, lemon bars, or classic blondies next.
Salted Caramel Butter Bars
Ingredients
- 1 cup unsalted butter softened to room temperature (2 sticks / 226 g)
- 1 cup granulated sugar 200 g
- 1/2 cup light brown sugar packed (100 g)
- 1 large egg room temperature
- 2 teaspoons pure vanilla extract
- 3 cups all-purpose flour 360 g
- 1/2 teaspoon baking powder
- 1/2 teaspoon fine sea salt
- 1/2 cup unsalted butter for caramel (1 stick / 113 g)
- 1/2 cup light brown sugar packed (for caramel, 100 g)
- 1/3 cup heavy cream 80 ml
- 1/4 cup light corn syrup 60 ml; helps keep the caramel smooth and sliceable
- 1 teaspoon pure vanilla extract for caramel
- 1/2-3/4 teaspoon flaky sea salt for caramel, plus extra for sprinkling on top
- 1/2 cup chopped pecans or walnuts optional; sprinkle over caramel layer
- 1/2 cup mini chocolate chips optional; sprinkle on top of hot caramel
- nonstick spray for preparing pan
- parchment paper to line pan with overhang
Instructions
- Preheat your oven to 325°F (165°C). Line a 9×13-inch baking pan with parchment paper, leaving overhang on the long sides to lift the bars out later. Lightly spray the parchment with nonstick spray.nonstick spray, parchment paper
- In a large mixing bowl, beat together the softened butter, granulated sugar, and brown sugar until smooth and creamy. Mix in the egg and vanilla until combined. In a separate bowl, whisk together the flour, baking powder, and fine sea salt. Add the dry ingredients to the butter mixture and stir until a soft, crumbly dough forms that holds together when pressed.1 cup unsalted butter, 1 cup granulated sugar, 1/2 cup light brown sugar, 1 large egg, 2 teaspoons pure vanilla extract, 3 cups all-purpose flour, 1/2 teaspoon baking powder, 1/2 teaspoon fine sea salt
- Transfer about 2/3 of the dough to the prepared pan. Press it firmly and evenly into the bottom of the pan, all the way to the corners. Chill the remaining 1/3 of the dough in the refrigerator; it will be used for the crumble topping.
- Bake the base layer for 18–20 minutes, or until just starting to turn lightly golden around the edges. Do not bake until deeply browned. While the crust bakes, prepare the caramel filling.
- In a medium saucepan, combine the butter, brown sugar, heavy cream, and light corn syrup. Cook over medium heat, stirring frequently, until the mixture begins to bubble gently around the edges. Once bubbling, cook for 3–4 minutes, stirring constantly, until slightly thickened and glossy. Remove from heat and stir in the vanilla and 1/2 teaspoon flaky sea salt. Taste carefully and add a bit more salt if a stronger sweet-and-salty flavor is desired. Let the caramel cool for about 5 minutes to thicken slightly.1/2 cup unsalted butter, 1/2 cup light brown sugar, 1/3 cup heavy cream, 1/4 cup light corn syrup, 1 teaspoon pure vanilla extract, 1/2-3/4 teaspoon flaky sea salt
- Pour the warm caramel evenly over the hot, partially baked crust. If using, sprinkle chopped nuts and/or mini chocolate chips evenly over the caramel layer.1/2 cup chopped pecans or walnuts, 1/2 cup mini chocolate chips
- Remove the reserved dough from the refrigerator and crumble it evenly over the caramel layer. Do not press flat; leave small clumps and crumbs with some caramel peeking through.
- Return the pan to the oven and bake for 22–28 minutes, or until the top is light golden and the edges are bubbling slightly. The center may look a bit soft but should not be liquid; it will firm up as it cools. If the top browns too quickly, tent the pan loosely with foil for the last 5 minutes.
- Transfer the pan to a wire rack. While the bars are still warm, sprinkle the top with additional flaky sea salt. Allow the bars to cool completely in the pan, 2–3 hours at room temperature. For extra-neat slices, chill the cooled bars in the refrigerator for 45–60 minutes before cutting.1/2-3/4 teaspoon flaky sea salt
- Use the parchment overhang to lift the entire slab of bars out of the pan. Place on a cutting board and slice into 16 large or up to 24 smaller bars, wiping the knife clean between cuts. Serve at room temperature.
Notes
Make-ahead: These bars often taste even better the next day as the caramel sets and flavors meld. Bake a day in advance for easy entertaining.
Tips: Do not rush cooling or the warm caramel will ooze and bars may fall apart. Use good-quality vanilla and flaky sea salt for the best flavor. Watch the caramel’s texture rather than the clock—it should gently bubble and coat the back of a spoon without boiling hard. Do not overbake the crust on the first bake; it should be just lightly golden.