Would you like to save this?
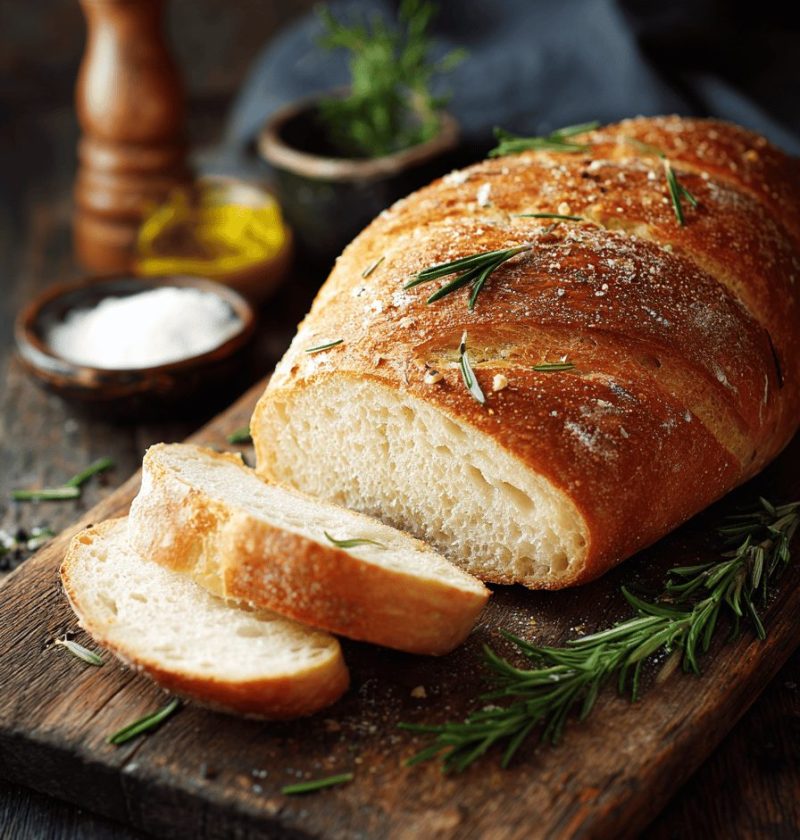
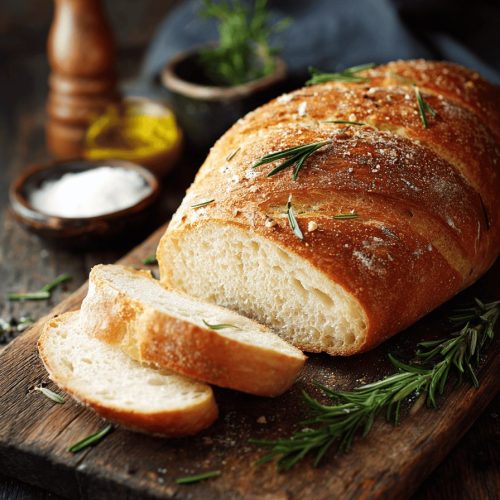
Italian Bread Recipe
If you’ve ever dreamed of slicing into a warm, crusty loaf of homemade Italian bread, this Italian Bread Recipe delivers a fluffy interior and golden artisan crust that’ll have you hooked from the very first bite.
Italian bread is a timeless staple—traditional yet surprisingly simple. This homemade loaf uses basic pantry ingredients like yeast, flour, salt, and water, but the magic happens through slow fermentation and a steamy bake. You’ll love how the crust crackles when you tap it and how the soft, airy crumb soaks up olive oil, soups, or your favorite sauce. I first perfected this recipe on a chilly November afternoon, inspired by memories of my Nonna’s kitchen in Cleveland. Back then, I had two rowdy teenagers underfoot; now I’m excited to share what I’ve learned so you can enjoy artisan-style baking without the fuss.
Why You’ll Love This Recipe
- Crispy crust that rivals any bakery’s artisan loaf
- Airy, fluffy interior perfect for sandwiches or dipping
- No fancy tools—just a mixing bowl, your hands, and a baking sheet
- Uses everyday ingredients you probably already have
- Hands-off rises mean you can prep, relax, then bake
- Makes two generous loaves—ideal for lunches and leftovers
- Freezes beautifully; pull out a loaf whenever you need warm bread
- Traditional method honed for consistent results
Ingredients
• 3 ½ cups (420 g) bread flour (substitute all-purpose flour; King Arthur works great)
• 1 ½ teaspoons active dry yeast (or instant yeast; reduce water by 1 tablespoon)
• 2 teaspoons granulated sugar (helps bloom the yeast)
• 2 teaspoons fine sea salt
• 1 ¼ cups (300 ml) lukewarm water (about 100°F; test with a thermometer or your wrist)
• 2 tablespoons extra-virgin olive oil (look for cold-pressed, fruity flavor)
Tips:
– For a deeper flavor, swap half the water for warm milk.
– If you prefer a chewier crumb, replace ½ cup flour with whole-wheat flour.
– Use a digital scale for accuracy—baking is part science, part art.

Directions
- Activate the yeast
In your mixing bowl, stir together lukewarm water, sugar, and yeast. Let it sit 5–10 minutes until foamy. If it doesn’t foam, your yeast may be expired—start over with fresh packets. - Mix the dough
Add flour and salt to the yeast mixture, then pour in olive oil. Use a wooden spoon (or dough hook on low speed) to combine until a shaggy dough forms. - Knead by hand
Lightly flour your countertop and turn out the dough. Knead for 8–10 minutes, pushing down and away with the heel of your hand, folding back, and repeating. You’re aiming for a smooth, elastic ball that springs back when poked. - First rise
Drizzle a clean bowl with olive oil, place the dough ball inside, cover loosely with plastic wrap, and let it rest in a warm spot for about 1 hour, or until doubled in size. A draft-free area near a slightly warm oven works wonders. - Shape the loaves
Gently deflate the dough and divide it in half. Shape each piece into a tight oval or round loaf—tuck edges underneath to build tension on the surface. - Second rise
Place loaves on a lightly floured baking sheet or parchment-lined pan. Cover with a clean kitchen towel and let rest 30–45 minutes until puffy. Preheat your oven to 450°F (230°C) during the last 15 minutes. - Slash and bake
Using a sharp blade or lame, make 3–4 diagonal slashes atop each loaf. Slide into the hot oven and pour 1 cup of hot water into a preheated cast-iron skillet on the bottom rack—this steam creates a crisp crust. Bake for 20–25 minutes until golden brown and hollow-sounding when tapped. - Cool and enjoy
Transfer loaves to a wire rack; let cool at least 20 minutes. Resist cutting too soon (the crumb needs to set), but if you must, go for it—fresh bread waits for no one!
Servings & Timing
Makes: 2 medium loaves
Prep Time: 20 minutes
First Rise: 1 hour
Second Rise: 30–45 minutes
Baking Time: 20–25 minutes
Total Time: About 2 hours 15 minutes (including rests)
Variations
• Garlic-Herb Twist: Add 1 teaspoon garlic powder and 1 tablespoon chopped fresh rosemary to the flour before mixing.
• Whole-Grain Delight: Substitute 1 cup of bread flour with whole-wheat flour for a nuttier taste.
• Cheesy Crust: Sprinkle ¼ cup grated Parmesan on top after slashing for a savory golden finish.
• Sun-Dried Tomato & Basil: Fold in ½ cup chopped sun-dried tomatoes and 2 tablespoons minced basil during kneading.
• Gluten-Reduced: Use a 1:1 gluten-free flour blend and add 1 extra teaspoon xanthan gum.
• Quick-Rise Version: Swap active dry yeast for 2 teaspoons instant yeast and reduce first rise to 45 minutes.
Storage & Reheating
Store loaves in a paper bag at room temperature for up to 2 days—this helps retain the crisp crust while keeping the crumb soft. For longer storage, slice and freeze in a sealed bag for up to 3 months. To refresh, thaw slices at room temperature, then warm in a 350°F oven for 5–7 minutes or toast directly. You can also reheat a whole loaf wrapped in foil at 300°F for 10–12 minutes—just enough to soften the crumb without burning the crust.
Notes
• I learned that under-kneading leads to dense spots, so give your dough a good 8–10 minutes of attention.
• If your kitchen is cold, try a proofing box or the microwave-on-low trick (place a cup of hot water beside the covered dough).
• For an even shinier crust, brush loaves with an egg wash (1 egg beaten with 1 tablespoon water) just before baking.
• Keep a loaf in the freezer, and you’ll always have fresh bread on hand for last-minute dinners.
FAQs
Q: Can I use all-purpose flour instead of bread flour?
A: Yes—your loaf will be slightly less chewy but still delicious. Just measure by weight for best results.
Q: Why is my crust too thick?
A: Too much steam or baking at a lower temperature can thicken the crust; try reducing steam water or bump up the oven to 460°F for a shorter bake.
Q: My dough didn’t rise—what happened?
A: Likely your yeast was old or water too hot/cold; aim for 100°F water and fresh yeast.
Q: Can I make the dough the night before?
A: Absolutely—after the first rise, refrigerate overnight; let it warm and finish the second rise before baking.
Q: How do I get those big air pockets?
A: Handle the dough gently during shaping to preserve bubbles; avoid over-kneading after the first rise.
Q: Is it okay to bake on a Pizza stone?
A: Definitely—preheat the stone, slide loaves on with parchment, and follow the same steam trick.
Q: What’s the best way to slice this bread?
A: Use a serrated knife with a gentle sawing motion to keep slices neat and avoid squishing the crumb.
Q: Can I add seeds or grains?
A: Sure—roll shaped loaves in seeds (sesame, sunflower) before the second rise for extra crunch.
Conclusion
This Italian Bread Recipe brings the joy of artisan, homemade baking right to your kitchen, pairing that crackling crust with a soft, fluffy crumb you’ll adore. Whether you’re a seasoned baker or just starting out, these loaves are sure to impress. Give it a try, leave a comment about your results, and don’t forget to explore my other recipes—like homemade focaccia or flaky ciabatta—for more bread-baking fun!
Italian Bread Recipe
Ingredients
- 3 ½ cups bread flour substitute all-purpose flour; King Arthur works great
- 1 ½ teaspoons active dry yeast or instant yeast; reduce water by 1 tablespoon
- 2 teaspoons granulated sugar helps bloom the yeast
- 1 ¼ cups lukewarm water about 100°F; test with a thermometer or your wrist
- 2 tablespoons extra-virgin olive oil look for cold-pressed, fruity flavor
Instructions
- Stir together lukewarm water, sugar, and yeast. Let it sit until foamy.
- Combine flour, salt, olive oil with yeast mixture to form a shaggy dough.
- Knead dough for 8-10 minutes until smooth and elastic.
- Let dough rise in a warm spot until doubled in size.
- Divide dough, shape into loaves, and let rest.
- Let loaves rise until puffy, preheat oven.
- Slash loaves, bake in hot oven with steam until golden brown.
- Transfer loaves to wire rack and let cool before slicing.