Would you like to save this?
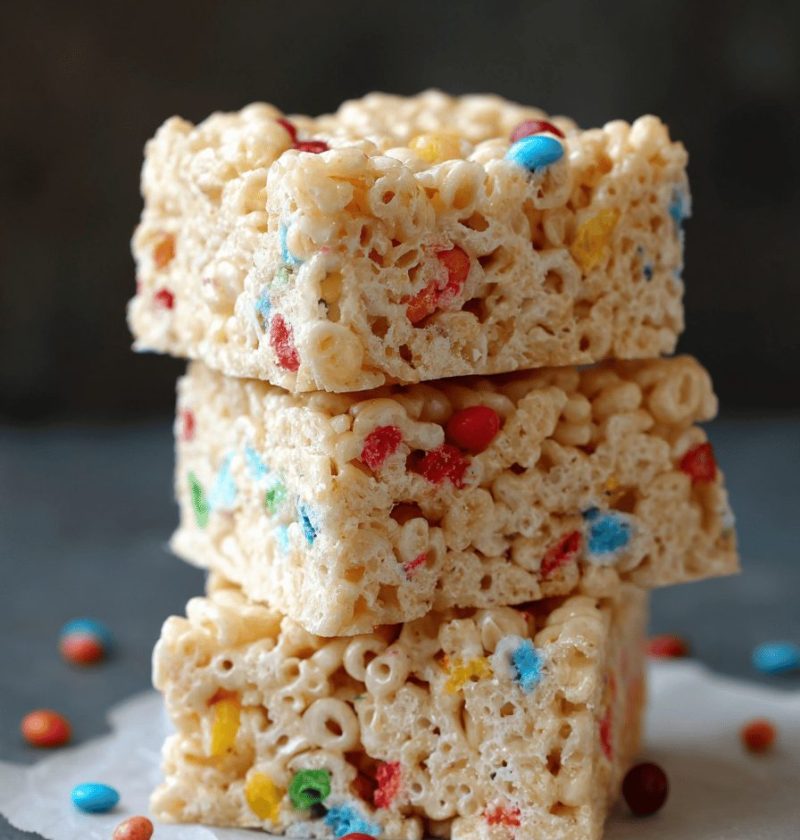
Need an easy no-bake snack that’s sweet, chewy, and crowd-pleasing? This Rice Crispy Treats Recipe comes together in minutes with pantry staples like Marshmallows, butter, and a splash of vanilla extract.
A bit about this classic comfort food
As a mom of three grown kids and now a grandma of two, I’ve made my fair share of homemade desserts—some with multiple steps, others downright fussy. But these cereal Bars? They’re my go-to when I want something special without heating up the kitchen. Picture after-school chaos tamed by sticky, sweet squares that are chewy yet light. Perfect for potlucks, bake sales, holiday cookie exchanges or simply as an anytime snack, these treats bring a nostalgic hug in every bite.
Here’s the thing: store-bought versions can taste a bit stale or overly sweet. By using real butter and pure vanilla extract, you get that classic flavor in a fresher, homemade form. Want to lighten things up? Swap in low-fat butter or gluten-free crispy rice—everyone still gets that signature crunch. Honestly, who doesn’t love a recipe that’s flexible and utterly foolproof?
Why You’ll Love This Recipe
- No oven needed—ready in about 20 minutes
- Uses just four simple ingredients you likely already have
- Perfect for kids’ lunchboxes or grandma-approved potlucks
- Sweet and chewy texture that melts in your mouth
- Customizable: add Chocolate chips, sprinkles, or nut butters
- Scales easily—double for a crowd, halve for a solo treat
- Pantry-friendly: cereal, marshmallows, butter, vanilla
- Keeps well sealed at room temperature—great make-ahead snack
Ingredients
• 6 cups crisped rice cereal (I like Kellogg’s Rice Krispies for classic crunch)
• 4 cups mini marshmallows (about one 10-oz bag; Jet-Puffed or store brand)
• 3 tablespoons unsalted butter, cut into pieces (Land O’Lakes or Land O Lakes works great)
• 1 teaspoon pure vanilla extract (Nielsen-Massey or whatever’s in your pantry)
• Pinch of fine salt (balances sweetness)
Substitutions & Tips
– For a lighter treat, swap 2 tablespoons of butter for coconut oil (adds a mild tropical note).
– Use vegan marshmallows and gluten-free crispy rice to make these bars allergy-friendly.
– Measure cereal first—pressing the mixture is easier when everything’s prepped.
– Fresh marshmallows melt smoother than stale ones; shake the bag to fluff them.

Directions
- Line a 9×13-inch baking pan with parchment or foil, then lightly grease with a bit of butter. This step makes lifting the bars a breeze.
- In a large, heavy-bottomed pot over low heat, melt the butter. Watch closely—when it’s just foaming, you’re ready for the next move.
- Add marshmallows to the melted butter. Stir gently with a silicone spatula until they collapse into a smooth, glossy mass (about 3–4 minutes). Tip: Keep the heat low to avoid scorching.
- Remove the pot from the heat. Stir in vanilla extract and a pinch of salt—this little twist deepens the flavor.
- Pour in the cereal all at once. Fold quickly but gently, using a spatula, until every flake is coated in marshmallow. Work fast so the mixture stays pliable.
- Transfer to your prepared pan. Using a lightly buttered piece of parchment or clean, buttered hands, press the mixture evenly (but not too hard—you want them a bit fluffy). Let rest for 15 minutes.
- Slice into 16–20 bars or squares. Enjoy warm for gooey edges or cooled for neat, classic shapes.
Servings & Timing
Yield: Makes 16–20 squares
Prep Time: 10 minutes
Rest Time: 15 minutes (no chilling required)
Total Time: 25 minutes
Variations
• Chocolate-Drizzled: Melt ½ cup semisweet chips, drizzle on top, let set.
• Peanut Butter Swirl: Drop dollops of peanut butter, swirl with a knife before pressing.
• Fruity Twist: Swap half the cereal for Fruity Pebbles for a colorful spin.
• Pumpkin Spice: Add 1 teaspoon pumpkin pie spice to marshmallow mix in fall.
• Cookies & Cream: Fold in ½ cup crushed sandwich cookies after cereal.
• Nutty Crunch: Stir in ½ cup chopped roasted almonds or peanuts for extra texture.
Storage & Reheating
Store at room temperature in an airtight container for up to 3 days (they’ll stay soft). For longer life, freeze individually wrapped bars in a zip-top bag—up to 6 weeks. Thaw at room temperature for 10–15 minutes or pop into the microwave for 8–10 seconds if you crave warm, gooey edges. These bars are fantastic make-ahead treats for school lunches or grab-and-go snack packs.
Notes
• I once overheated the marshmallows and ended up with a grainy mess—low heat is your friend.
• Press gently: too much force yields rock-hard bars, too little and they fall apart.
• If you prefer extra chewiness, add ¼ cup more marshmallows.
• For perfectly even slices, use a long, sharp knife warmed under hot water; wipe clean between cuts.
FAQs
Q: Can I use big marshmallows instead of minis?
A: Yes—just measure 4 cups after cutting them into roughly 1-inch pieces so they melt evenly.
Q: Why are my treats crumbly?
A: You probably pressed too lightly or didn’t melt the marshmallows enough—reheat gently and press again.
Q: Are these gluten-free?
A: Only if you choose a certified gluten-free rice cereal and marshmallows—most Kellogg’s and Jet-Puffed versions contain malt flavoring.
Q: Can I add chocolate chips to the hot mixture?
A: I don’t recommend it—chips can seize. Instead, sprinkle them on top immediately after pressing, then let them warm slightly before chilling.
Q: How do I make them extra buttery?
A: Increase the butter by a tablespoon or two, but note that too much can make the bars greasy.
Q: What’s a good tool for pressing?
A: A piece of parchment paper or a silicone spatula sprayed with nonstick oil works like a charm.
Conclusion
These Rice Crispy Treats Recipe bars are the epitome of simple, quick, no-bake desserts—sweet, chewy, and endlessly adaptable. They bring back childhood memories while still feeling fresh and homemade. Give this recipe a try, share your twist in the comments, and don’t forget to pin it for your next gathering or snack attack!
Rice Crispy Treats Recipe
Need an easy no-bake snack that’s sweet, chewy, and crowd-pleasing? This Rice Crispy Treats Recipe comes together in minutes with pantry staples like marshmallows, butter, and a splash of vanilla extract.
- 6 cups crisped rice cereal (I like Kellogg’s Rice Krispies for classic crunch)
- 4 cups mini marshmallows (about one 10-oz bag; Jet-Puffed or store brand)
- 3 tablespoons unsalted butter (cut into pieces)
- 1 teaspoon pure vanilla extract
- Pinch fine salt (balances sweetness)
- Line a 9×13-inch baking pan with parchment or foil, then lightly grease with butter.
- Melt the butter in a large pot over low heat, then add marshmallows and stir until smooth.
- Remove from heat, stir in vanilla extract and salt, then add the cereal and mix until coated.
- Transfer the mixture to the prepared pan and press evenly. Let it rest for 15 minutes.
- Slice into 16-20 bars or squares. Enjoy warm for gooey edges or cooled for neat shapes.
For a lighter treat, swap 2 tablespoons of butter for coconut oil. Use vegan marshmallows and gluten-free crispy rice for allergy-friendly options. Fresh marshmallows melt smoother than stale ones.