Would you like to save this?
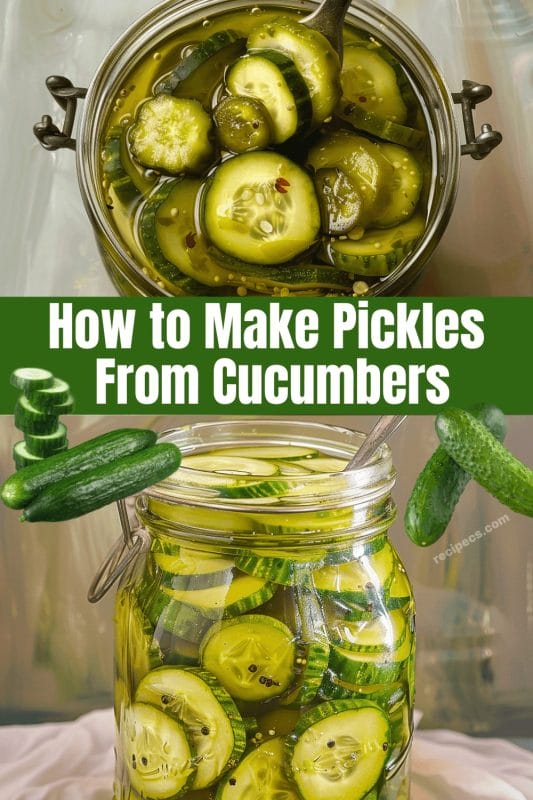
The Perfect Dill Pickles: A Timeless Recipe
There’s something incredibly satisfying about making your own pickles. It’s a process that connects you to generations of home cooks who have preserved the bounty of their gardens for centuries. Whether you’re using cucumbers from your own garden or those from a local farmer’s market, homemade dill pickles offer a crunch and flavor that store-bought varieties simply can’t match.
I remember the first time I made dill pickles with my grandmother. The kitchen was filled with the sharp aroma of vinegar and dill, and I was fascinated by the transformation of fresh cucumbers into tangy, crunchy pickles. That experience instilled in me a love for home canning and preserving, and I’ve been making my own pickles ever since.
This recipe for dill pickles is straightforward and requires only a few simple ingredients. The result is a classic dill pickle that’s perfect for snacking, adding to sandwiches, or enjoying straight from the jar. Let’s get started!
Ingredients:
For the Pickles:
Cucumbers (small to medium-sized, fresh)
Garlic cloves, peeled
Fresh dill sprigs
Water
White vinegar
Pickling salt
Sugar (optional, for a slightly sweet pickle)
Pickling spices (optional, for additional flavor)
Directions:
Step 1: Prepare the Jars and Cucumbers
- Sterilize the Jars:
- Begin by sterilizing your canning jars. Wash them in hot, soapy water, then rinse well. Place them in a large pot of boiling water for 10 minutes to ensure they are clean and free from bacteria. Alternatively, you can run them through the sterilize cycle in your dishwasher.
- Sterilize the lids and bands by placing them in a small pot of simmering water. Do not boil, as this can damage the sealing compound.
- Prepare the Cucumbers:
- Wash the cucumbers thoroughly to remove any dirt or residue. Trim off the ends, especially the blossom end, as it can contain enzymes that make the pickles soft.
- Slice the cucumbers into spears, rounds, or leave them whole, depending on your preference. For whole pickles, choose cucumbers that are small and uniform in size for even pickling.
Step 2: Make the Brine
- Prepare the Brine:
- In a large saucepan, combine water, white vinegar, and pickling salt in the ratio of 4 cups water to 2 cups vinegar to ¼ cup pickling salt. This creates a basic brine.
- If you prefer a slightly sweeter pickle, add 1-2 tablespoons of sugar to the brine mixture.
- Bring the brine to a boil, stirring to dissolve the salt (and sugar, if used). Once dissolved, remove from heat and let it cool slightly.
Step 3: Pack the Jars
- Pack the Jars:
- Place 1-2 garlic cloves and 2-3 sprigs of fresh dill into each sterilized jar. If you are using pickling spices, add about 1 teaspoon per jar.
- Pack the prepared cucumbers tightly into the jars, leaving about ½ inch of headspace at the top.
- Add the Brine:
- Carefully pour the hot brine over the cucumbers, ensuring they are fully submerged. Leave ½ inch of headspace at the top of each jar to allow for expansion during processing.
- Use a clean knife or a canning tool to remove any air bubbles by running it around the inside edge of the jars.
Step 4: Seal and Process the Jars
- Seal the Jars:
- Wipe the rims of the jars with a clean, damp cloth to remove any brine or debris that could prevent a good seal.
- Place the sterilized lids on the jars and screw on the bands until they are fingertip tight.
- Process the Jars:
- Place the filled jars into a boiling water canner, ensuring they are covered by at least 1-2 inches of water. Bring the water to a boil and process the jars for 10 minutes (adjusting for altitude if necessary).
- After processing, carefully remove the jars from the water and place them on a towel or cooling rack. Let them sit undisturbed for 12-24 hours.
Step 5: Check Seals and Store
- Check Seals:
- After 12-24 hours, check the seals by pressing down on the center of each lid. If the lid doesn’t pop back, the jar is sealed properly. If any jars did not seal, refrigerate them and consume within a few weeks.
- Label and Store:
- Label the jars with the date and type of pickles. Store the sealed jars in a cool, dark place for at least 3 weeks to allow the flavors to develop. Properly sealed jars can last for up to a year.
Variations and Tips
Spicy Pickles: Add a few slices of jalapeno or a pinch of red pepper flakes to each jar for a spicy kick.
Different Vegetables: While this recipe is for cucumbers, you can use the same brine for pickling other vegetables like carrots, green beans, or bell peppers.
Low-Sodium Pickles: If you’re watching your sodium intake, reduce the amount of pickling salt. Be aware that this may affect the preservation time.
Dill Substitute: If you can’t find fresh dill, you can use 1 teaspoon of dried dill weed per jar.
Conclusion
Making your own dill pickles is a rewarding and delicious way to preserve cucumbers. This recipe provides a classic, tangy dill flavor that pairs perfectly with sandwiches, burgers, or straight from the jar. The process is straightforward, and the results are far superior to store-bought pickles. Plus, homemade pickles make great gifts!
By following these detailed steps and tips, you’ll ensure that your pickles come out perfect every time. So gather your ingredients and enjoy the satisfaction of creating your own crunchy, flavorful dill pickles at home. Happy canning!