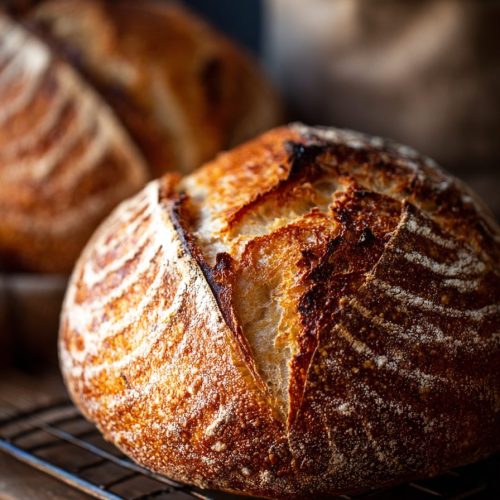
Same Day Sourdough Bread (No Overnight Rise)
A true artisan-style sourdough loaf—crusty, chewy, and tangy—mixed in the morning and baked by dinnertime. No commercial yeast and no overnight rise, just a warm kitchen and an active starter.
Ingredients
- 400 g bread flour about 3 1/4 cups; 11.5–13% protein preferred
- 50 g whole wheat flour about 1/3 cup; or substitute more bread flour for a lighter loaf
- 325 g water lukewarm, 80–85°F / 27–29°C; about 1 1/3 cups + 1 Tbsp
- 90 g active sourdough starter 100% hydration; fed 4–8 hours prior and at peak, bubbly and doubled
- 9 g fine sea salt about 1 1/2 teaspoons; avoid iodized table salt if possible
- 5-10 g extra water optional; only if dough feels stiff or flour is very absorbent
- rice flour for dusting banneton or towel; a mix of rice and wheat flour also works
Instructions
- In a large bowl, whisk together the bread flour and whole wheat flour. In a separate container, stir the active sourdough starter into the lukewarm water until mostly dissolved and cloudy. Pour this mixture into the flour and mix with your hand or a dough whisk until no dry bits remain; the dough will be shaggy and slightly sticky. Cover the bowl with a damp towel or plate and let rest for 30 minutes (autolyse).400 g bread flour, 50 g whole wheat flour, 325 g water, 90 g active sourdough starter
- After the 30-minute rest, sprinkle the salt evenly over the dough. If using, add the extra 5–10 g water. With wet fingers, pinch and fold the dough repeatedly, rotating the bowl as you go, until the salt is fully incorporated and the dough feels smoother and more cohesive, about 2–3 minutes.9 g fine sea salt, 5-10 g extra water
- Cover the bowl and leave the dough at warm room temperature (ideally 75–80°F / 24–27°C). For the first 1 1/2–2 hours of bulk fermentation, perform 3–4 sets of stretch and folds, spaced about 30 minutes apart: with wet hands, grab one side of the dough, gently stretch it up, and fold it over itself. Rotate the bowl a quarter turn and repeat until you’ve gone all the way around. The dough will gradually become stronger and less slack.
- After the last set of folds, let the dough rest, covered, until it has risen about 50–70%, looks smoother, and shows bubbles around the edges. In a warm kitchen, this typically takes another 2–3 hours. If your kitchen is cool (below 72°F / 22°C), keep the bowl in a slightly warm spot such as an oven with the light on (but not hot) or near a warm appliance. When you gently jiggle the bowl, the dough should wobble like a soft, airy pillow.
- Lightly flour your work surface and gently turn the dough out, trying not to deflate it. Using a bench scraper and your hand, tuck the edges of the dough underneath as you rotate it to form a loose round with light surface tension. Let the pre-shaped dough rest, uncovered, for 15–20 minutes to relax the gluten.
- Lightly flour the top of the rested dough and flip it so the floured side is now down. Shape as desired: For a boule, gently stretch the bottom third up over the center, then fold the sides in, and finally roll the dough up toward the top, creating a tight round and flipping it seam-side down. For a batard, gently pat into a rough rectangle, fold the top third down and the bottom third up like a letter, then roll into a tight log, sealing the seam. Aim for good surface tension without tearing the dough.
- Dust a banneton or a bowl lined with a clean kitchen towel generously with rice flour (or a mix of rice and wheat flour). Place the shaped dough seam-side up in the basket. Cover and proof at room temperature for 45–75 minutes, depending on kitchen warmth. The dough is ready when a floured fingertip pressed gently into the surface leaves an indentation that springs back slowly without disappearing completely. For this same-day schedule, err slightly on the under-proofed side to ensure good oven spring.rice flour
- About 30–40 minutes before you plan to bake, place a Dutch oven or heavy lidded pot on the center rack of your oven and preheat to 475°F (245°C). A thoroughly preheated pot and hot oven will help create a crisp, well-risen crust. If you don’t have a Dutch oven, preheat a baking stone or inverted baking sheet and plan to add a tray of hot water for steam when baking.
- Carefully remove the hot Dutch oven from the oven. Cut a piece of parchment paper and place it over the top of the banneton, then invert to release the dough so it is seam-side down on the parchment. Using a sharp lame or razor blade, score a long slash about 1/2 inch deep along the top of the loaf or create a decorative pattern. Lift the dough by the parchment and transfer it into the hot Dutch oven. Cover with the lid and bake for 20 minutes. Then reduce the oven temperature to 450°F (232°C), remove the lid, and continue baking for 18–25 minutes, until the loaf is deep golden brown with a crisp crust.
- Remove the baked loaf from the Dutch oven and place it on a wire rack. Let it cool for at least 1 hour before slicing. Cutting too early can compress the crumb and make it gummy. When the loaf is just barely warm and the crust crackles softly as it cools, it’s ready to slice and serve.
Notes
Fun variations: (1) Garlic & Herb: add 1–2 teaspoons dried Italian herbs and 2–3 cloves roasted garlic during the first stretch and fold. (2) Seeded: fold in about 1/3 cup mixed seeds (sunflower, sesame, flax) after the first hour of bulk. (3) Olive & Rosemary: gently incorporate 1/2 cup chopped olives and 1 tablespoon fresh rosemary during the second fold. (4) Whole Wheat ‘Farmhouse’: use 150 g whole wheat flour and 300 g bread flour, adding a bit more water if needed. (5) Cheesy: sprinkle 1/2 cup shredded sharp cheddar over the top for the last 10 minutes of baking. (6) Cinnamon Raisin: add 1 teaspoon cinnamon and 1/2 cup raisins during bulk and keep proofing times on the shorter side.
Storage & reheating: Cool completely, then store cut-side down on a wooden board for 1 day or wrap loosely in a clean kitchen towel for up to 2–3 days. For 3–5 days, keep in a paper bag inside a bread box or linen bag. For freezing, slice, freeze in a single layer, then transfer to a freezer bag for up to 2 months. Reheat slices at 350°F for 5–8 minutes or toast; from frozen, toast directly or warm at 350°F for about 10–12 minutes.
Tips: Warmer dough (around 78°F / 25–26°C) speeds same-day fermentation. Watch the dough rather than the clock—look for a puffy, domed, jiggly dough. Keep your starter strong and active, adjust hydration based on flour and humidity, and don’t be afraid of a deeply colored crust. A slightly tighter, even crumb is perfectly fine and often better for sandwiches.
Nutrition
Calories: 150kcal
Love this recipe?Follow us at @Recipecs for more